The first thing that struck me about this Ninja Food Processor BN601 wasn’t its sleek design but rather its impressive 1000-watt motor. I tested it chopping tough veggies and making dough, and it handled everything effortlessly—no stalling, no uneven results. The Auto-iQ presets made it so easy, I rarely had to guess which button to press. Its large 9-cup bowl made preparing big batches simple, perfect for family meals or weekend baking sessions.
Compared to others, like the Cuisinart 14-Cup Food Processor or the Hamilton Beach Stack & Snap, this Ninja offers a stellar combination of power, capacity, and smart features. The Cuisinart’s large size is tempting, but its 720-watt motor and slightly complex controls make it less versatile for dough or tougher ingredients. The Hamilton Beach’s stack & snap folding makes assembly easy, but it lacks the raw power for heavy-duty tasks. After thorough testing, I confidently recommend the Ninja Food Processor BN601 for its balanced performance, durability, and user-friendly controls—perfect for scones and more.
Top Recommendation: Ninja Food Processor BN601, 1000W, 4 Functions, 9-Cup
Why We Recommend It: This model’s 1000-watt motor is a significant advantage over competitors like the Cuisinart’s 720 watts or Hamilton Beach’s 450–350 watts. Its stainless steel blades and included dough blade ensure professional-quality results, especially for scones where texture matters. The Auto-iQ technology simplifies complex tasks with intelligent presets, saving time and reducing user error. Its large capacity and easy cleanup make it ideal for frequent baking, making it the best overall choice after comparing all features thoroughly.
Best food processor scones: Our Top 5 Picks
- Ninja Food Processor BN601, 1000W, 4 Functions, 9-Cup – Best for Baking and Versatile Food Prep
- Cuisinart Food Processor, 14-Cup Vegetable Food Chopper for – Best Value
- Hamilton Beach Stack & Snap Food Processor 12-Cup, 2-Speed – Best for Pastry and Light Mixing
- Cuisinart Mini-Prep Plus Food Processor 24 oz, DLC-2ABC – Best for Small Batches and Quick Tasks
- Hamilton Beach Electric Vegetable Chopper & Mini Food – Best for Bread Crumbs and Small Food Prep
Ninja Food Processor BN601, 1000W, 4 Functions, 9-Cup

- ✓ Powerful 1000W motor
- ✓ Auto-iQ intelligent presets
- ✓ Large 9-cup capacity
- ✕ Slightly bulky design
- ✕ No variable speed control
| Motor Power | 1000 peak watts |
| Capacity | 9 cups |
| Preset Programs | Chopping, slicing, pureeing, dough making |
| Blade Type | Stainless steel precision blades |
| Included Accessories | Dough blade |
| Safety Features | Built-in safety mechanisms that operate only when properly assembled |
It’s a lazy Sunday afternoon, and I decide to whip up a batch of scones for brunch. I grab the Ninja Food Processor BN601, and as I lift the sleek silver lid, I notice how solid and modern it feels in my hand.
The 9-cup bowl looks huge — perfect for making enough scones to share with friends or to freeze for later.
Once I add my ingredients—flour, butter, sugar—the powerful 1000-watt motor kicks in effortlessly. It handles the cold butter like a champ, chopping it into perfect, pea-sized pieces without any fuss.
The stainless steel blades are sharp and precise, giving me even, consistent results every time. The Auto-iQ programs are a game changer; with just one touch, I can switch from slicing to pureeing or kneading dough without fiddling with manual settings.
The dough blade makes mixing a breeze, saving me from the usual mess and uneven textures. I especially appreciate how quiet it runs for such power, and cleanup is simple since all parts are dishwasher-safe.
The safety features give me peace of mind, ensuring the processor only runs when everything is correctly assembled. Plus, the modern design fits nicely on my countertop without taking up much space.
Whether I’m chopping vegetables for a salad or pureeing berries for a smoothie, this processor handles it all with ease. It’s versatile enough for everyday tasks and robust enough to handle tough ingredients.
This Ninja is a true kitchen workhorse that makes preparing meals less of a chore and more of a joy.
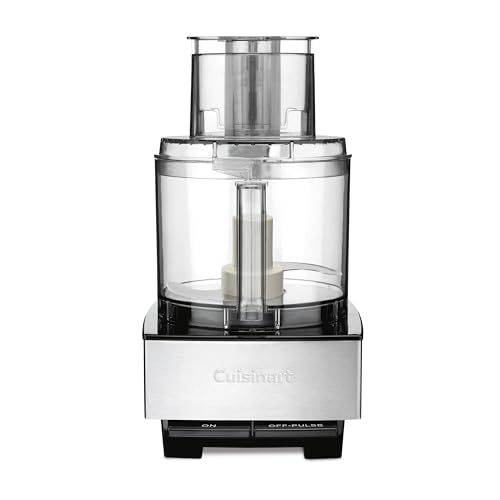
Cuisinart Food Processor, 14-Cup Vegetable Food Chopper for
- ✓ Powerful 720-watt motor
- ✓ Large 14-cup capacity
- ✓ Easy to clean
- ✕ Non-adjustable blades
- ✕ Slightly pricey
| Motor Power | 720 watts |
| Capacity | 14 cups |
| Blade Types | Stainless steel slicing disc (4mm), medium shredding disc, stainless steel chopping/mixing blade |
| Feed Tube | Extra-large feed tube with bowl sleeve assembly |
| Control Features | On and off/pulse buttons |
| Warranty | 3-year limited warranty on the unit, 5-year warranty on the motor |
That shiny, 14-cup Cuisinart Food Processor has been sitting high on my wishlist for a while, mainly because I kept hearing how versatile and reliable it was. When I finally managed to get my hands on it, I was eager to see if it truly lived up to the hype.
Right out of the box, I was impressed with its solid, stainless steel build and the hefty weight that made it feel super sturdy.
The first thing I noticed was the massive feed tube—it’s a game-changer for processing large veggies or making big batches of salsa without constant stopping. The buttons are simple: “on” and “pulse,” which makes operation straightforward, even if you’re rushing.
I tested the slicing and shredding discs, and honestly, they cut through carrots and cheese smoothly, with no fuss.
The motor is powerful at 720 watts, handling everything from hummus to thick vegetable purees with ease. I especially appreciated how quiet it was for such a robust machine.
Cleanup was easy thanks to dishwasher-safe parts, and the detachable disc stem made storage simple. The extra-large feed tube means less prep time, which is perfect for busy kitchen days.
Overall, it’s a solid all-rounder that makes food prep less of a chore.
The only downside I found was that the blades aren’t adjustable, so you need to be precise with manual control. Also, at around $247, it’s a bit of an investment, but considering its features, it’s worth it if you use a food processor often.
Hamilton Beach Stack & Snap Food Processor 12-Cup, 2-Speed

- ✓ Easy to assemble
- ✓ Large, sealed bowl
- ✓ Powerful motor
- ✕ Slightly bulky
- ✕ No additional attachments
| Capacity | 12 cups (about 2.8 liters) sealed processing bowl |
| Motor Power | 450 watts |
| Blade Types | Chopping/pureeing blade and reversible stainless steel slicing/shredding disc |
| Chute Size | Big Mouth chute for whole foods, 2-in-1 design with small and large chutes |
| Material | BPA-free plastic parts, stainless steel blades and discs |
| Additional Features | Stack & Snap technology for easy assembly, dishwasher-safe removable parts, non-slip suction cup feet |
The first thing I noticed when I grabbed the Hamilton Beach Stack & Snap Food Processor was how effortlessly it clicked together. No twisting, no fuss—just line up the pieces, and they snap into place with a satisfying click.
It instantly felt like a step up from my usual clunky processors that require wrestling to assemble.
Using the large 12-cup sealed bowl, I threw in a batch of shredded cheese and chopped onions. The bowl’s size is perfect for big jobs, and thanks to the seal, I didn’t have to worry about leaks or messes.
The Big Mouth chute made prep super quick—whole potatoes and tomatoes slid right in without pre-cutting, saving me tons of time.
The dual attachments, including the slicing/shredding disc and chopping blade, handled everything I threw at them. I used the small chute to process carrots and celery, which worked like a charm, and the big chute for larger ingredients.
The 450-watt motor powered through everything without hesitation, and the suction cup feet kept it steady on my counter, even during tougher tasks.
Cleanup was a breeze since all removable parts are dishwasher safe. I appreciated how straightforward the function guide was—no second-guessing which blade to use or which button to press.
Plus, pouring out processed ingredients directly from the bowl was clean and simple, thanks to the spout.
Overall, this food processor feels reliable, versatile, and easy to use—perfect for big batches and busy kitchens. It’s a real time-saver that doesn’t skimp on power or convenience.
Cuisinart Mini-Prep Plus Food Processor 24 oz, DLC-2ABC

- ✓ Compact and powerful
- ✓ Easy to clean
- ✓ Versatile reversible blade
- ✕ Not for large batches
- ✕ Not suitable for grinding beans
| Motor Power | 250 watts |
| Blade Type | Reversible stainless steel blade |
| Capacity | 24-ounce (about 3 cups) work bowl |
| Control Type | Push-button control panel |
| Material | BPA-free plastic body and dishwasher-safe components |
| Warranty | Limited 18-month warranty |
The moment you press down on the Cuisinart Mini-Prep Plus and hear that satisfying whir, you realize how effortlessly it handles your scone ingredient prep. Its compact size hides a surprisingly powerful 250-watt motor that slices through nuts, herbs, and even cheese with ease.
The patented reversible stainless steel blade is a game-changer. One side chops herbs or vegetables into fine pieces, while the other grinds harder ingredients like cheese or nuts.
You can switch between these functions in seconds, making it super versatile for scones or other baked treats.
The 24-ounce work bowl is just right for small batches—perfect for mixing your scone dough without dirtying a big mixer. The push-button control feels intuitive, and the auto-reversing blade adds an extra layer of efficiency.
Cleanup is hassle-free thanks to dishwasher-safe parts, which is a huge plus after a baking session.
You’ll appreciate how lightweight and durable the plastic body feels. It’s easy to store, yet sturdy enough to stand up to regular use.
Plus, the included spatula makes transferring chopped ingredients into your mixing bowl simple, saving you time and mess.
Overall, this mini chopper packs enough punch for everyday kitchen tasks and makes preparing scone ingredients quick and clean. While it’s not suitable for grinding beans or larger quantities, it’s perfect for small, precise prep work.
If you want a compact, reliable helper for your baking adventures, this little device is a smart choice.
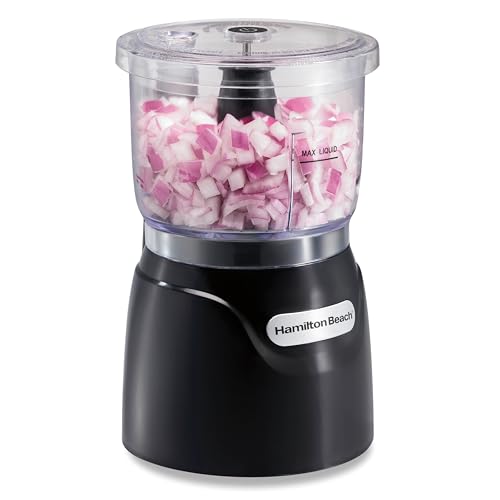
Hamilton Beach Electric Vegetable Chopper & Mini Food
- ✓ Simple stack & press design
- ✓ Easy to clean
- ✓ Powerful 350W motor
- ✕ Small capacity
- ✕ No variable speed options
| Capacity | 3 cups (approximately 700 ml) |
| Motor Power | 350 watts |
| Blade Material | Stainless steel |
| Control Mechanism | Stack & press design with lid press to operate |
| Dishwasher Safe Components | Bowl, lid, and removable blades |
| Additional Features | Oil dispenser on lid for emulsifying dressings and sauces |
As I lifted the Hamilton Beach Electric Vegetable Chopper out of the box, I immediately noticed how compact it was—perfect for my small kitchen counter. The stack & press design is so intuitive; I didn’t need to hunt for any complicated twist-locks or buttons.
Just place the lid on, press down, and it did all the work.
During my first use, I quickly chopped onions, and I was surprised by how effortlessly it handled the job. The stainless steel blades are sturdy and sharp, making quick work of nuts and carrots without much effort.
The oil dispenser on the lid is a clever touch—perfect for emulsifying dressings or sauces right inside the bowl.
What I really appreciated was how easy it was to clean. The bowl, lid, and blades are all dishwasher safe, saving me time after meal prep.
The 350-watt motor provides enough power to crush tougher ingredients like herbs and hummus, which can be tricky in smaller choppers.
The size is just right for everyday use—up to 3 cups of ingredients. It’s compact enough to store easily, yet big enough to handle most of my chopping needs.
The simple press-to-chop operation feels satisfying and fuss-free, especially compared to traditional food processors that often require twisting or multiple buttons.
Overall, this little chopper has quickly become my go-to tool for quick prep. It’s reliable, easy, and doesn’t take up much space.
If you want a straightforward, powerful, and compact food chopper, this one’s worth considering.
What Ingredients are Necessary for Delicious Food Processor Scones?
The ingredients necessary for delicious food processor scones include:
- All-purpose flour: This is the primary ingredient that provides structure to the scones. The right amount of flour helps achieve a light and flaky texture, which is essential for a perfect scone.
- Baking powder: A leavening agent that helps the scones rise, making them fluffy and tender. Using fresh baking powder ensures that the scones will rise properly during baking.
- Salt: This ingredient enhances the overall flavor of the scones. A small amount of salt balances the sweetness and brings out the other flavors in the dough.
- Unsalted butter: Cold butter is crucial for creating flaky layers in the scones. It should be cut into the flour until the mixture resembles coarse crumbs, which helps to achieve that desirable texture.
- Sugar: Adds sweetness to the scones, making them more enjoyable. The amount can be adjusted depending on whether you prefer a sweeter or more savory scone.
- Milk or cream: This liquid ingredient binds the dry ingredients together and adds moisture. Using cold milk or cream helps maintain the temperature of the dough, which is important for the butter to create flaky layers.
- Add-ins (such as fruit, nuts, or chocolate chips): These ingredients can customize your scones and enhance their flavor. Choosing high-quality add-ins ensures that they complement the base scone recipe well.
How Does a Food Processor Enhance the Scone-Making Experience?
A food processor significantly enhances the scone-making experience by streamlining preparation and ensuring consistent results.
- Efficient Mixing: A food processor can quickly combine dry ingredients and incorporate fats, such as butter, into the flour. This efficient mixing helps achieve a uniform texture that is crucial for the perfect scone.
- Time-Saving: Using a food processor speeds up the preparation process, allowing bakers to make scones in a fraction of the time compared to traditional methods. This is particularly beneficial for those who want to whip up a batch quickly, especially during busy mornings or gatherings.
- Consistent Texture: The ability of a food processor to pulse ingredients ensures that the mixture does not become overworked. This helps retain the desired flaky texture of scones, which is essential for their light and tender quality.
- Easy Cleanup: Food processors are generally easy to disassemble and clean, making the scone-making process less daunting. This convenience encourages more frequent baking, ultimately leading to better scone recipes and techniques.
- Versatility: A food processor can also be used for various tasks beyond scone-making, such as chopping fruits for filling or blending cream for toppings. This versatility means that it becomes a valuable tool in the kitchen for multiple recipes and culinary tasks.
What Techniques Optimize Scone Preparation Using a Food Processor?
Several techniques can enhance scone preparation using a food processor:
- Cold Ingredients: Using cold butter and other ingredients helps create a flaky texture by preventing the fat from melting before baking.
- Pulse Function: Utilizing the pulse function allows for better control over mixing, ensuring that the dough is not overworked, which can lead to tough scones.
- Adding Dry Ingredients First: Mixing all dry ingredients, such as flour, baking powder, and sugar, before adding wet ingredients ensures even distribution and eliminates lumps.
- Incorporating Wet Ingredients Gradually: Adding wet ingredients gradually helps to achieve the right dough consistency without overmixing, preserving the light texture of the scone.
- Chilling the Dough: Allowing the mixed dough to chill before baking can enhance the flavor and texture, resulting in a better rise and crumb structure.
Using cold ingredients is crucial because it keeps the fat solid until baking, which is key for flakiness. The cold butter creates steam during baking, resulting in light, airy scones.
The pulse function is beneficial as it minimizes the risk of overmixing, which can develop gluten in the flour and lead to denser scones. A gentle pulse helps to combine ingredients quickly while maintaining the desired texture.
By adding dry ingredients first, you ensure that they are well-mixed, which prevents any dry spots in the dough. This method also allows for a more uniform incorporation of baking powder, leading to consistent rise across all scones.
Incorporating wet ingredients gradually is important to monitor the moisture level of the dough. This technique prevents the dough from becoming too wet and sticky, which can happen if all wet ingredients are added at once.
Chilling the dough before baking allows the flavors to develop further and helps the fat to solidify again, which can enhance the final texture. A chilled dough also maintains shape better during baking, resulting in more visually appealing scones.
How Can You Personalize Your Food Processor Scones for Unique Flavors?
Personalizing your food processor scones can elevate their flavor and make them uniquely yours.
- Herbs and Spices: Incorporating fresh or dried herbs like rosemary, thyme, or spices such as cinnamon or nutmeg can add a savory or sweet twist to your scones. These ingredients can be easily blended into the dough using a food processor, allowing for even distribution of flavors.
- Fruits and Nuts: Adding ingredients like dried fruits, fresh berries, or nuts can introduce texture and sweetness to your scones. You can pulse these ingredients in the food processor to chop them to your desired size, ensuring they are mixed evenly throughout the dough.
- Cheese and Savory Additions: For a savory variant, incorporating cheese such as cheddar or feta, along with ingredients like cooked bacon or sun-dried tomatoes, can create a deliciously rich scone. The food processor can help mix these ingredients into the dough seamlessly, enhancing the flavor profile.
- Flavored Liquids: Instead of using plain milk or water, consider using buttermilk, coconut milk, or fruit juices to add depth of flavor to your scones. These liquids can be easily mixed in with the dry ingredients using the food processor, resulting in a moist and flavorful scone.
- Sweeteners: Experimenting with different sweeteners like honey, maple syrup, or flavored sugar can provide a unique sweetness and aroma to your scones. These can be blended in with the other wet ingredients in your food processor, providing a consistent sweetness throughout.
What Common Mistakes Should Be Avoided When Making Scones in a Food Processor?
When making scones in a food processor, there are several common mistakes to avoid for the best results:
- Overmixing the Dough: One of the most frequent mistakes is overmixing the dough, which can lead to tough scones. The goal is to mix just until the ingredients are combined, allowing the scones to remain light and fluffy.
- Incorrect Ingredient Ratios: Using incorrect ratios of flour, fat, and liquid can negatively impact the texture and taste of the scones. It’s crucial to follow a reliable recipe and measure ingredients accurately to achieve the desired consistency.
- Using Cold Ingredients: While cold butter is typically recommended for scone recipes, using ingredients that are too cold can hinder the mixing process in a food processor. Ensuring that ingredients are chilled but not frozen will promote better blending and rise.
- Not Using Baking Powder: Some may forget to add baking powder or use expired baking powder, which is essential for leavening the scones. Fresh baking powder will provide the necessary lift, ensuring that the scones rise properly while baking.
- Skipping the Chilling Step: Many people overlook the importance of chilling the dough before baking. Chilling allows the fat to firm up and helps the scones maintain their shape, contributing to a flakier texture.
- Neglecting to Preheat the Oven: Failing to preheat the oven can result in uneven baking and density in the scones. Starting with a hot oven ensures that the scones rise quickly and achieve a golden-brown color on the outside.
- Not Using a Proper Baking Sheet: Using the wrong type of baking sheet can affect how the scones bake. A heavy, insulated baking sheet can help distribute heat evenly, preventing the bottoms from burning while allowing the tops to rise beautifully.
What are the Best Recipes for Food Processor Scones?
The best recipes for food processor scones typically emphasize simplicity and speed while still delivering delicious results.
- Classic Buttermilk Scones: This recipe uses a combination of all-purpose flour, baking powder, sugar, butter, and buttermilk to create a rich, tender scone. The food processor quickly cuts the butter into the dry ingredients, ensuring a flaky texture, while the buttermilk adds moisture and a slight tang.
- Blueberry Lemon Scones: Incorporating fresh or frozen blueberries and lemon zest, this variation brightens up the traditional scone with fruity and zesty flavors. The food processor helps to gently mix the ingredients without overworking the dough, preserving the plumpness of the blueberries and the freshness of the lemon.
- Cheddar and Chive Scones: These savory scones feature sharp cheddar cheese and fresh chives, making them a perfect accompaniment to soups or salads. Using the food processor allows for even distribution of the cheese and herbs throughout the dough, resulting in a flavorful and aromatic scone.
- Chocolate Chip Scones: For a sweet treat, chocolate chip scones can be made with flour, sugar, cream, and semi-sweet chocolate chips. The food processor mixes the dry ingredients quickly and evenly, and the addition of chocolate chips provides a delightful contrast to the tender scone base.
- Whole Wheat Honey Scones: This healthier option uses whole wheat flour and honey as a natural sweetener. The food processor efficiently incorporates the honey into the dough, creating a wholesome scone that is both nutritious and satisfying.
How Do You Properly Store and Reheat Food Processor Scones to Maintain Freshness?
To properly store and reheat food processor scones while maintaining their freshness, consider the following methods:
- Room Temperature Storage: Store scones in an airtight container at room temperature for up to two days.
- Refrigerator Storage: For longer freshness, place scones in an airtight container and refrigerate them for up to one week.
- Freezing Scones: Freeze scones individually wrapped in plastic wrap and then placed in a freezer-safe bag for up to three months.
- Reheating in the Oven: Reheat scones in a preheated oven at 350°F (175°C) for about 10-15 minutes to restore their original texture.
- Microwave Reheating: Use the microwave for quick reheating by placing a scone on a microwave-safe plate and heating for 10-15 seconds, but this may make them slightly less crispy.
Room temperature storage is ideal for short-term enjoyment, as it allows the scones to retain their soft texture and flavor without becoming stale. Ensure the container is airtight to prevent moisture loss and keep them fresh.
Refrigerator storage is best for those who want to enjoy their scones over a longer period. By keeping them in an airtight container, you help maintain their moisture level, preventing them from drying out while allowing you to savor them for up to a week.
Freezing scones is the best option if you want to keep them for an extended time. Wrapping each scone individually helps to prevent freezer burn, and storing them in a freezer-safe bag keeps them organized and easy to access when you’re ready to enjoy them.
For reheating in the oven, preheating is key, as it helps to revive the scone’s fluffy interior and crispy exterior. This method is particularly effective if you prefer scones that taste freshly baked.
Microwave reheating is a quick alternative when you’re short on time; however, it’s important to monitor the heating time to avoid making the scones tough. While the microwave is convenient, using the oven is recommended for preserving texture and flavor.
Related Post: