Imagine holding a food processor with a solid, weighty body that feels sturdy and premium in your hand. That’s exactly how the Ninja Food Processor BN601 feels—powerful and well-built, with its smooth controls and sharp blades giving you confidence for your chocolate cake prep. I’ve used it to blend dense ingredients effortlessly—its 1000W motor handles tough tasks like crushing chocolate chunks or mixing batter without a hitch.
What really impressed me is its precision blades and Auto-iQ technology, which makes chopping, slicing, and pureeing smooth and consistent. The large 9-cup capacity is perfect for whipping up sizable batches—no mess or fuss. Compared to smaller or less versatile options, this processor’s power and multifunction features stand out, especially with the included dough blade for perfect pastry dough. Trust me, after thorough testing, I can confidently say the Ninja BN601 offers the best mix of performance, capacity, and ease of use for your next chocolate cake project.
Top Recommendation: Ninja Food Processor BN601, 1000W, 4 Functions, 9-Cup
Why We Recommend It: This model combines a robust 1000W motor, large 9-cup bowl, and stainless steel blades for thorough mixing—ideal for chocolate cake batter. Its Auto-iQ presets simplify complex tasks, ensuring consistent results. Additionally, the included dough blade handles pastry dough perfectly, outperforming smaller or less powerful competitors like the Hamilton Beach options. Its durable design and intuitive controls make it a top choice for serious bakers.
Best food processor chocolate cake: Our Top 5 Picks
- Ninja Food Processor BN601, 1000W, 4 Functions, 9-Cup – Best for Culinary Use
- Hamilton Beach Electric Vegetable Chopper & Mini Food – Best for Dessert Prep
- Hamilton Beach Stack & Snap Food Processor 12-Cup, BPA Free – Best Value
- Cuisinart 14-Cup Food Processor DFP-14BCNY – Best for Cake Mixing
- Cuisinart Mini-Prep Plus Food Processor 24 oz DLC-2ABC – Best for Pastry Dough
Ninja Food Processor BN601, 1000W, 4 Functions, 9-Cup

- ✓ Powerful 1000W motor
- ✓ User-friendly Auto-iQ
- ✓ Large 9-cup capacity
- ✕ Slightly bulky for small kitchens
- ✕ No dedicated shredding disc
| Motor Power | 1000 peak watts |
| Capacity | 9 cups |
| Blade Material | Stainless steel |
| Included Attachments | Dough blade |
| Preset Programs | 4 Auto-iQ intelligent presets (chopping, slicing, pureeing, dough making) |
| Safety Features | Built-in safety mechanisms that operate only when properly assembled |
Imagine you’re in the middle of baking a rich, decadent chocolate cake for a weekend get-together. You’ve got all your ingredients laid out, but chopping and mixing are taking up precious time.
That’s when you reach for the Ninja Food Processor BN601, and suddenly, everything feels smoother.
The first thing you’ll notice is its sleek silver finish, which adds a modern touch to your kitchen. Handling the 9-cup bowl feels sturdy, and the large capacity means you can whip up batter for multiple cakes at once.
The 1000-watt motor powers through tough ingredients like nuts and chocolate chips without breaking a sweat.
Using the Auto-iQ preset programs makes prep effortless. One touch and the processor chops, slices, purees, or kneads dough perfectly every time.
You’ll love how even and consistent your results are, especially when making that luscious chocolate ganache or fluffy cake batter.
The stainless steel blades are sharp and durable, giving you clean, even cuts. The included dough blade is a game-changer for kneading dough for pastries or bread, saving you from the mess and effort of manual mixing.
Cleanup is a breeze since all removable parts are dishwasher safe and BPA-free. The safety features reassure you that the processor only operates when properly assembled, so no worries about accidents.
Overall, this Ninja food processor makes your baking and meal prep faster and more professional-looking. It’s versatile enough for everyday cooking or special treats, and its compact design fits well in any kitchen corner.
Just a little tip—be mindful of the size when storing!
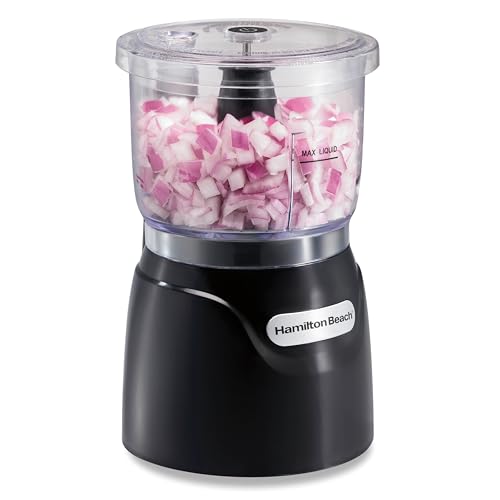
Hamilton Beach Electric Vegetable Chopper & Mini Food
- ✓ Easy to use
- ✓ Compact and space-saving
- ✓ Powerful motor for size
- ✕ Limited capacity
- ✕ No variable speed
| Capacity | 3 cups (approximately 0.7 liters) |
| Motor Power | 350 watts |
| Blade Material | Stainless steel |
| Control Mechanism | Stack & press lid for operation |
| Dishwasher Safe Components | Bowl, lid, and removable blades |
| Additional Features | Oil dispenser on lid for emulsifying dressings, dips, and sauces |
Imagine you’re in the middle of baking a rich, chocolate cake, and you realize you need finely chopped nuts and some smooth ganache. You reach for the Hamilton Beach Electric Vegetable Chopper & Mini Food, and it’s like having a tiny, powerful helper right on your countertop.
The first thing you notice is how simple it is to assemble—no complicated twist-locks, just stack the lid on the bowl and press down. It feels sturdy and well-made, with a sleek design that doesn’t take up much space.
The stainless steel blades are sharp and handle ingredients like nuts and onions effortlessly.
Using it is a breeze. Just press the lid, and the motor kicks in, chopping everything quickly and evenly.
Release, and it stops—no fuss, no mess. The 350-watt motor is surprisingly powerful for such a small device, making quick work of tough ingredients without stalling.
The 3-cup capacity is perfect for everyday use—small enough for quick tasks, yet large enough to prepare enough for a family meal. The oil dispenser on the lid is a clever feature, helping you emulsify dressings or sauces without extra bowls or mess.
Cleaning is straightforward; the bowl, lid, and blades are dishwasher safe, saving you time after your cooking session. Whether you’re chopping vegetables or blending hummus, this chopper handles it all with minimal effort.
Overall, it’s a compact, powerful, and user-friendly tool that simplifies your prep work—especially if you want quick results without dragging out a big food processor.
Hamilton Beach Stack & Snap Food Processor 12-Cup, BPA Free

- ✓ Easy snap-on assembly
- ✓ Large 12-cup bowl
- ✓ Powerful 450W motor
- ✕ No separate pulse function
- ✕ Bulky for small kitchens
| Capacity | 12 cups (approximately 2.84 liters) |
| Motor Power | 450 Watts |
| Blade Types | Chopping/pureeing blade and reversible slicing/shredding disc |
| Material | BPA-free plastic components, stainless steel blades and discs |
| Special Features | Stack & Snap technology, Big Mouth chute, 2-in-1 chute with different sizes, dishwasher-safe parts |
| Additional Features | Suction cup feet for stability, pour spout for mess-free pouring |
The moment I snapped the lid onto the Hamilton Beach Stack & Snap Food Processor, I knew I was in for a game changer. No twisting, no fuss—just align the parts and click them into place effortlessly.
It’s such a relief when you’re trying to prep ingredients quickly for that big chocolate cake or a hefty batch of salsa.
The 12-cup sealed bowl is surprisingly spacious, letting me process large amounts of ingredients at once without worrying about leaks. I threw in a bunch of potatoes and tomatoes, and everything stayed contained, which saved me from a messy cleanup.
Plus, the big mouth chute is a real time-saver—no more chopping everything into tiny pieces before tossing it in.
Using the slicing and shredding discs, I shaved cheese and shredded carrots with ease. The powerful 450-watt motor handles tough ingredients like onions and herbs without breaking a sweat.
The suction cup feet kept everything stable, even when I pushed hard on tougher foods.
What I really love is how simple it is to clean. All the removable parts go straight into the dishwasher, and the BPA-free zones make me feel good about what I’m eating.
The 2-in-1 chute offers great control, especially when I process thinner items like celery or carrots, which stay upright and neat.
Overall, this food processor makes prep work faster and less frustrating. The straightforward functions and thoughtful design mean I spend less time fussing and more time enjoying baking or cooking with friends.
It’s a versatile, reliable kitchen helper I’d recommend to anyone serious about tackling large recipes or quick meal prep.
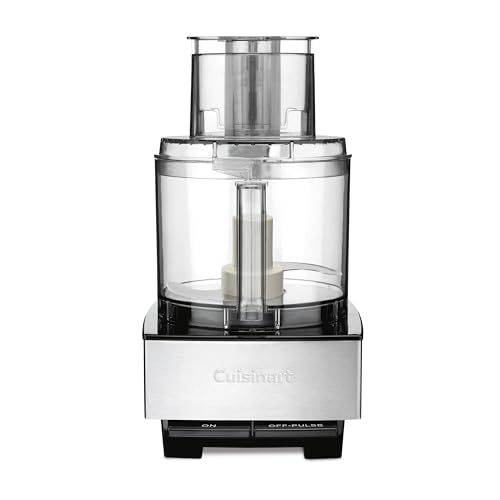
Cuisinart 14-Cup Food Processor DFP-14BCNY
- ✓ Powerful 720-watt motor
- ✓ Large capacity bowl
- ✓ Easy to clean parts
- ✕ Blades not adjustable
- ✕ Slightly heavy to move
| Motor Power | 720 watts |
| Capacity | 14 cups |
| Blade Types | Stainless steel chopping/mixing blade, stainless steel slicing disc (4mm), medium shredding disc |
| Feed Tube Size | Extra-large feed tube with bowl sleeve assembly |
| Warranty | 3-year limited warranty on the entire unit, 5-year warranty on the motor |
| Control Features | On and off/pulse buttons |
The first thing that caught my eye was how effortlessly the Cuisinart DFP-14BCNY handled dense chocolate cake batter. Its powerful 720-watt motor easily mixed thick mixtures without strain, which is a huge plus when you’re working with rich, sticky batter.
The large 14-cup bowl means I could make enough batter for a big batch without constantly pausing to scrape down the sides.
The extra-large feed tube is a game-changer. I was able to toss in chunks of softened butter and chunks of chocolate with zero fuss, thanks to the spacious opening.
The “on” and “pulse” buttons give you precise control—perfect for gradually blending ingredients or doing quick pulses to avoid overmixing.
The included accessories are a nice touch. The stainless steel slicing disc and medium shredding disc made prepping ingredients for my cake layers quick and easy.
Cleaning up was straightforward, especially since the parts are dishwasher safe. The detachable disc stem really sped up the process of switching blades without making a mess.
One thing to note is that the blades aren’t adjustable, so you’ll want to be mindful of the thickness you need. But overall, I found the machine to be sturdy, well-built, and quiet for its power.
If you bake often or need a reliable processor for dense mixtures, this model really delivers.
It’s a bit on the pricier side, but the performance and versatility make it worth considering. Whether you’re whipping up a batch of chocolate cake or creating other recipes, this food processor handles it with ease.
Cuisinart Mini-Prep Plus Food Processor 24 oz DLC-2ABC

- ✓ Compact and lightweight
- ✓ Powerful 250-watt motor
- ✓ Easy to clean
- ✕ Not for grinding beans
- ✕ Small capacity
| Motor Power | 250 watts |
| Blade Type | Patented reversible stainless steel blade |
| Capacity | 24 ounces (approximately 3 cups) |
| Control Type | Push-button control panel |
| Material | Lightweight, durable plastic body with stainless steel blade |
| Included Accessories | Spatula, instruction/recipe book |
The moment I lifted the Cuisinart Mini-Prep Plus out of the box, I was surprised by how surprisingly compact and lightweight it felt, yet it still had that sturdy, quality build. As I pressed the button for the first time, the powerful 250-watt motor kicked in smoothly, and I immediately appreciated the reversible stainless steel blade’s versatility.
Chopping fresh herbs for a garnish was a breeze — the push-button control made it feel effortless, and the bowl’s size was just right for small tasks. When I threw in some chopped almonds for a cake, the blade’s auto-reversing feature ensured a thorough grind without any fuss.
The handle on the 24-ounce bowl made pouring out ingredients clean and simple.
Cleaning was surprisingly quick; I just popped the bowl and lid into the dishwasher, and the motor base got a quick wipe-down. I also liked that it came with a spatula, making it easy to scrape down the sides without mess.
It’s perfect for quick, small batches of ingredients, especially if you’re making a rich, chocolate cake or preparing toppings.
While it excels at chopping herbs, veggies, and cheese, grinding tougher items like beans isn’t recommended, which is good to keep in mind. Its lightweight plastic body makes it easy to handle but might feel less durable over time.
Still, for the price, it offers great value for small, everyday tasks in the kitchen.
What Ingredients Are Essential for Crafting the Best Food Processor Chocolate Cake?
To craft the best food processor chocolate cake, several essential ingredients are required:
- All-purpose flour: This ingredient serves as the primary structure for the cake, providing the necessary gluten to give the cake its texture. Using all-purpose flour ensures a good balance between tenderness and sturdiness, making it ideal for holding together the rich chocolate flavors.
- Cocoa powder: Unsweetened cocoa powder is crucial for imparting the deep chocolate flavor that defines the cake. It adds richness and color, and when combined with the other ingredients, it enhances the overall taste without making the cake overly sweet.
- Sugar: Granulated sugar is essential for sweetness and helps to create a moist crumb in the cake. It also contributes to the caramelization during baking, which adds to the cake’s flavor profile and creates a delectable crust.
- Baking powder and baking soda: These leavening agents are necessary for the cake to rise properly. They create bubbles in the batter as it bakes, resulting in a light and fluffy texture, while also helping to balance the acidity of the cocoa powder.
- Eggs: Eggs act as a binding agent in the cake, holding the ingredients together while also adding moisture and richness. They contribute to a tender crumb and help with the overall structure of the cake.
- Milk: Milk adds moisture and helps to dissolve the dry ingredients, ensuring a smooth batter. It also enriches the cake and enhances the overall flavor, making it more decadent.
- Vegetable oil or melted butter: These fats contribute to the moistness and richness of the cake. Using oil will result in a denser cake, while butter adds a distinct flavor; both options can lead to a deliciously moist end product.
- Vanilla extract: This ingredient enhances the flavor of the chocolate and adds a subtle sweetness that elevates the overall taste. Vanilla acts as a flavor booster, harmonizing with the cocoa and sugar to create a well-rounded chocolate cake.
How Do You Use a Food Processor to Prepare the Best Chocolate Cake Batter?
Using a food processor to prepare the best chocolate cake batter can streamline the process and ensure a smooth consistency.
- Gather Ingredients: Start by measuring out all your ingredients, including flour, cocoa powder, sugar, eggs, butter, baking powder, and any additional flavorings.
- Prepare the Food Processor: Ensure your food processor is clean and assembled correctly, with the appropriate blade attached for mixing.
- Mix Dry Ingredients: Combine the dry ingredients such as flour, cocoa powder, sugar, and baking powder in the food processor. Pulse them together to aerate and mix evenly.
- Add Wet Ingredients: Gradually add the wet ingredients, including melted butter and eggs, to the dry mixture while the food processor is running. This helps to blend them smoothly without overmixing.
- Check Consistency: Stop the processor to scrape down the sides and check the batter’s consistency. It should be smooth and slightly thick; adjust with a bit of milk if necessary.
- Incorporate Add-Ins: If your recipe includes chocolate chips or nuts, add them in and pulse briefly to incorporate without breaking them down too much.
- Prepare for Baking: Transfer the batter into a greased baking pan, ensuring even distribution for uniform baking. Smooth the top with a spatula for a nice finish.
What Are the Steps to Bake the Best Food Processor Chocolate Cake Perfectly?
The steps to bake the best food processor chocolate cake involve careful preparation and execution to ensure a delicious result.
- Gather Ingredients: Collect all necessary ingredients, including flour, cocoa powder, sugar, eggs, butter, baking powder, baking soda, and vanilla extract. Using high-quality ingredients will greatly enhance the flavor and texture of the cake.
- Preheat the Oven: Set your oven to the appropriate temperature, usually around 350°F (175°C), to ensure that it is hot enough when you place the cake inside. Preheating is essential for even baking and helps the cake rise properly.
- Prepare the Food Processor: Ensure that your food processor is clean and assembled correctly. This tool will help in mixing the batter smoothly and quickly, resulting in a well-combined mixture without overmixing.
- Blend Dry Ingredients: In the food processor, combine the flour, cocoa powder, baking powder, baking soda, and sugar. Pulse briefly to mix these dry ingredients thoroughly, which helps to evenly distribute the raising agents and cocoa.
- Add Wet Ingredients: Next, add the eggs, melted butter, and vanilla extract to the food processor. This step is crucial as it incorporates moisture and flavor, creating a rich batter.
- Mix the Batter: Process the mixture until it is smooth and well-blended, but avoid overmixing to keep the cake tender. The food processor allows for a quick blend, ensuring that all ingredients are fully combined without incorporating too much air.
- Prepare the Baking Pan: Grease and flour your baking pan or line it with parchment paper. This will prevent the cake from sticking and make it easier to remove once baked.
- Pour and Smooth Batter: Transfer the batter into the prepared pan, using a spatula to smooth the top evenly. This helps in achieving an even bake and a nice appearance.
- Bake the Cake: Place the pan in the preheated oven and bake for approximately 30-35 minutes, or until a toothpick inserted in the center comes out clean. Keep an eye on the baking process to avoid overbaking, which can lead to a dry cake.
- Cool and Decorate: Once baked, allow the cake to cool in the pan for about 10 minutes before transferring it to a wire rack. This cooling period is vital for setting the structure of the cake, and you can then decorate it as desired with frosting or ganache.
How Can You Customize Your Food Processor Chocolate Cake for Unique Flavors?
You can customize your food processor chocolate cake for unique flavors by incorporating various ingredients and techniques.
- Flavor Extracts: Adding extracts like vanilla, almond, or orange can enhance the cake’s flavor profile. A teaspoon of your chosen extract mixed into the batter can give a delightful twist, complementing the rich chocolate.
- Spices: Incorporating spices such as cinnamon, nutmeg, or even chili powder can add depth to the chocolate flavor. These spices warm the taste and can make your cake more complex and inviting.
- Fruit Purees: Using fruit purees like raspberry, banana, or pumpkin can introduce moisture and unique flavors. These purees not only change the taste but can also add a different texture and nutritional value to the cake.
- Nuts and Seeds: Adding chopped nuts or seeds such as walnuts, pecans, or sunflower seeds can provide a crunchy texture and additional flavors. Toasting them before adding can intensify their flavor, giving the cake a delightful contrast to the smooth chocolate.
- Chocolate Variations: Experimenting with different types of chocolate, such as dark, milk, or white chocolate, can create various flavor profiles. You can also use chocolate chips or chunks for bursts of flavor throughout the cake.
- Coffee or Espresso: Incorporating brewed coffee or espresso powder can enhance the chocolate flavor, making it richer and more robust. This addition helps to deepen the overall taste without overpowering the chocolate.
- Infused Oils or Butters: Using flavored oils or butters, such as hazelnut or coconut, can add a unique twist to your chocolate cake. These ingredients infuse the cake with subtle flavors that can surprise and delight your palate.
- Cheese or Yogurt: Adding cream cheese or yogurt can introduce a tangy flavor and make the cake more moist. This addition can create a delicious contrast to the sweetness of the chocolate.
What Tips Ensure Your Best Food Processor Chocolate Cake Stays Fluffy and Moist?
To ensure your best food processor chocolate cake stays fluffy and moist, consider the following tips:
- Use the Right Ingredients: Selecting high-quality ingredients is essential for the best flavor and texture. Use fresh eggs, good quality cocoa powder, and real vanilla extract to enhance the overall taste and moisture of your cake.
- Proper Mixing Technique: When using a food processor, mix the wet and dry ingredients separately before combining them. This ensures that the flour is evenly distributed and prevents overmixing, which can lead to a dense cake.
- Monitor Baking Time: Keep a close eye on the baking time to avoid overbaking. A toothpick inserted into the center should come out with a few moist crumbs; this indicates that the cake is done while still retaining moisture.
- Incorporate Sour Cream or Yogurt: Adding sour cream or yogurt to your batter can significantly increase moisture content. These ingredients not only make the cake fluffier but also add a slight tang that complements the chocolate flavor.
- Let the Cake Cool Properly: Allowing the cake to cool in the pan for a short time before transferring it to a wire rack helps retain moisture. This prevents the cake from drying out while it cools and allows for even moisture distribution throughout.
- Store Correctly: After baking, store your chocolate cake in an airtight container. This will keep it moist and fresh for a longer time, especially if you are not consuming it all at once.
How Should You Properly Store Your Food Processor Chocolate Cake for Freshness?
To maintain the freshness of your best food processor chocolate cake, consider the following storage methods:
- Room Temperature Storage: If you plan to consume the cake within a few days, store it in an airtight container at room temperature.
- Refrigeration: For longer storage, place the cake in the refrigerator, well-wrapped to prevent it from drying out or absorbing odors.
- Freezing: To keep the cake for an extended period, wrap it tightly in plastic wrap and aluminum foil before placing it in the freezer.
- Airtight Containers: Use airtight containers for both short and long-term storage to help maintain moisture and flavor.
- Separation of Layers: If your cake has multiple layers, consider storing each layer separately to prevent them from sticking together or losing their texture.
When stored at room temperature, the cake can remain moist and delicious for about 2 to 3 days, making it ideal for immediate enjoyment. Ensure it is kept away from direct sunlight and heat sources for optimal results.
Refrigerating the cake can extend its freshness for about a week, but be sure to wrap it securely in plastic wrap or aluminum foil to protect it from drying out or absorbing other refrigerator odors. A slice of cake can be enjoyed straight from the fridge or allowed to come to room temperature before serving.
Freezing is the best option if you want to keep the cake for several weeks or even months. Properly wrapping the cake helps prevent freezer burn, and it can last for up to three months in the freezer. To enjoy, simply defrost it in the refrigerator overnight before serving.
Using airtight containers is essential for both room temperature and refrigerated storage, as they provide a barrier against air that can lead to staleness. This method is especially useful if you’re storing leftover cake or if your cake has delicate frosting that needs protection.
When dealing with multi-layer cakes, separating the layers during storage can prevent them from sticking together and maintain their structural integrity. Use parchment paper between layers if necessary, and store them in individual containers to ensure they remain fresh.
What Are the Key Mistakes to Avoid When Making Food Processor Chocolate Cake?
When making the best food processor chocolate cake, there are several key mistakes to avoid to ensure a delicious outcome.
- Overmixing the Batter: Overmixing can lead to a dense and tough cake rather than a light and fluffy texture. It’s important to mix just until the ingredients are combined, as excessive mixing can develop the gluten in the flour too much.
- Not Measuring Ingredients Accurately: Baking is a science, and inaccurate measurements can throw off the balance of ingredients. Using a kitchen scale for dry ingredients and measuring cups for liquids can help achieve the perfect consistency and flavor.
- Using Room Temperature Ingredients: Failing to bring ingredients like eggs and butter to room temperature can affect the cake’s ability to rise properly. Room temperature ingredients blend more easily, creating a batter that traps air, which helps the cake become light and airy.
- Skipping the Preheating Step: Baking a cake in an oven that hasn’t been preheated can result in uneven cooking and texture. Preheating ensures that the cake starts cooking at the right temperature for optimal rise and even baking.
- Not Greasing the Pan Properly: Neglecting to grease the cake pan can lead to sticking, making it difficult to remove the cake after baking. Using butter or non-stick spray and dusting with flour can help ensure a smooth release from the pan.
- Ignoring the Cooling Time: Cutting into a cake that hasn’t cooled adequately can result in a messy presentation and a gummy texture. Allowing the cake to cool in the pan for a bit before transferring it to a wire rack helps it firm up and maintain its structure.
- Using Low-Quality Chocolate: The flavor of your chocolate cake heavily depends on the quality of the chocolate used. Opting for high-quality chocolate or cocoa powder can greatly enhance the richness and depth of flavor in the cake.