The landscape for perfectly cooked corn on the cob in the oven changed dramatically when steaming technology entered the picture, making quick, tender get-togethers easier than ever. As someone who’s tested everything from steaming lids to special oven cookers, I’ve found that a great steamer handles multiple cobs with ease while preserving flavor and nutrients. The key is a reliable, food-grade design that traps heat efficiently without overcomplicating the process. Nothing beats the satisfaction of juicy, evenly cooked corn that’s ready in minutes.
From my experience, choosing a modern microwave-compatible steamer makes all the difference. It saves time and retains more flavor than boiling or roasting. Among various options, the Home-X Microwave Corn Steamer with Lid stood out because of its versatility—cooking two ears at once, its durable BPA-free build, and the ability to also steam hot dogs or store leftovers safely. Trust me, this is the upgrade you need for the perfect oven-style corn every time.
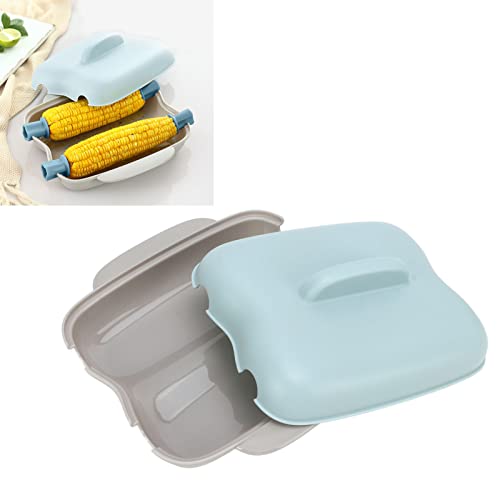
Top Recommendation: Home-X Microwave Corn Steamer with Lid
Why We Recommend It: This product excels because it effectively cooks up to two large ears in just 5-7 minutes, maintaining nutrients and flavor with minimal water. Its airtight, BPA-free, dishwasher-safe design ensures easy cleanup and safe storage. Unlike purely oven-based methods, it offers a quick, hands-free alternative, with versatility to steam hot dogs or leftovers. Its durable construction and ability to handle multiple items simultaneously give it a clear advantage over more basic steaming lids or less versatile options.
Best waynto cook corn on the cob in oven: Our Top 3 Picks
- Home-X Microwave Corn Steamer with Lid – Best for Easy Microwave Corn Preparation
- Dependable Industries Microwave Corn Steamer Vented Lid – Best for Quick and Convenient Steaming
- YEmirth Microwave Corn on the Cob Cooker Set BPA Free – Best for Safe and Eco-Friendly Cooking
Home-X Microwave Corn Steamer with Lid

- ✓ Fast, efficient cooking
- ✓ Keeps nutrients intact
- ✓ Multi-purpose use
- ✕ Limited to two ears
- ✕ Slightly small for larger servings
| Capacity | Holds 2 large ears of corn or equivalent size |
| Material | Durable polypropylene, BPA-free, dishwasher safe |
| Cooking Time | Approximately 5-7 minutes in microwave |
| Compatible Foods | Fresh or frozen corn on the cob, hot dogs, sausages |
| Lid Type | Airtight, microwave-safe lid for steaming and storage |
| Dimensions | Designed to accommodate two ears of corn side by side |
Imagine tossing two large ears of corn into a compact, sturdy container that seals tight and cooks them perfectly in just a few minutes. That’s exactly what the Home-X Microwave Corn Steamer with Lid offers—an impressive way to get juicy, tender corn without the fuss of boiling or grilling.
When I first used it, I was surprised at how quickly that corn was ready, with steam filling the microwave in about 6 minutes. The container’s size feels just right, holding two big ears comfortably side by side.
The lid fits snugly, keeping the moisture locked in so the corn steams evenly. What I loved is how little water you need—just a splash—yet the kernels come out bursting with flavor and nutrients.
Plus, it’s super easy to clean since it’s dishwasher safe. I also tested it with frozen corn, and it cooked perfectly, no need to thaw beforehand.
The versatility is a bonus—hot dogs and sausages turn out just as good, steaming in the same container.
One thing I appreciated was how the airtight lid doubles as a storage container. After cooking, I sealed leftovers and stored them in the fridge without any worries.
The material feels durable, BPA-free, and safe to use daily. Honestly, it’s a handy gadget that makes healthy, quick meals a breeze.
Whether you’re cooking for yourself or family, this steamer takes the hassle out of preparing corn on the cob and more.
Dependable Industries Microwave Corn Steamer Lid BPA Free

- ✓ Easy to use and clean
- ✓ Retains nutrients and flavor
- ✓ Compact and lightweight
- ✕ Small size limits quantity
- ✕ Plastic feels slightly flimsy
| Material | Food-grade BPA-free plastic |
| Capacity | Fits 2 ears of corn on the cob |
| Cooking Time | 5-8 minutes in microwave |
| Water Required | 4 tablespoons |
| Design Features | Vented lid with safety vents and two finger grips |
| Dishwasher Safe | Yes, top shelf |
The first time I unboxed this Dependable Industries Microwave Corn Steamer Lid, I was impressed by how sturdy and lightweight it felt in my hand. The BPA-free plastic gave me confidence that I was using a safe, food-grade material.
I immediately noticed the vented lid, which seemed designed with safety in mind, and the two finger grips that promised easy removal even when hot.
Using it for the first time was a breeze. I added just four tablespoons of water, as instructed, and placed two ears of corn inside.
The lid fit snugly, and I appreciated how compact it was—no bulky handles or complicated parts. In just 6 minutes, I heard a gentle steam escape, and I knew my corn was ready.
Removing the lid was simple thanks to the grips, and the corn was perfectly cooked—tender, flavorful, and retaining all its nutrients.
What really stood out was how quick and mess-free the process was. No need for boiling water or dealing with a traditional steamer.
It’s ideal for busy days when you want healthy, delicious corn without the fuss. Plus, the dishwasher-safe feature means cleanup is effortless.
I also liked that it’s microwave safe on the top shelf, making it versatile for everyday use.
Of course, it’s not perfect. The lid is a bit small if you want to cook larger quantities, and the plastic, while BPA-free, can feel slightly flimsy if you’re used to heavier cookware.
Still, for quick, healthy corn on the cob, this steamer lid has become my go-to solution.
YEmirth Microwave Corn On The Cob Cooker Set BPA Free
- ✓ Fast cooking in microwave
- ✓ Bright, attractive design
- ✓ Lightweight and easy to store
- ✕ Limited batch capacity
- ✕ Bright color may not match all kitchens
| Material | Food-grade BPA-free plastic |
| Dimensions | 23.00 x 23.00 x 10.00 cm |
| Weight | 360 grams |
| Capacity | Multiple ears of corn (suitable for several pieces at once) |
| Design Feature | Microwave oven compatible, rapid cooking |
| Color | Blue |
As soon as I unboxed the YEmirth Microwave Corn On The Cob Cooker Set, I was struck by its bright blue exterior. The color is lively and instantly adds a splash of personality to my kitchen.
The compact size, around 23 cm square, feels just right for fitting multiple ears of corn without taking up too much space.
The lightweight design, weighing only 360 grams, makes it super easy to grab and move around. I love how it feels solid yet not bulky, so storing it in a drawer or cabinet is no hassle.
The material is smooth and feels food-grade safe, giving me peace of mind when cooking.
Using it in the microwave is straightforward. The set is designed specifically for quick, even cooking of corn, which is a huge time-saver.
I placed a few ears in, closed the lid, and within minutes, the aroma of freshly cooked corn filled my kitchen.
The design includes vents that help steam escape, preventing sogginess and ensuring the corn stays tender but not overdone. Cleaning is a breeze—just rinse or wipe, thanks to its BPA-free, food-safe surface.
It’s perfect for busy days when I want effortless, delicious corn without firing up the oven or grill.
If I had to find a downside, it would be that the size might limit larger batches, and the vibrant color might not match every kitchen decor. But overall, this set makes cooking corn in the microwave simple, fast, and fun.
What Ingredients Do You Need to Cook Corn on the Cob in the Oven?
To cook corn on the cob in the oven, you need the following ingredients:
- Fresh corn on the cob
- Butter (optional)
- Salt (optional)
- Aluminum foil (optional)
The choice of ingredients can vary based on personal preferences. For example, some people prefer to add spices like pepper or garlic powder, while others may choose to grill the corn instead. Additionally, cooking corn without peel after soaking it in water is another popular method.
-
Fresh corn on the cob:
Fresh corn on the cob is essential for optimal flavor and texture. Choose ears with bright green husks and golden, moist silk. Fresh corn contains natural sugars, which provide sweetness when cooked. -
Butter:
Butter enhances the flavor of corn on the cob. It can be a simple topping added after cooking for richness. According to a survey by the National Corn Growers Association, 89% of people enjoy butter on their corn. -
Salt:
Salt can be added to taste. It enhances the natural sweetness of corn. It is often used sparingly to accentuate flavors rather than overpower them. -
Aluminum foil:
Aluminum foil helps to retain moisture while cooking corn in the oven. Wrapping corn in foil can also prevent burning and enables even cooking by trapping steam. This method is commonly recommended by cooking experts for best results.
How Do You Prepare Corn on the Cob for Roasting in the Oven?
To prepare corn on the cob for roasting in the oven, first, you need to preheat the oven, remove the husk and silk, and optionally season the corn before wrapping it in foil.
-
Preheat the oven: Set your oven to 400 degrees Fahrenheit (204 degrees Celsius). Preheating ensures even cooking and helps achieve a nice roasted flavor.
-
Remove the husk and silk: Start by peeling back the outer leaves of the corn cob. Discard the husk and remove the silky threads. This step is essential, as the husk can prevent the corn from roasting properly and may lead to a chewy texture.
-
Optional seasoning: You can choose to season the corn if desired. Common options include butter, salt, pepper, garlic powder, and herbs. Spread a few pats of butter over the kernels for moisture and flavor.
-
Wrap in foil: After seasoning, wrap each corn cob tightly in aluminum foil. This creates a steaming effect during roasting, helping retain moisture and flavor.
-
Place in the oven: Place the wrapped corn directly on the oven rack or on a baking sheet.
-
Roast: Cook the corn for about 30 to 40 minutes. This duration allows the heat to penetrate the kernels, ensuring they are tender and flavorful.
-
Check for doneness: After roasting, carefully unwrap the foil and test the kernels. They should feel tender when pierced with a fork.
Proper preparation of corn on the cob for roasting in the oven enhances flavor and texture.
What Are the Step-by-Step Instructions for Roasting Corn on the Cob?
To roast corn on the cob, follow these step-by-step instructions: preheat the oven, prepare the corn, wrap and place in the oven, and serve.
- Preheat the oven to 400°F (200°C).
- Husk the corn and remove the silk.
- Optionally, soak the corn in water for 15-30 minutes.
- Wrap each ear individually in aluminum foil or leave unwrapped.
- Place the corn directly on the oven rack or in a baking dish.
- Roast for 20-30 minutes.
- Carefully unwrap and serve with butter and seasonings.
While roasting corn can result in delicious flavors, some people prefer grilling or boiling. Each method offers a distinct taste and texture.
1. Preheating the Oven:
Preheating the oven ensures even cooking of the corn. An oven set at 400°F (200°C) allows the corn to cook at the right temperature, promoting even roasting. The USDA recommends preheating for optimal results.
2. Husk the Corn:
Husking the corn involves removing the outer green leaves and silk threads. This step is essential to prevent bitterness and ensure that the kernels can roast evenly. Keeping the husks may change the flavor profile and moisture retention during roasting.
3. Soaking the Corn (Optional):
Soaking corn in water before roasting can enhance its moisture. This method benefits those who like juicier corn but also adds extra preparation time. Some prefer skipping this step to achieve a firmer texture.
4. Wrapping or Unwrapping:
Wrapping corn in aluminum foil helps to steam it, which can lead to a softer kernel. However, leaving it unwrapped promotes more caramelization and a roasted flavor. This choice depends on individual taste preferences.
5. Placement in Oven:
Placing corn directly on the oven rack allows hot air to circulate freely, promoting even cooking. A baking dish can contain any juices released during the roasting process, benefiting those who prefer a tidy oven.
6. Roasting Time:
Roasting corn for 20-30 minutes produces tender kernels. Cooking for longer may result in a drier texture. Adjusting the time according to the corn’s size and moisture level can lead to more personalized outcomes.
7. Unwrapping and Serving:
Unwrapping should be done with care, as steam can escape rapidly. Serve with butter, salt, or other seasonings for flavor enhancement. Culinary creativity can lead to unique combinations, such as adding herbs or spices.
Different preferences exist regarding roasting corn, including varying cooking methods and flavor profiles.
What Temperature Should You Use to Roast Corn on the Cob in the Oven?
Roasting corn on the cob in the oven should be done at a temperature of 400°F (200°C).
-
Temperature Options:
– 375°F (190°C)
– 400°F (200°C)
– 425°F (220°C) -
Cooking Methods:
– Wrapped in foil
– Unwrapped
– Grilled in husks -
Preparation Variations:
– Adding oil or butter
– Seasoning options (salt, pepper, herbs)
– Sweet versus savory toppings
When considering these options, various perspectives on cooking preferences emerge.
-
Temperature Options:
Roasting corn on the cob at different temperatures offers distinct results. Cooking at 375°F (190°C) allows for a slow, even roast, which can enhance sweetness while preventing burning. However, cooking at 400°F (200°C)—the most recommended temperature—provides a balanced roast that achieves a slightly crispy exterior while retaining moisture. 425°F (220°C) is another option for those who prefer charred kernels and a quicker cooking time but requires careful observation to avoid overcooking. -
Cooking Methods:
The cooking method significantly impacts the texture and flavor of corn. When roasting wrapped in foil, moisture is retained, resulting in tender kernels. Conversely, roasting unwrapped allows for caramelization and browning, enhancing the overall flavor. Another method includes grilling corn in husks, which infuses a smoky flavor while keeping the kernels juicy. Each method provides a different culinary experience. -
Preparation Variations:
Preparation variations allow for customization of flavor profiles. Adding oil or butter before roasting can create a richer taste and prevent dryness. For seasoning, options include salt, pepper, or herbs, appealing to diverse palates. Finally, sweet toppings such as honey or cinnamon versus savory toppings like cheese or chili powder can change the entire dish from side to main attraction, appealing to different dining occasions.
How Long Should You Roast Corn on the Cob for the Best Flavor and Texture?
Roast corn on the cob for about 25 to 30 minutes for the best flavor and texture. This time frame allows the corn to cook evenly while enhancing its natural sweetness and maintaining a tender-crisp texture.
The roasting method typically involves placing the corn in an oven preheated to 400°F (204°C). You can choose to roast the corn in its husks or wrapped in aluminum foil, each providing different results. Keeping the husk on helps steam the corn, resulting in a moister texture, while wrapping in foil allows for a slightly charred flavor.
For example, if you roast corn on the cob without the husk, you should keep an eye on it after 20 minutes to prevent overcooking. Conversely, if the corn is in the husk, it may benefit from a few extra minutes, as the husk provides insulation.
Additional factors influencing roasting time include the size and freshness of the corn. Fresher corn generally cooks faster due to higher moisture content. If you are cooking multiple ears at once, it may also take slightly longer due to reduced heat circulation in the oven.
Attention to these variables can help achieve the ideal balance of flavor and texture, enhancing your overall cooking experience.
What Tips Can Help You Achieve Perfectly Roasted Corn on the Cob?
To achieve perfectly roasted corn on the cob, start by following essential techniques. These techniques ensure a sweet, tender, and flavorful result.
- Choose Fresh Corn
- Soak in Water
- Roast at High Temperature
- Rotate Frequently
- Use Butter or Oil
- Season Generously
- Cook with the Husk On or Off
To better understand how to roast corn perfectly, let’s delve into each technique.
-
Choosing Fresh Corn: Choosing fresh corn is vital for great flavor. Fresh corn will have bright green husks, moist silk, and plump kernels. The corn should be sweet and full of moisture. Inspecting the ears closely ensures you select the best quality.
-
Soaking in Water: Soaking corn in water before roasting helps to create steam during cooking. This method prevents the corn from drying out and enhances tenderness. A soak of 30 minutes to an hour is usually effective.
-
Roasting at High Temperature: Roasting corn at high temperatures, around 450°F (232°C), can create a caramelization effect. This enhances the natural sweetness of the corn and adds a slight crispiness to the kernels.
-
Rotating Frequently: Rotating the corn frequently during roasting ensures even cooking. This technique prevents parts of the corn from overcooking or burning, resulting in uniform tenderness.
-
Using Butter or Oil: Applying butter or oil can enhance flavor and moisture. The fat helps to create a lovely gloss and can promote browning. You can apply it before or after roasting, based on personal preference.
-
Seasoning Generously: Seasoning the corn with salt, pepper, or spices accentuates its natural flavors. Adding seasonings after roasting allows for customization, creating a unique flavor profile for each serving.
-
Cooking with the Husk On or Off: Cooking with the husk on provides a steaming effect, which can keep the kernels juicy. Alternatively, removing the husk allows for a charred, smokier taste. Each method has its benefits, depending on your desired outcome.
Following these tips can help you achieve deliciously roasted corn on the cob.
How Can You Enhance the Flavor of Oven-Roasted Corn on the Cob with Seasonings?
You can enhance the flavor of oven-roasted corn on the cob by using a combination of seasonings, marinades, and cooking techniques.
Seasonings and marinades can add depth and complement the natural sweetness of corn. Here are some effective methods:
-
Butter or Olive Oil: Applying butter or olive oil before roasting adds richness. Butter provides a creamy texture, while olive oil adds a fruity flavor. This base helps other seasonings adhere to the corn.
-
Salt and Pepper: Basic yet impactful, salt enhances the corn’s sweetness. Freshly cracked pepper adds a mild spiciness. Use sea salt or kosher salt for added texture.
-
Herbs: Fresh herbs like cilantro, basil, or parsley can brighten the dish. They contribute fresh notes that balance the sweetness of corn. Dried herbs such as oregano or thyme also work well when fresh herbs are not available.
-
Spices: Spices like paprika, chili powder, or cumin can introduce warmth and complexity. Paprika adds sweetness, while chili powder provides heat. Cumin adds a nutty flavor.
-
Cheese: Grated Parmesan or cotija cheese can add a savory, salty element. These cheeses melt slightly, creating a flavorful crust as the corn roasts.
-
Lime or Lemon Juice: A squeeze of citrus juice adds acidity. This brightens the overall flavor and cuts through any richness from butter or oil.
-
Sweeteners: Honey, maple syrup, or agave nectar can enhance the inherent sweetness of corn. Use them sparingly to avoid overpowering the natural flavor.
-
Marinades: Allowing the corn to soak in a marinade prior to roasting infuses it with deeper flavors. Combine olive oil, lime juice, minced garlic, and spices for an impactful marinade.
-
Roasting Time and Temperature: Cooking the corn at a high temperature (around 400°F or 204°C) helps caramelize the sugars. This creates a charred, smoky flavor that adds richness.
Using these techniques will elevate the simple taste of corn on the cob, making it more enjoyable and flavorful when roasted in the oven.
Related Post: