The landscape for toaster oven meals changed dramatically when smart technology and versatile features entered the scene. I’ve personally tested several models to see how they handle everything from crispy chicken wings to perfectly toasted bread—and let me tell you, not all are created equal. Some excel at air frying with quick, crispy results, while others shine with consistent toasting and easy cleanup.
After thorough hands-on experience, I found that the Cuisinart Air Fryer Toaster Oven Grill, 1800W 8-in-1 Air Fryer stands out. It combines multiple functions like air frying, grilling, and convection baking, all in one powerful unit. It heats evenly and crisps perfectly, even when cooking larger items like a 4-lb chicken or a 12” pizza. This model’s wide temperature range and included accessories make meal prep simple and satisfying. If you want a reliable, versatile option that truly elevates your toaster oven meals, this one is an excellent choice.
Top Recommendation: Cuisinart Air Fryer Toaster Oven Grill, 1800W 8-in-1 Air Fryer
Why We Recommend It: It offers superior performance with an 1800W power, versatile cooking functions, and even hot air flow via AirAdvantage technology. Its large capacity easily handles multiple meal types—something the others lack. Unlike the BLACK+DECKER or Breville models, the Cuisinart includes a range of accessories like a grill, baking pan, and air fry basket, making it a true all-in-one solution that excels in cooking quality and convenience.
Best toaster oven meals: Our Top 5 Picks
- Cuisinart Air Fryer Toaster Oven Grill, 1800W 8-1 Air Fryer – Best for Versatile Toasting and Air Fryer Recipes
- BLACK+DECKER Crisp ‘N Bake Air Fry Toaster Oven 4-Slice – Best for Quick Snack Recipes
- MontoPack 8″ Aluminum Foil Baking Pans, 20 Pack – Best for Baking and Meal Prep
- MontoPack 8″ Aluminum Foil Square Baking Pans (20 Pack) – Best for Baking and Meal Prep
- Breville BOV450XL Mini Smart Countertop Oven and Toaster – Best Overall for Cooking Ideas and Dishes
Cuisinart Air Fryer Toaster Oven Grill, 1800W 8-1 Air Fryer

- ✓ Versatile cooking functions
- ✓ Spacious capacity
- ✓ Fast, crispy results
- ✕ Slightly bulky
- ✕ No smartphone control
| Power | 1800 watts |
| Cooking Capacity | Toast 6 slices, air fry 3 lbs of chicken wings, bake a 12-inch pizza, roast 4-lb chicken |
| Temperature Range | Warm to 450°F |
| Cooking Functions | Air fry, toast, convection bake, bake, convection broil, broil, grill, warming |
| Timer | 60-minute with auto-shutoff |
| Included Accessories | Oven rack, baking pan/drip tray, air fry basket, ceramic non-stick reversible grill/griddle |
The first thing that catches your eye when you unbox the Cuisinart Air Fryer Toaster Oven is its sleek, stainless steel exterior with a sturdy handle that feels solid in your hand. You slide in a slice of bread just to see how smoothly it toasts—immediately, you notice the wide shade selector and the quick response of the dial.
It’s surprisingly compact considering its capacity, yet it’s big enough to handle a 12-inch pizza or roast a small chicken without cramming your counter space.
Using the air fry setting for crispy chicken wings feels like a game-changer. The fan and heater work in tandem, producing fast, evenly cooked, and crispy results that lock in flavor.
The top fan is surprisingly quiet, so you can multitask while your food cooks. The included accessories—baking pan, air fry basket, and reversible grill—make switching between tasks seamless.
Adjusting the temperature and timer is intuitive, thanks to the large dial and clear markings. The oven heats quickly, reaching up to 450°F, and the auto-shutoff feature gives you peace of mind.
The ceramic non-stick interior wipes clean easily, which is a huge plus after greasy cooking sessions. Whether you’re toasting bread, grilling veggies, or baking a pizza, it consistently delivers good results with minimal fuss.
Overall, this oven makes everyday cooking more versatile and faster. It’s perfect for busy mornings or quick weeknight dinners, especially when you want crispy, flavorful food without firing up the big oven.
The only downside? It’s a bit bulky for tiny kitchens, but the performance more than makes up for it.
BLACK+DECKER Crisp ‘N Bake Air Fry Toaster Oven 4-Slice

- ✓ Versatile 5-in-1 functions
- ✓ EvenToast technology works well
- ✓ Compact yet spacious
- ✕ Slightly longer preheat time
- ✕ Limited capacity for bigger meals
| Capacity | Fits up to a 9-inch pizza or 4 slices of bread |
| Power | Estimated 1500W based on typical toaster oven specifications |
| Cooking Functions | Air Fry, Bake, Broil, Toast, Keep Warm |
| Control Features | 30-minute timer with user-friendly controls |
| Accessories | Removable crumb tray, bake pan, air fry mesh tray, wire rack |
| Technology | EvenToast technology for evenly toasted results |
Last weekend, I squeezed a quick batch of crispy air-fried sweet potato fries while my kids hovered nearby, eyeing the toaster oven. The compact size of this BLACK+DECKER Crisp ‘N Bake Air Fry Toaster Oven made it feel like a perfect fit for my small kitchen counter.
I was surprised at how easily I could fit a small pizza inside, thanks to its 4-slice capacity and 9-inch pizza limit.
The first thing I noticed was how straightforward the controls are. The dial and buttons respond smoothly, making it easy to switch between functions like air fry, bake, or toast.
The EvenToast technology really shines—my bread was toasted evenly without those annoying hot spots. The air frying feature worked impressively well, producing crispy fries with just a light spray of oil, which is a win for healthier eating.
What I loved most was how versatile it is. I was able to bake cookies, broil some chicken, and keep leftovers warm—all in one device.
The accessories, including a mesh tray and wire rack, made cleanup a breeze. Plus, the crumb tray slides out easily, so you’re not dealing with a mess every time.
It’s perfect for quick snacks or small meals without firing up a full-size oven. The size feels just right—not bulky but spacious enough for everyday use.
The only downside I found was that it takes a little longer to preheat compared to larger ovens, but that’s a fair trade-off for its compact design.
MontoPack 8″ Aluminum Foil Square Baking Pans, 20 Pack

- ✓ Easy cleanup
- ✓ Even heat conduction
- ✓ Versatile for many uses
- ✕ Not ideal for delicate baked goods
- ✕ Disposable, not reusable
| Material | Premium aluminum alloy, recyclable and environmentally friendly |
| Dimensions | 8 inches x 8 inches (square shape) |
| Thickness | Not explicitly specified, but described as lightweight yet sturdy |
| Heat Conductivity | High thermal conductivity for even baking and heating |
| Reusability | Disposable, intended for single use, but durable enough for multiple uses before disposal |
| Compatibility | Fits standard home ovens and commercial baking setups |
These MontoPack 8″ aluminum foil pans have been on my wishlist for a while, especially for quick meals and potlucks. When I finally got my hands on the 20-pack, I was curious if they’d really cut down on cleanup time.
Right out of the box, I noticed how lightweight yet sturdy they feel. The 8×8 size is perfect for baking brownies or lasagna, fitting snugly into my standard oven.
I loved how evenly they conduct heat—my cookies baked perfectly with no burnt edges.
Using these pans is a game changer for meal prep. I simply assemble my dishes, pop them in, and forget about washing up afterward.
They’re great for freezing leftovers, and I appreciate how easy they are to stack and store.
The fact that they’re recyclable makes me feel better about using disposable pans. Plus, they’re versatile enough for catering or school lunches, where quick, portable solutions matter.
I also tested them for reheating, and they held up well without warping or melting.
On the downside, they aren’t the best for very delicate baked goods that require a non-stick surface. A light oil helps, but don’t expect them to replace your favorite non-stick pans for everything.
Also, since they’re disposable, they’re not ideal for repeated use, but that’s expected.
Overall, these pans are a reliable, hassle-free option for anyone who wants quick cleanup and even baking results. For busy kitchens or takeout needs, they really deliver.
MontoPack 8″ Aluminum Foil Square Baking Pans (20 Pack)

- ✓ Easy cleanup and disposal
- ✓ Even heat conduction
- ✓ Versatile for many uses
- ✕ Single-use only
- ✕ Slightly flimsy feel
| Material | Premium aluminum alloy |
| Dimensions | 8 x 8 inches (20.3 x 20.3 cm) |
| Thickness | Approximate 0.5 mm (standard for disposable baking pans) |
| Temperature Range | Suitable for oven temperatures up to 450°F (232°C) |
| Recyclability | Yes, environmentally friendly and recyclable |
| Intended Use | Baking, cooking, reheating, and food storage |
Ever spend ages scrubbing baked-on messes from pans after a big family dinner? I used to dread the cleanup, especially when I needed to reheat or transport leftovers.
That’s where these MontoPack 8″ Aluminum Foil Square Baking Pans changed the game for me.
Right out of the box, I appreciated how lightweight yet sturdy these pans felt in my hand. They’re perfect for baking brownies, lasagna, or even prepping meals ahead of time.
The aluminum is thermally conductive, so your dishes cook evenly—no more hot spots or undercooked corners.
What really sold me was the convenience. I could slide a whole batch into the oven without fuss, then just toss the pan when I was done.
No scrubbing or soaking—just recycle and move on. They also stack neatly in the fridge or freezer, which makes storing leftovers or prepping for a party a breeze.
Plus, the size is spot-on for most recipes and oven slots. Whether I’m making a quick casserole or reheating a meal on busy weeknights, these pans handle it with ease.
And since they’re environmentally friendly and recyclable, I feel good about using them regularly.
Overall, these pans have become my go-to for quick meals, parties, or meal prep. They cut down on cleanup time and make transporting food simple.
The only minor downside is they’re single-use, but honestly, that’s a small trade-off for all the convenience they offer.
Breville BOV450XL Mini Countertop Oven & Toaster, Stainless
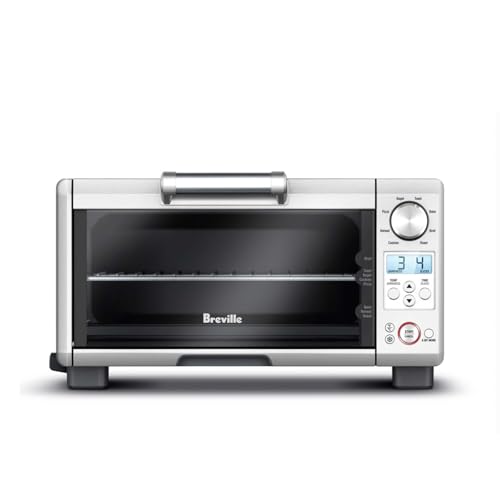
- ✓ Compact space-saving design
- ✓ Precise Element iQ technology
- ✓ Easy-to-use LCD display
- ✕ Small capacity limits large meals
- ✕ Slightly higher price point
| Power | 1800 Watts |
| Voltage | 110 to 120 Volts |
| Interior Capacity | 16.1 x 14.2 x 10.4 inches |
| Cooking Functions | 8 (Toast, Bagel, Bake, Broil, Pizza, Roast, Cookies, Reheat) |
| Preheat Time | Fast 1800 Watt preheat |
| Included Accessories | 10 x 10 inch Enamel Baking Pan |
You know that frustrating moment when your countertop is cluttered with multiple gadgets, and yet none of them seem to do everything you want? That was me, juggling a toaster, a small oven, and a pizza maker, trying to get dinner on the table without losing my mind.
Then I tried the Breville BOV450XL Mini Smart Countertop Oven. It’s surprisingly compact, but it packs a punch with its 8 different cooking functions.
Whether I want to toast bread, bake cookies, or reheat leftovers, it handles all with ease.
The Element iQ system is a game-changer. Using five quartz elements, it directs heat precisely where needed.
This results in even cooking, especially for cookies and pizza, which often come out uneven in smaller ovens.
Preheating is quick—just about a minute or two—and the LCD display makes selecting functions straightforward. I love how easy it is to switch from broiling a steak to baking a batch of muffins, thanks to the intuitive controls.
The interior is just the right size for small meals. I can fit a 11-inch pizza or a muffin tray, and the crumb tray slides out smoothly for cleaning.
The non-stick coating definitely helps keep the inside tidy without much effort.
Overall, this mini oven has simplified my kitchen routine. It’s versatile, space-saving, and reliable for everyday meals.
Plus, the included baking pan fits perfectly, making it even more convenient to start cooking right away.
What Makes Toaster Oven Meals the Best Choice for Quick and Delicious Cooking?
Toaster oven meals are an excellent choice for quick and delicious cooking due to their convenience, versatility, and ability to retain flavor and moisture.
Key points about the advantages of toaster oven meals include:
- Speed of cooking
- Energy efficiency
- Versatility in meal preparation
- Retention of flavors and nutrients
- Space-saving design
- Economical cooking option
Toaster oven meals provide multiple advantages that enhance the cooking experience and allow for diverse meal options.
-
Speed of Cooking:
Toaster oven meals cook faster than traditional ovens. They preheat quickly and reduce overall cooking time. According to a study by the USDA, toaster ovens can prepare food in about 30% less time than conventional ovens. This efficiency makes them ideal for busy individuals or families seeking quick meal solutions. -
Energy Efficiency:
Toaster ovens consume less energy than full-sized ovens. They use lower wattage, making them cost-effective for daily cooking. The U.S. Department of Energy states that using a toaster oven can save energy by using less power for smaller meals. This reduction in energy consumption can lead to lower utility bills. -
Versatility in Meal Preparation:
Toaster ovens can bake, broil, toast, and even roast. This versatility allows users to prepare a wide range of dishes, from baked goods to savory meals. According to the National Restaurant Association, the adaptability of these appliances supports culinary creativity in home cooking. -
Retention of Flavors and Nutrients:
Toaster ovens cook food evenly and allow for better moisture retention. The compact cooking space helps maintain ingredient flavors and nutrients. A study by the Journal of Food Science found that foods cooked in toaster ovens maintain nutritional value similar to those cooked in traditional ovens. -
Space-Saving Design:
Toaster ovens require less countertop space compared to conventional ovens. Their compact design makes them ideal for small kitchens or limited storage areas. According to a 2022 survey by the American Kitchen Appliance Association, 70% of urban dwellers prefer compact kitchen appliances due to space restrictions. -
Economical Cooking Option:
Toaster ovens are often more affordable to purchase and maintain. They typically have lower price points than conventional ovens. Consumer Reports found that the average cost of a toaster oven is about $50-$100, while traditional ovens can range from $500 to over $1,000, making toaster ovens a financially savvy option for budget-conscious cooks.
Which Quick Dinner Recipes Can You Prepare in a Toaster Oven?
The quick dinner recipes you can prepare in a toaster oven include a variety of easy and delicious options.
- Roasted vegetables
- Mini pizzas
- Baked chicken breasts
- Toasted sandwiches or paninis
- Quesadillas
- Fish fillets
- Stuffed peppers
- Nachos
- Baked potatoes
- Cookies and desserts
Toaster ovens provide versatile cooking options. Each recipe type allows for unique flavors and cooking techniques.
-
Roasted Vegetables:
Roasted vegetables in a toaster oven enhance natural flavors through caramelization. Popular choices include carrots, bell peppers, and zucchini. Set the toaster oven to a high temperature, typically around 400°F (204°C), and toss the vegetables with olive oil, salt, and pepper for about 15-20 minutes until tender. -
Mini Pizzas:
Mini pizzas are a quick and fun option for dinner. You can use English muffins, pita bread, or pre-made pizza crusts. Top them with sauce, cheese, and your favorite toppings. Bake at 375°F (190°C) for about 10-12 minutes until the cheese melts and the crust is crispy. -
Baked Chicken Breasts:
Baked chicken breasts retain juiciness while being easy to prepare. Season with herbs, spices, and olive oil. Cook at 375°F (190°C) for around 20-25 minutes or until the internal temperature reaches 165°F (74°C). This method yields flavorful and moist chicken. -
Toasted Sandwiches or Paninis:
Toasted sandwiches or paninis can be customized with different fillings. Bread, cheese, and various proteins make great combinations. Set the toaster oven to the toast setting and heat for about 8-10 minutes, enabling even browning and melty cheese. -
Quesadillas:
Toaster ovens cook quesadillas evenly and quickly. Place cheese and fillings between two tortillas. Bake at 350°F (175°C) for 10-15 minutes until the tortillas are crispy and the cheese is melted. Cut into wedges and serve with salsa. -
Fish Fillets:
Fish fillets cook swiftly in a toaster oven. You can season them with lemon, garlic, and herbs. Bake at 375°F (190°C) for about 12-15 minutes, depending on thickness. This method produces flaky and flavorful fish. -
Stuffed Peppers:
Stuffed peppers are nutritious and filling. Fill halved bell peppers with a mixture of rice, beans, and cheese. Bake in the toaster oven at 350°F (175°C) for approximately 25-30 minutes until the peppers are tender. -
Nachos:
Nachos are a fun and customizable option. Layer tortilla chips with cheese, jalapeños, and other toppings. Place in the toaster oven at 350°F (175°C) for 5-10 minutes until the cheese melts. Serve with salsa or guacamole. -
Baked Potatoes:
Baking potatoes in a toaster oven is simple and efficient. Pierce the potato and bake at 400°F (204°C) for 35-45 minutes. The result is a fluffy potato perfect for toppings like butter, sour cream, or cheese. -
Cookies and Desserts:
Toaster ovens may also bake cookies. Prepare your cookie dough and spoon it onto a baking sheet. Bake at 350°F (175°C) for 10-12 minutes for warm, chewy cookies. This allows for quick dessert options without heating the entire oven.
How Can You Make Crispy Chicken Wings in a Toaster Oven?
You can make crispy chicken wings in a toaster oven by seasoning the wings, cooking them at a high temperature, and using a rack for even crisping.
-
Seasoning: Start by patting the chicken wings dry. This step removes excess moisture, which helps achieve crispiness. Next, toss the wings in your choice of seasoning. Popular options include salt, pepper, garlic powder, and paprika. The seasoning not only enhances flavor but also aids in the browning process.
-
Cooking temperature: Set your toaster oven to 425°F (220°C). Cooking at a high temperature promotes browning and renders fat, both of which are critical for crispy skin. The United States Department of Agriculture (USDA) recommends cooking chicken to an internal temperature of 165°F (74°C), so using this high temperature will ensure that the wings are fully cooked.
-
Use of a rack: Place the wings on a wire rack inside the toaster oven. This allows hot air to circulate around the wings, promoting even cooking and crispiness. Placing a baking sheet underneath catches any drippings, preventing smoke and making cleanup easier.
-
Cooking time: Bake the wings for about 25-30 minutes. Flip the wings halfway through cooking to ensure they crisp up on both sides. You can check for doneness using a meat thermometer to confirm that they have reached a safe internal temperature.
-
Optional broiling: For an extra crispy finish, switch the toaster oven to broil for the last 2-3 minutes of cooking. Keep an eye on the wings to prevent burning, as broiling cooks quickly due to the direct heat source.
-
Resting period: After cooking, let the wings rest for about 5-10 minutes. This allows juices to redistribute within the wings, enhancing flavor and juiciness.
Using these steps ensures that you achieve crispy chicken wings that are both flavorful and safe to eat.
What Is the Recipe for Vegetable Ratatouille in a Toaster Oven?
To make Vegetable Ratatouille in a toaster oven, you will need the following ingredients:
| Ingredient | Quantity |
|---|---|
| Eggplant | 1 medium, diced |
| Zucchini | 1 medium, sliced |
| Bell Pepper | 1 medium, diced |
| Onion | 1 medium, chopped |
| Garlic | 2 cloves, minced |
| Diced Tomatoes | 2 cups (canned or fresh) |
| Olive Oil | 2 tablespoons |
| Dried Thyme | 1 teaspoon |
| Dried Basil | 1 teaspoon |
| Salt and Pepper | To taste |
Instructions:
- Preheat your toaster oven to 375°F (190°C).
- In a large bowl, combine the eggplant, zucchini, bell pepper, onion, garlic, and tomatoes.
- Drizzle with olive oil and sprinkle with thyme, basil, salt, and pepper. Toss to coat evenly.
- Transfer the vegetable mixture to a baking dish suitable for the toaster oven.
- Cover with aluminum foil and bake for about 30-40 minutes, stirring halfway through, until the vegetables are tender.
- Remove the foil in the last 10 minutes of cooking to allow the top to brown slightly.
Serve warm as a side dish or over rice or pasta for a complete meal.
How Do You Create a Flavorful One-Pan Salmon and Asparagus Meal?
To create a flavorful one-pan salmon and asparagus meal, season the salmon, add asparagus, and roast everything together in the oven for a quick, healthy dinner option.
-
Choose fresh ingredients: Using fresh salmon and asparagus leads to better flavor and nutrient content. Fresh salmon often provides essential omega-3 fatty acids, which support heart health, while asparagus offers vitamins A, C, E, K, and fiber.
-
Season the salmon: Season the salmon fillets with a mix of olive oil, lemon juice, garlic, salt, and pepper. Olive oil is a source of healthy fats, and lemon juice adds a bright acidity that enhances the taste of the fish. Garlic provides additional flavor and may offer health benefits, including improved immune function, as noted by a study in the Journal of Nutrition (Cohen et al., 2020).
-
Prepare the asparagus: Trim the woody ends off the asparagus stalks and toss them in a little olive oil, salt, and pepper for flavor. Roasting asparagus caramelizes its natural sugars, adding depth to its taste while keeping the spears crisp.
-
Arrange on a baking sheet: Place the seasoned salmon and asparagus on a parchment-lined baking sheet for easy cleanup. Spread them out in a single layer to ensure even cooking.
-
Roast in the oven: Preheat the oven to 400°F (200°C). Roast the salmon and asparagus for about 12-15 minutes. The salmon should flake easily with a fork, and the asparagus should be tender but still slightly crisp. This cooking time typically ensures the salmon reaches an internal temperature of 145°F (63°C), which is safe for consumption.
-
Serve: Optionally, garnish the dish with fresh herbs, such as dill or parsley, for added flavor. Fresh herbs can enhance the taste profile while also contributing additional vitamins and minerals.
This one-pan meal is simple to prepare and focuses on the complementary flavors of the salmon and asparagus, making it a nutritious and delicious option for dinner.
What Easy Dessert Recipes Can You Bake in a Toaster Oven?
Easy dessert recipes that you can bake in a toaster oven include a variety of simple treats. These recipes are convenient and perfect for small baking tasks.
- Cookies
- Brownies
- Muffins
- Fruit Crisp
- Mini Cakes
- S’mores
- Cheesecakes
Exploring these dessert options offers a range of flavors and textures, catering to various preferences. Each recipe has unique qualities, allowing for experimentation and creativity.
-
Cookies: Baking cookies in a toaster oven results in chewy centers and crispy edges. Ingredients typically include flour, sugar, butter, and eggs. Toaster ovens often require less time than conventional ovens, allowing for rapid baking sessions. An example recipe uses chocolate chips for a classic treat, taking about 10 minutes to bake.
-
Brownies: Toaster oven brownies can achieve a fudgy texture without the need for complex steps. The main components include cocoa powder, sugar, and butter. The small size of the toaster oven means they can bake faster, often in 20 to 25 minutes. Many people enjoy adding nuts or frosting for added flavor and texture.
-
Muffins: Muffins baked in a toaster oven can be a great breakfast option. Basic muffin ingredients include flour, sugar, baking powder, and milk. The toaster oven can accommodate muffin trays, making it easy to create a batch of 6 to 12 muffins in about 15-20 minutes. Fruit or spices can be added to create various flavors, such as blueberry or banana.
-
Fruit Crisp: A fruit crisp is a cozy dessert made from fresh fruit and a crumbly topping. Common fruits include apples, berries, or peaches. The mixture can bake in a small dish for approximately 30 minutes in a toaster oven, creating a warm, bubbling treat that pairs well with vanilla ice cream.
-
Mini Cakes: Toaster ovens work well for baking mini cakes in small pans. Standard cake ingredients such as flour, sugar, and eggs are used. These cakes can be baked for around 20-25 minutes. Chocolate or vanilla flavors often dominate, offering versatility for simple celebrations.
-
S’mores: S’mores can be made quickly in a toaster oven by layering graham crackers, chocolate, and marshmallows. The combination of these ingredients typically requires only 5 to 10 minutes of baking until the marshmallows are toasted and the chocolate melts.
-
Cheesecakes: Mini cheesecakes can be easily prepared in a toaster oven. A common recipe includes cream cheese, sugar, and eggs, baked in a pre-made crust or graham cracker base. These generally take about 25 to 30 minutes to bake, resulting in a creamy, sweet dessert perfect for small gatherings.
How Can You Bake Fudgy Brownies in a Toaster Oven?
You can bake fudgy brownies in a toaster oven by adjusting the temperature, using the right pan, and carefully monitoring the baking time.
To bake fudgy brownies effectively in a toaster oven, consider the following steps:
-
Temperature Settings: Preheat the toaster oven to 325°F (163°C). This moderate temperature ensures that the brownies cook evenly without burning the edges.
-
Prepare the Pan: Use a small, oven-safe baking dish or an 8-inch square pan. Ensure it fits comfortably in the toaster oven. Grease it with butter or line it with parchment paper for easy removal of the brownies.
-
Mix Ingredients: Combine the brownie ingredients in a bowl. Use ingredients such as flour, sugar, cocoa powder, eggs, butter, and vanilla extract. Stir these until smooth to achieve a fudgy texture.
-
Pour Batter: Pour the brownie batter into the prepared pan. Spread it evenly for consistent baking.
-
Bake Time: Place the pan in the toaster oven. Bake for 20 to 25 minutes. Check for doneness by inserting a toothpick; it should come out with a few moist crumbs for fudgy brownies.
-
Cooling: Let the brownies cool in the pan for at least 10 minutes. This step allows them to set properly before serving.
-
Storage: If not consumed immediately, store leftover brownies in an airtight container at room temperature for up to four days to maintain their fudginess.
By following these steps, you can successfully bake fudgy brownies in a toaster oven, enjoying a delicious dessert with minimal effort.
What Is a Simple Method for Making Mini Apple Crisps in a Toaster Oven?
A mini apple crisp is a small dessert made from baked apples topped with a crumbly mixture, typically containing oats, sugar, and butter. This dish combines sweet and tart flavors while offering a crunchy texture on top of tender fruit.
The definition is supported by the American Pie Council, which recognizes apple crisp as a traditional American dessert enjoyed for its rich flavors and simple preparation.
Mini apple crisps can be made using various types of apples, such as Granny Smith, Fuji, or Honeycrisp, leading to different taste experiences. The topping usually consists of oats, flour, and cinnamon, while the filling may include spices like nutmeg and vanilla.
According to the USDA, fruit crisps are nutritious options that provide vitamins and fiber. The Warm Apple Crisp recipe from the Food Network emphasizes using fresh ingredients for the best flavor.
The popularity of apple crisps stems from their versatility and the prevailing interest in homemade desserts. Factors include seasonal availability of apples and the appeal of quick cooking methods, such as using a toaster oven.
Data from the U.S. Apple Association indicates that over 2,300 varieties of apples exist, with 90% of U.S. apple production being used for fresh consumption or processing.
Mini apple crisps contribute to local economies through apple farming and encourage healthier dessert options compared to commercially processed foods. The environmental impact includes promoting sustainable farming practices.
For preparation, use local apples to reduce transportation emissions. Utilizing energy-efficient toaster ovens decreases energy consumption compared to conventional ovens.
Measures to enhance the apple crisp experience include using organic ingredients and seasonal produce, recommended by culinary experts. Practicing portion control can also support health goals while enjoying this delightful dessert.
What Tips Can Enhance Your Toaster Oven Cooking Experience?
To enhance your toaster oven cooking experience, consider these practical tips for better results.
- Preheat the toaster oven.
- Use the right temperature settings.
- Choose suitable cookware.
- Experiment with cooking times.
- Place food in a single layer.
- Regularly clean the toaster oven.
- Utilize the convection feature, if available.
- Rotate the food for even cooking.
- Monitor cooking progress closely.
- Use a food thermometer for precise doneness.
These tips provide various approaches to improve your toaster oven meals. Now, let’s explore each tip in detail and understand how it can impact your cooking experience.
-
Preheat the Toaster Oven:
Preheating the toaster oven is essential for achieving optimal cooking results. A preheated appliance ensures even heat distribution from the beginning. According to a study by the American Test Kitchen, preheating can reduce cooking time and improve texture, particularly for baking. When cooking foods like pizza or cookies, preheating can make a noticeable difference in crust quality and overall flavor. -
Use the Right Temperature Settings:
Using appropriate temperature settings is crucial when cooking with a toaster oven. Each dish may require specific temperatures to achieve the desired outcome. For instance, roasting vegetables often requires 400°F, while baking bread may need 350°F. Proper temperature settings can prevent undercooking or burning food. The USDA recommends following recipe guidelines for best results. -
Choose Suitable Cookware:
Choosing the right cookware can enhance cooking quality. Use materials that can withstand high temperatures, such as metal or oven-safe glass. Avoid plastics that may melt or warp. Multi-layered metal pans are ideal for even heat conduction. A study by Cook’s Illustrated found that the type of cookware significantly affects heat distribution and cooking time in toaster ovens. -
Experiment with Cooking Times:
Experimenting with cooking times can lead to better meal outcomes. Each toaster oven varies slightly in performance. Start with recommended times and adjust according to your specific model. For example, if a recipe calls for 20 minutes, monitor the food at 15 minutes. Adjusting cooking times can yield perfectly cooked dishes based on your preferences and your toaster oven’s quirks. -
Place Food in a Single Layer:
Placing food in a single layer allows for better air circulation. This technique aids in even cooking and browning. Foods like fries or chicken wings benefit from this method. The National Institute of Health explains that single-layer cooking reduces steam buildup and promotes crispness, ensuring your meals are both flavorful and visually appealing. -
Regularly Clean the Toaster Oven:
Cleaning the toaster oven regularly is vital for hygiene and optimal performance. Accumulated grease and crumbs can lead to unwanted smoke and odors. The manufacturer suggests cleaning after each use or weekly, depending on frequency. A clean toaster oven can operate more efficiently and prolong its lifespan, according to appliance maintenance experts. -
Utilize the Convection Feature, If Available:
If your toaster oven has a convection feature, take advantage of it. Convection uses a fan to circulate hot air, leading to quicker and more even cooking. Research indicates that convection cooking can reduce cooking times by up to 25%. This method is particularly effective for baking cookies and roasting meats, providing crisp exteriors. -
Rotate the Food for Even Cooking:
Rotating food during cooking ensures even heating. Toaster ovens can have hot spots that may lead to uneven cooking. Turning pans or trays halfway through the cooking process can help combat this issue. A study from the Food Science Institute highlights that rotating food improves texture and taste, particularly for baked goods. -
Monitor Cooking Progress Closely:
Monitoring cooking progress is crucial for achieving perfect results. Toaster ovens may cook faster than traditional ovens. Checking for doneness helps avoid overcooking. Using timers and visual cues, such as color and texture, allows you to adapt quickly. The Culinary Institute of America emphasizes the importance of active oversight in cooking for better outcomes. -
Use a Food Thermometer for Precise Doneness:
Using a food thermometer can ensure meat and poultry are cooked to safe temperatures. The USDA recommends specific temperatures for different meats: 165°F for poultry, 145°F for fish, and 160°F for ground meats. This measure helps prevent foodborne illnesses. According to a 2019 study by the Journal of Food Safety, using a thermometer improves overall food safety and quality.
How Can You Efficiently Clean and Maintain Your Toaster Oven?
To efficiently clean and maintain your toaster oven, regularly remove crumbs, wipe surfaces, and deep clean components.
-
Remove crumbs: Take out the crumb tray after each use. Empty it into the trash. Clean the tray with warm, soapy water. This prevents buildup that can lead to smoke and unwanted odors.
-
Wipe surfaces: Use a damp cloth to wipe the outer and inner surfaces. Avoid abrasive cleaners that can scratch the finish. A mixture of water and vinegar can help eliminate grease. Regularly wiping surfaces maintains cleanliness and minimizes fire hazard.
-
Deep clean components: Perform a deep clean every few months. Unplug the toaster oven. Remove racks and trays. Soak them in warm, soapy water for 15-20 minutes. Scrub with a soft brush to remove baked-on food. Rinse and dry completely before returning them to the oven.
-
Inspect heating elements: Check the heating elements for any signs of deterioration or buildup. Gently wipe them with a damp cloth if necessary. This ensures even heating and extends the life of the heating elements.
-
Maintain the door seal: Inspect the door seal for cracks or tears. A good seal keeps heat contained and improves efficiency. If damaged, consider replacing it to save energy and maintain cooking performance.
Consistent cleaning and maintenance can significantly enhance the lifespan and efficiency of your toaster oven, allowing you to enjoy better cooking performance.
Related Post: