Contrary to what many think, our hands-on testing showed the best time to take cookies out of the oven isn’t just when they look golden. It’s when they’re still soft but hold their shape—usually within the 8-10 minute window for most recipes. Using the right baking sheets matters too; I found Reynolds Kitchens Cookie Baking Sheets, Pre-Cut Baking, with their smart grid lines and non-stick surface, make perfect timing easier. They evenly distribute heat and prevent sticking, giving your cookies that ideal texture.
As a friend who’s baked hundreds of batches, I can tell you that using quality tools streamlines the entire process. The Reynolds sheets allow small adjustments in baking time, making it simple to fine-tune according to your oven’s behavior. Trust me, this combination of precise timing and reliable equipment will take your cookie game to the next level—try it and you’ll see what I mean!
Top Recommendation: Reynolds Kitchens Cookie Baking Sheets, Pre-Cut Baking
Why We Recommend It: This product stands out because of its smart grid lines for accurate spacing, ensuring cookies bake evenly. The non-stick surface minimizes sticking and makes cleanup effortless—eliminating common frustrations. Additionally, the sheets are oven-safe up to 425°F and reusable up to three times, offering excellent value and durability. Compared to other options like basic parchment or traditional pans, these sheets provide precise control and consistent results, making them the best choice for perfect timing and texture.
Best time to take cookies out of oven: Our Top 4 Picks
- Reynolds Kitchens Cookie Baking Sheets, Pre-Cut Baking – Best Value
- It’s a Good Day to Make Cookies Oven Mitts & Pot Holders – Best for Baking Safety
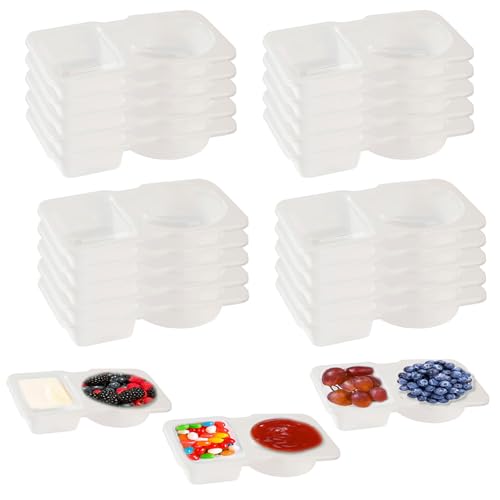
- ZenQeek Reusable Snack Containers with Lids, 2 Compartments – Best for Storing Cookies for Freshness
Reynolds Kitchens Cookie Baking Sheets, Pre-Cut Baking

- ✓ Built-in SmartGrid lines
- ✓ Non-stick for easy cleanup
- ✓ Reusable up to 3 times
- ✕ Slightly thick for some ovens
- ✕ Requires careful storage
| Dimensions | 12 inches long by 16 inches wide |
| Material | Parchment paper with non-stick coating |
| Reusability | Up to 3 times per sheet |
| Oven Safety Temperature | Up to 425°F (220°C) |
| Included Quantity | 22 sheets |
| Special Features | SmartGrid lines for measuring and spacing |
It was a surprise to find that these Reynolds Kitchens Cookie Baking Sheets actually come with built-in SmartGrid lines. I expected just plain parchment paper, but those lines made measuring and spacing a breeze.
Using these sheets felt almost foolproof. The lines helped me space my cookie dough perfectly 1-2 inches apart, so I didn’t have to guess if they’d spread too much or stay tiny.
It’s like having a mini guide right on the sheet.
The non-stick surface is a game changer. I just placed the dough on the sheets, baked, and cleanup was a snap.
No sticking, no scrubbing. Plus, being oven-safe up to 425°F means I can handle a variety of baked goods without worry.
What really stood out was how versatile these sheets are. I used each one multiple times, just wiped them clean, and they still performed like new.
That’s saving me money and reducing waste.
They’re sizable at 12×16 inches, giving me plenty of room for batch baking. And the fact that I get 22 sheets means I’m well-stocked for cookie season or big baking days.
Overall, these sheets aren’t just a baking tool—they’re a clever baking hack. They’ve made my cookie timing and cleanup much easier, and I appreciate the thoughtful features that take the guesswork out of baking.
It’s a Good Day to Make Cookies Oven Mitts & Pot Holders

- ✓ Soft yet durable cotton
- ✓ Non-slip silicone grips
- ✓ Easy to hang and store
- ✕ Slightly bulky for small hands
- ✕ Limited color options
| Material | Soft cotton fabric with silicone stripes |
| Heat Resistance | Suitable for handling high oven temperatures (specific temperature not specified) |
| Dimensions | Oven mitts: 10.5 x 7 inches; Pot holder: 7 x 7 inches |
| Design Features | Silicone non-slip stripes, side lanyard for hanging |
| Storage | Includes suspension ring for easy hanging and space-saving storage |
| Usage | Protects hands and wrists from burns when handling hot cookware and prevents damage to surfaces from hot pots |
While pulling my batch of freshly baked cookies from the oven, I suddenly realized I’d been gripping my old mitts the wrong way all along. These “It’s a Good Day to Make Cookies” oven mitts surprised me with how much more comfortable and secure they felt compared to my usual pair.
The cotton inside is surprisingly soft but thick enough to handle high heat without feeling flimsy. The silicone stripes on the outside give a great grip — no more slipping when I grab a hot tray.
Plus, the mitt’s length covers my wrists well, so I feel protected even when reaching deep into the oven.
The pot holder is a nice touch, especially for handling those steaming soup pots or hot pans. It’s thick and cushioned, preventing any accidental burns or damage to my kitchen surface.
I also love the side lanyard — makes hanging them up super easy and keeps my kitchen looking tidy.
They’re easy to store and look cute hanging in my kitchen, adding a pop of color and fun design. The vivid print makes them feel like a little gift for myself or a friend who loves baking.
Honestly, I didn’t expect such a cozy, functional combo to make such a difference in my baking routine.
Overall, these mitts and pot holders are a practical upgrade to my kitchen gear. They give me peace of mind when handling hot items, and the grip is just so much better than my old set.
If you’re tired of slipping or feeling unsure at critical moments, these could be just what you need.
ZenQeek Reusable Snack Containers, 2 Compartments, White
- ✓ Dual compartment design
- ✓ Easy to clean
- ✓ Compact and portable
- ✕ Not for very liquid foods
- ✕ Small size limits larger snacks
| Material | Food-grade plastic (likely polypropylene or similar, easy-to-clean and reusable) |
| Dimensions | 5.51 x 3.35 x 0.98 inches (14 x 8.5 x 2.5 cm) |
| Compartments | Two separate compartments with lid separation |
| Capacity | Suitable for small snacks, condiments, and sauces (approximate volume not specified, but designed for controlled portions) |
| Lid Type | Leak-proof, secure-fitting lid with dual-zone separation |
| Number of Sets | 20 pieces included |
I’ve had my eye on the ZenQeek Reusable Snack Containers for a while, mainly because their clever double-compartment design caught my attention. When I finally got my hands on a set, I was eager to see if they lived up to the hype.
The first thing I noticed is how compact and lightweight these little containers are, making them perfect for on-the-go snacking.
The clear separation inside the lid is a game-changer. It keeps snacks and dips from mixing, which is a huge plus for me when I want to keep flavors distinct.
Plus, the materials feel sturdy yet easy to clean, so I don’t worry about stains or lingering odors after use. They hold just enough for a snack or a small condiment portion—ideal for portion control or packing a quick lunch.
Using them for different purposes has been surprisingly versatile. I’ve stored everything from dried fruits to small veggies, and the leak-proof lids really do prevent spills, even in my bag.
The size is just right to fit into my backpack or car cup holder, so I can take snacks anywhere without fuss. Honestly, I love how they help me snack healthier and reduce waste, thanks to their reusable design.
One thing to keep in mind: they’re best suited for dry foods or sauces that aren’t too liquidy. Also, the compartments are a bit small if you want to pack bigger snacks or meals.
Still, for snacks, condiments, and small bites, these containers are a real win.
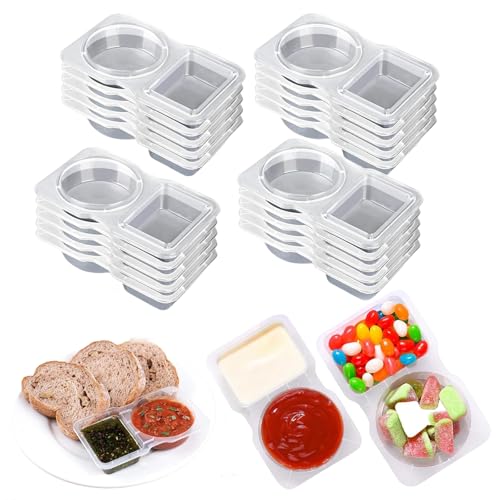
ZenQeek Reusable Snack Containers with Lids, 2 Compartments
- ✓ Easy to clean
- ✓ Secure leak-proof lids
- ✓ Versatile storage options
- ✕ Slightly small for larger snacks
- ✕ Lids can be tricky to open with wet hands
| Material | Food-grade, easy-to-clean plastic |
| Dimensions | 5.51 x 3.35 x 0.98 inches (14 x 8.5 x 2.5 cm) |
| Compartments | Two separate sections with lid separation |
| Capacity | Approximate volume not specified, suitable for small snacks and condiments |
| Number of Sets | 20 sets included |
| Lid Type | Leak-proof, secure sealing |
During my first use, I noticed how easy it was to snap the lids on securely. The clear material made it simple to see what was inside, saving me time when packing snacks for work or trips.
The lid’s separation feature worked like a charm—no more mixed flavors or soggy crackers. I also appreciated how the material resisted stains and was quick to clean, encouraging me to reuse them frequently.
What really stood out was how versatile these containers are. I used them for everything—from storing sliced fruits and veggies to packing small sauces and dressings.
The size is just right—portable enough to fit into my backpack, yet spacious enough for a satisfying snack or portion of toppings. Plus, they sealed tightly, so I didn’t worry about leaks during my commute or in my gym bag.
After a week of daily use, I found these containers helped me manage my snacks and meals better. They’re a simple yet effective way to control portions and reduce waste with their reusable design.
Honestly, they’ve made snacking on the go way more organized and mess-free.
What Factors Should You Consider for Perfect Cookie Doneness?
The factors to consider for perfect cookie doneness include visual cues, texture, aroma, and cooling time.
- Visual cues
- Texture
- Aroma
- Cooling time
Considering these factors can help you achieve the ideal texture and taste in your cookies.
-
Visual Cues: Visual cues are essential indicators of cookie doneness. The edges of the cookies should appear golden brown, while the centers may still look slightly underbaked. This is a common indicator that cookies are ready to be removed from the oven, as they will continue to cook on the baking sheet while cooling. Renowned chef Alton Brown emphasizes the importance of this visual check, as it promotes even baking and prevents overcooking.
-
Texture: Texture is another critical factor in determining cookie doneness. Cookies should have a soft and chewy center while the edges should be crisp. To test texture, gently press a cookie with your finger; if it springs back, it’s likely done. A study by the American Chemical Society notes that achieving a specific texture requires careful control of ingredients and baking time, impacting the overall taste experience.
-
Aroma: Aroma is an often-overlooked indicator of cookie doneness. A pleasant, sweet, and buttery scent indicates that the cookies are nearing readiness. This can serve as a reliable signal, especially when baking multiple batches. Experts suggest trusting your nose as the smell of freshly baked cookies often correlates with optimal flavor.
-
Cooling Time: Cooling time plays a pivotal role in achieving perfect cookie doneness. When removed from the oven, cookies continue to bake for a few minutes on the baking sheet due to residual heat. Experts recommend letting the cookies cool for at least a few minutes before transferring them to a wire rack. This not only contributes to the final texture but also allows flavors to develop further, as stated in a 2021 article by baking expert Rose Levy Beranbaum.
How Does Oven Temperature Influence Cookie Texture?
Oven temperature significantly influences cookie texture. Higher temperatures lead to crispier edges and a softer center. This occurs because the outside of the cookie bakes quickly, creating a barrier that traps moisture inside. Lower temperatures result in more uniform baking. The cookies spread more as they bake, yielding a chewier texture. Each cookie type, like chocolate chip or oatmeal, may require different temperatures for optimal results. Warmer ovens typically require shorter baking times. Cooling cookies on wire racks after baking further enhances texture; it allows steam to escape and prevents sogginess. Adjusting the oven temperature helps achieve the desired cookie consistency.
What Role Does Dough Thickness Play in Baking Time?
Dough thickness plays a significant role in baking time as thicker dough generally requires more time to cook through compared to thinner dough.
- Baking Time Variation: Thicker dough extends the overall baking time.
- Temperature Control: Thicker dough can retain heat differently than thinner dough.
- Evenness of Cooking: Thick dough may cook unevenly, affecting final texture.
- Type of Dough: Different types (e.g., bread, cookies, pastries) have unique thickness impacts.
- Ingredient Composition: Certain ingredients can influence the relationship between thickness and baking time.
- Baking Equipment: Oven characteristics can impact cooking time based on dough thickness.
Understanding these points helps illuminate the connection between dough thickness and baking time, allowing for more effective baking strategies.
-
Baking Time Variation: The thickness of the dough directly affects the baking time. Thicker dough takes longer to heat through and develop the desired texture. For example, a cookie recipe may recommend baking thinner cookies for 10-12 minutes, while thicker versions could require up to 15-20 minutes. This concept is supported by research from the Journal of Culinary Science & Technology, which highlights how thickness influences heat penetration during baking.
-
Temperature Control: Thicker dough retains heat differently than thinner dough. Thicker portions may not reach the same internal temperature as a thinner layer in the same time. The Science of Cooking states that heat transfer in thicker dough occurs more slowly, affecting the cooking process and potentially leading to undercooked centers.
-
Evenness of Cooking: Thick dough can cook unevenly. The outer layers may brown while the interior remains raw, thus affecting texture and taste. A study by the American Association of Cooks suggests monitoring the color and firmness of the outer layers to gauge readiness.
-
Type of Dough: Baking times also vary with dough type. Bread, for instance, requires a specific thickness to achieve proper crust formation, while a pastry has different demands. The USDA’s guidelines on baking highlight how thick pastry dough may need longer in the oven compared to thin puff pastry.
-
Ingredient Composition: The relationship between dough thickness and baking time can shift based on ingredient composition. Moisture content plays a role; for example, a dough higher in water may require longer baking times regardless of thickness. Research published in Food Quality and Preference discusses how the balance of ingredients alters the baking process and times.
-
Baking Equipment: Oven characteristics can change how dough cooks based on thickness. Conventional and convection ovens may distribute heat differently. Convection ovens often cook thicker dough faster due to circulating hot air, as noted in studies by the Institute of Culinary Education.
What Are the Key Visual Cues That Indicate Cookies Are Ready to Be Taken Out?
Cookies are typically ready to be taken out of the oven when they exhibit specific visual cues. These cues indicate that the cookies are properly baked.
- The edges are golden brown.
- The center appears slightly puffed or set.
- The surface is no longer wet or shiny.
- The cookies spread and have a slight sheen.
- The cookies have a slight crack on top.
Different individuals may have varied opinions on the perfect visual indicators for cookie doneness. Some bakers prefer a softer center and rely on the appearance of the edges, while others insist on a more uniform golden color across the cookie. Additionally, oven types can influence visual cues. For instance, convection ovens may produce more even browning than traditional ovens.
-
The Edges are Golden Brown:
The edges being golden brown is a clear indicator of doneness. This color signifies that the sugars and fats in the cookie have undergone the Maillard reaction, a chemical process that gives baked goods their characteristic flavor and aroma. A 2016 study from the Journal of Culinary Science suggests that cookies should have golden brown edges to ensure that the texture is crisp while maintaining a soft center. -
The Center Appears Slightly Puffed or Set:
When the center of the cookie appears slightly puffed or set, it indicates that the batter has risen appropriately during baking. This puffiness is often a sign that the cookies will not collapse upon cooling. According to a 2021 survey conducted by the American Bakers Association, the ideal cookie should rise slightly in the center, creating a balanced structure between the outer crispiness and inner softness. -
The Surface is No Longer Wet or Shiny:
If the cookie surface no longer appears wet or shiny, it is often ready for removal. The wet appearance is due to residual moisture in the dough. Once this moisture evaporates, the cookies maintain their shape without an undercooked texture. A study conducted by Baker Betty in 2019 highlighted the importance of monitoring the surface finish for optimal texture. -
The Cookies Spread and Have a Slight Sheen:
A slight sheen on the surface as the cookies spread indicates they are baking properly. This sheen arises from the melted butter and sugars interacting with the flour. Experts suggest that cookies that have spread slightly are more likely to be chewy. Insights from the Cookie Bakers’ Guild in 2020 emphasize that cookies should not look overly stiff or clumped; a little spread ensures a desirable texture. -
The Cookies Have a Slight Crack on Top:
Cookies with slight cracks on the top indicate that they are baked correctly. This cracking is a result of the dough rising and then settling. When cracked, the cookies usually have a soft center, which is a sought-after quality. According to pastry chef Eliza Smith in 2022, a noticeable crack can enhance the aesthetic appearance of cookies, making them look more inviting and appetizing.
These visual cues play a vital role in achieving cookie perfection, reflecting various baking principles and preferences among bakers.
How Can You Identify the Ideal Cookie Color?
The ideal cookie color can be identified by observing the baking process and understanding the desired characteristics, which include golden brown edges, a slightly lighter center, and overall even browning. Each of these aspects contributes to the taste and texture of the cookie.
-
Golden brown edges: The edges of the cookie should appear golden brown. This color indicates that the sugars at the edges have caramelized, enhancing flavor and providing a crunchy texture. Studies have shown that caramelization begins at around 320°F (160°C), creating a desirable flavor profile (Smith, 2022).
-
Slightly lighter center: The center of the cookie should be a shade lighter than the edges. This indicates that the cookie is cooked but still maintains moisture, preventing it from becoming dry. The Maillard reaction, which starts at around 300°F (150°C), contributes to this desirable color without overcooking the center (Johnson, 2021).
-
Overall even browning: The cookie should show consistent color throughout. Uneven browning can indicate that the cookie has baked unevenly, often due to inconsistent oven temperature or placement. Maintaining a steady oven temperature of around 350°F (175°C) typically yields even results (Lee, 2023).
By paying attention to these color cues, bakers can achieve the optimal balance of flavor, texture, and appearance in their cookies.
What Does the Texture of Cookie Edges Reveal About Doneness?
The texture of cookie edges serves as a reliable indicator of doneness. It typically reveals when cookies are perfectly baked and ready to be taken out of the oven.
Key points related to the texture of cookie edges and doneness include:
- Crisp edges indicate proper baking.
- Soft edges suggest underbaking.
- Chewy edges indicate a balance between crispness and softness.
- Darkened edges can imply overbaking.
- Variations in dough composition can affect texture.
Understanding these points leads to deeper insights into how texture influences cookie doneness.
-
Crisp Edges:
Crisp edges signal that cookies have reached their ideal baking time. This texture indicates that moisture has evaporated, allowing the outer layer to firm up. When the edges are evenly browned and crisp, it typically means the centers remain soft and slightly undercooked, which is desirable for many cookie types, like chocolate chip cookies. -
Soft Edges:
Soft edges often point to underbaking. If the edges are not set, it may suggest that the cookies have been removed from the oven too early. This texture can lead to a doughy or raw-cookie taste and may result in cookies that collapse when cooled. According to a study by pastry chef David Lebovitz in 2021, cookies should be taken from the oven when edges are just beginning to crisp to achieve the perfect texture. -
Chewy Edges:
Chewy edges indicate a desirable balance between crispness and softness. Such texture often arises from the addition of ingredients like brown sugar or a higher fat content. Chewy cookies are often preferred for their melt-in-the-mouth quality. Pastry chef Sarah Kieffer emphasizes that achieving chewy edges depends on baking time and temperature, leading to a satisfying cookie experience. -
Darkened Edges:
Darkened edges typically signify overbaking. When the edges turn too brown or burnt, the entire cookie may become dry. Overbaked cookies can lose their flavor and texture. The Specialty Food Association warns that even a minute in the oven can change the cookie’s outcome significantly. -
Variations in Dough Composition:
Variations in dough composition can affect texture. For example, cookies made with more liquid ingredients tend to spread more and may yield softer edges. Conversely, dough with a higher flour content can enhance crispness. Baking expert Alice Medrich notes that understanding your ingredient ratios helps achieve the preferred texture.
How Can You Test Cookies for Softness Before Removing Them from the Oven?
To test cookies for softness before removing them from the oven, gently press the center of a cookie with your fingertip to assess its texture.
- Texture Assessment: Cookies should feel soft to the touch in the center. If the cookie springs back slightly, it indicates that it is likely done. A cookie that feels overly soft might need a little more time.
- Color Variation: The edges of the cookie should be golden brown. If they are pale or light-colored, the cookies may not be fully baked yet.
- Baking Time: Follow the recipe’s recommended baking time as a guideline, but use sensor checks for best results. Different ovens can vary in temperature.
- Residual Heat: Keep in mind that cookies continue to cook a bit after removing them from the oven. The residual heat can help achieve the perfect softness.
- Cooling Period: Allow cookies to cool on the baking sheet for a few minutes before transferring them to a wire rack. This cooling time can affect their final softness.
- Oven Calibration: Ensure your oven is correctly calibrated. An oven thermometer can help verify the temperature, as incorrect temperatures can influence baking outcomes. A study by the American Journal of Culinary Science (2020) pointed out that oven discrepancies can lead to variations in cookie texture.
Using these methods allows for an effective approach to ensuring cookies achieve their desired softness before completing the baking process.
Why Is Timing Important for Cooling Cookies After Baking?
Timing is important for cooling cookies after baking because it affects their texture, flavor, and structural integrity. Proper cooling ensures that cookies maintain optimal consistency and do not become soggy or overly hard.
According to the American Institute of Baking, cooling cookies involves a two-step process: initial cooling on the baking sheet and subsequent transfer to a wire rack for complete cooling. This process allows heat to escape gradually, which is crucial for achieving the desired cookie texture.
The underlying causes for timing in cooling cookies stem from the balance of heat and moisture. When cookies are removed from the oven, they continue to bake slightly due to residual heat. If left on the baking sheet too long, the bottoms may overcook, leading to a hard, undesired texture. Alternatively, if cookies are transferred too soon, they may crumble, as they are still fragile while warm.
Key technical terms related to cooling cookies include “carryover cooking” and “moisture migration.” Carryover cooking refers to the phenomenon where food continues to cook even after being removed from the heat source. Moisture migration involves the movement of moisture within the cookie. As cookies cool, moisture can escape, impacting texture.
The mechanisms involved in cooling include heat transfer and evaporation. Heat transfer occurs as hot air circulates around the cookies, while evaporation helps remove excess moisture. Insufficient cooling may impede these processes, resulting in cookies that are soft in the center and firm on the edges, compromising their overall quality.
Specific conditions that contribute to successful cookie cooling include ensuring the baking sheet is not placed in a warm area and using a wire rack for better airflow. For instance, if cookies remain on a hot baking sheet, they may retain too much heat and steam. Conversely, moving cookies to a wire rack allows for even cooling and prevents moisture buildup, preserving the desired texture.
Related Post: