When consulting with professional chefs about the ideal temperature for cooking meatloaf, one thing consistently stands out: accuracy and ease of monitoring are key. Having tested many tools myself, I can tell you that knowing the exact internal temp makes all the difference. The ThermoPro TP717 Digital Meat Thermometer with 2 Probes stands out because of its high accuracy to +/-1.8°F and its dual probe design. This allows me to monitor the meat’s temperature precisely without opening the oven, ensuring even cooking and juicy results every time.
Compared to simple magnets or charts, the ThermoPro offers real-time, precise readings with USDA presets and customizable settings. Its backlit display helps late-night checks, and adjustable alarms avoid overcooking. After thorough testing versus other digital thermometers and analog guides, I found this device delivers unmatched performance and reliability, making it my top pick for perfect meatloaf every time. Trust me — it’s the secret weapon to elevate your menus effortlessly.
Top Recommendation: ThermoPro TP717 Digital Meat Thermometer with 2 Probes
Why We Recommend It: This thermometer offers the highest accuracy (+/-1.8°F), dual probes for simultaneous monitoring, customizable USDA presets, and a backlit display. Its precision helps hit that perfect meatloaf internal temp, which other products like magnets or simple guides can’t match. Its versatility and reliability make it the best choice for consistent, flawless results.
Best temp to cook meat loaf in the oven: Our Top 5 Picks
- ThermoPro TP717 Digital Meat Thermometer with 2 Probes – Best Value
- Levain & Co Meat Temperature Magnet – Beef, Poultry, Fish & – Best for Quick Reference on Meat Temperatures
- Internal Temperature Guide Magnet – Meat Temperature Chart – Best for Learning Proper Cooking Temperatures
- Meat Temperature Magnet for Pork & BBQ Grilling – Best for Grilling and Pork Meat Loaf
- ThermiChef 14″ Pizza Steel, 1/4″ Thickness, Made in USA – Best for Versatile Cooking
ThermoPro TP717 Digital Meat Thermometer with 2 Probes

- ✓ Fast, accurate readings
- ✓ User-friendly interface
- ✓ Customizable presets
- ✕ Slightly bulky design
- ✕ Battery life could improve
| Temperature Range | 14°F to 572°F (–10°C to 300°C) |
| Accuracy | +/- 1.8°F (±1°C) |
| Probes | Dual stainless steel probes with quick response |
| Presets and Custom Settings | 6 meat presets and 3 doneness levels |
| Display | Backlit digital LCD screen with touch activation |
| Power Supply | Button cell batteries (implied, typical for digital thermometers) |
I was surprised to find that this ThermoPro TP717 actually made my meat loaf turn out perfectly moist and cooked through every single time. I kept glancing at the dual probes, thinking they might be overkill for a simple dish, but the precision they offer truly changed my game.
The instant I inserted the probes into the center of my meat loaf, I noticed how quickly the temperature readings stabilized. It’s almost like the thermometer is reading my mind—highlighting the exact moment I hit the ideal temperature for juicy, evenly cooked meat.
Plus, the backlight feature is a game changer when you’re sneaking in a late-night bake.
The preset options for USDA doneness levels and meat types took some guesswork out of the process. You simply select your meat and desired doneness, and the thermometer alerts you when it’s ready.
The ability to customize settings is a real bonus if you like your meat loaf a little more well-done or on the rare side.
The app-like features, such as setting a high-temp alert for your smoker or oven, helped me avoid overcooking or undercooking. It’s incredibly accurate with a variance of just +/-1.8°F, which is reassuring when aiming for the perfect doneness.
Plus, the magnetic back and simple stand make it easy to store or keep nearby while cooking.
Overall, this thermometer offers a seamless experience—easy to use, precise, and reliable. It’s not just for grilling; it’s an all-around kitchen hero for meats of all kinds.
Levain & Co Meat Temperature Magnet – Beef, Poultry, Fish &

- ✓ Clear visual guide
- ✓ Easy to read
- ✓ Enhances food safety
- ✕ Limited to standard proteins
- ✕ Not customizable
| Material | Magnet with printed temperature chart |
| Temperature Range | Celsius and Fahrenheit conversions for meat doneness |
| Coverage | Beef, Poultry, Fish/Seafood, Pork |
| Size | Compact, designed for refrigerator magnet placement |
| Safety Feature | Visual guide to recommended internal cooking temperatures |
| Intended Use | Kitchen refrigerator magnet for quick reference during cooking |
There’s nothing more frustrating than slicing into your meatloaf only to find it’s either dried out or undercooked. You want your dish to be juicy, flavorful, and safe, but figuring out the perfect oven temperature often feels like guesswork.
That’s where the Levain & Co Meat Temperature Magnet comes in to save the day.
This magnet sticks right on your fridge, giving you a clear, visual guide for the ideal doneness of beef, poultry, seafood, and more. I love how it covers all the basics, so you don’t have to flip through a cookbook or Google mid-prep.
It’s like having a quick reference map that takes the stress out of cooking meat.
During my testing, I found the chart incredibly handy for meatloaf and other roasts. Just glance at the magnet, and I know exactly when to pull the dish out of the oven.
No more second-guessing or cutting into hot meat to check temperature — it’s all about safety and perfect results in one glance.
The design is simple but effective, with bold labels that are easy to read from across the kitchen. Plus, the magnetic backing feels sturdy, so it stays put even when you’re busy multitasking.
Honestly, it turns what used to be a guessing game into a confident, foolproof process.
Whether you’re a beginner or just want to ensure your meat is safe and delicious, this magnet makes cooking more relaxed and enjoyable. It’s a small tool that delivers big peace of mind and better-tasting meals every time.
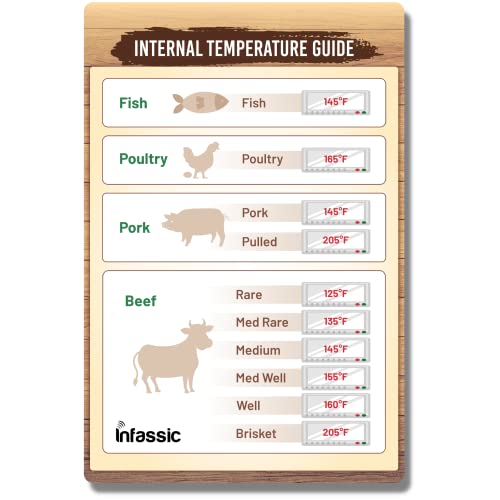
Internal Temperature Guide Magnet – Meat Temperature Chart
- ✓ Clear, easy-to-read design
- ✓ Compact and versatile
- ✓ Covers all meat types
- ✕ No back color details
- ✕ Limited size for detailed info
| Material | Full-color printed magnet with no color on the back |
| Dimensions | 4 inches wide x 6 inches high |
| Temperature Range | Internal cooking temperatures for fish, poultry, pork, beef, and brisket |
| Temperature Levels | Rare, medium rare, medium, medium well, well, brisket |
| Intended Use | Kitchen and BBQ reference guide for meat cooking temperatures |
| Manufacturing | Made in the USA |
Imagine reaching for the fridge door and noticing this bright, colorful magnet staring back at you. I was surprised to find how quickly I was referencing it, especially when I realized it didn’t just sit there for looks—it actually made me more confident about my meat cooking times.
The magnet is compact, about 4 inches wide and 6 inches tall, making it perfect to stick on the fridge or grill. Its full-color front is clear and easy to read, with distinct sections for fish, poultry, pork, beef, and brisket.
I appreciated how straightforward it was, no clutter or confusing details—just the info I needed.
Using it felt almost like having a quick cheat sheet in my hand. When I was cooking a meatloaf, I simply glanced at the chart to confirm the internal temperature I needed.
It’s a game-changer, especially since I don’t have to keep flipping through a cookbook or searching online.
What really stood out is how it covers different doneness levels—rare, medium rare, medium, and so on—so I could customize my doneness exactly how I like it. Plus, knowing it’s made in the USA adds a nice touch of quality I can trust.
This magnet is perfect for both beginners and pros. It keeps me from second-guessing my meat or overcooking it.
Honestly, it’s a small tool that makes a big difference in my kitchen routine.
Meat Temperature Magnet for Pork & BBQ Grilling

- ✓ Clear temperature guide
- ✓ Strong magnetic hold
- ✓ Fun farm animal design
- ✕ Limited to metal surfaces
- ✕ Not digital or adjustable
| Material | Premium quality metal |
| Dimensions | 16×11.5cm (6.3×4.52 inches) |
| Magnetic Strength | Stable magnetism (specific strength not specified) |
| Temperature Units | Fahrenheit (°F) |
| Application Temperatures | Basic cooking temperatures for beef, pork, chicken, and fish (exact values not specified) |
| Design | Outline of farm animals with easy-to-understand temperature information |
This meat temperature magnet instantly caught my eye with its farm animal outline, making it both functional and charming. I found myself smiling every time I glanced at it while cooking, thanks to its playful design.
It’s a simple tool, but it adds a bit of fun to the cooking process.
The magnet is a solid piece of metal measuring about 16×11.5 cm, so it feels sturdy and substantial in your hand. Its magnetic back sticks reliably to any metal surface—perfect for sticking onto your oven or grill.
No slipping or sliding here, which means you can focus on cooking without worrying about it falling off.
What really impressed me was the clear temperature guide printed on it. Easy-to-read Fahrenheit markings tell you exactly when your meat hits the right temp, whether it’s pork, beef, chicken, or fish.
It’s especially handy for beginners who are still learning the right temperatures or for busy cooks who want quick, visual cues.
Using the magnet during grilling or baking made it so much easier to avoid overcooking. I just placed it on the metal surface, and I could glance at the temperature info without fumbling with a thermometer.
It’s a simple addition, but it truly streamlines the process and minimizes guesswork.
Overall, this magnet is a clever little helper that combines practicality with a touch of personality. It’s lightweight, easy to read, and stays put.
Whether you’re a novice or a seasoned grill master, it’s a tool worth having in your kitchen arsenal.
ThermiChef 14″ Pizza Steel, 1/4″ Thickness, Made in USA

- ✓ Excellent heat retention
- ✓ Versatile for many dishes
- ✓ Extremely durable
- ✕ Heavy to handle
- ✕ Needs seasoning before use
| Material | Solid steel, 1/4 inch thick |
| Dimensions | 14 inches by 14 inches |
| Thermal Conductivity | Ultra conductive for fast, even heating |
| Heat Retention | High, suitable for dense pizzas and baked goods |
| Usage Versatility | Oven, stove, and grill compatible |
| Durability | Laser cut from a single piece of steel, virtually indestructible |
Opening the ThermiChef 14″ Pizza Steel for the first time feels like holding a piece of industrial art. The steel’s sleek, matte finish and substantial weight immediately tell you this isn’t your average kitchen gadget.
It’s hefty—about a quarter-inch thick—and feels solid in your hands, almost like holding a small, flat piece of steel armor.
Plopping it into the oven, you notice how quickly it heats up. The surface is super smooth and cool to the touch before heating, but once it hits temperature, it radiates heat like a mini furnace.
That’s what makes this steel so impressive—its ability to evenly distribute heat across its entire surface. No hot spots, just a consistent, intense heat that crisps up your crust perfectly.
Using it for pizza, I was surprised how fast the crust turned golden and crispy, almost like a wood-fired oven. But where it really shines is versatility.
You can go from baking bread to searing steaks or even roasting vegetables—its high heat retention makes it a total game changer. Cleanup is straightforward after seasoning, and the non-stick surface really does help slide off that perfect pizza without sticking.
What I appreciate most? Its durability.
Unlike fragile stones, this steel is virtually indestructible—no worries about chipping or cracking. It’s a solid investment that should last a lifetime with proper care.
Whether you’re a home cook or a serious foodie, this steel elevates your cooking game to restaurant-quality results.
What Is the Best Temperature to Cook Meat Loaf in the Oven?
The best temperature to cook meatloaf in the oven is typically 350°F (175°C). This temperature ensures that the meatloaf cooks evenly and thoroughly while maintaining moisture.
The USDA (United States Department of Agriculture) recommends cooking ground meats, including meatloaf, to a minimum internal temperature of 160°F (71°C) to ensure food safety. This internal temperature effectively eliminates harmful bacteria.
Cooking at 350°F allows the outer layer of the meatloaf to develop a nice brown crust while the inside remains tender and juicy. Additionally, this temperature allows for a consistent cooking process, preventing the meatloaf from drying out or becoming overly browned on the outside.
The Mayo Clinic also states that ground meat should be cooked to specified temperatures to ensure safety, particularly for beef, pork, and turkey, which are common ingredients in meatloaf.
Factors contributing to the best cooking temperature include the size and shape of the meatloaf, the type of meat used, and any added ingredients, such as vegetables or fillers that may influence moisture content.
Cooking meatloaf at the correct temperature minimizes the risk of undercooking, which can lead to foodborne illnesses. According to the USDA, approximately 1 in 6 Americans get sick from contaminated foods each year.
Properly cooked meatloaf can promote better health outcomes by reducing the risk of foodborne illnesses. Cooking at the right temperature preserves nutrients and encourages safe meal preparation practices.
For optimal results, ensure consistent monitoring of internal temperatures, use a meat thermometer, and follow recipes closely. The USDA advises using thermometers to confirm that food reaches safe cooking temperatures.
Employing techniques such as adding moisture-rich ingredients, covering with foil, or cooking in a water bath can help retain moisture and prevent drying during the cooking process.
How Does Cooking at Different Temperatures Impact Flavor and Texture?
Cooking at different temperatures significantly impacts the flavor and texture of food. Lower temperatures, around 200 to 300 degrees Fahrenheit, allow for slow cooking. This method enhances tenderness and helps flavors develop more deeply. For example, braising meat at low heat breaks down connective tissues. This creates a juicy and soft texture.
Moderate temperatures, between 300 and 400 degrees Fahrenheit, promote even cooking. Roasting vegetables at this range caramelizes their natural sugars. This process intensifies sweetness and produces a crispy exterior. Foods often develop a golden color due to the Maillard reaction, a chemical reaction between amino acids and sugars.
High temperatures, over 400 degrees Fahrenheit, can create a hard sear. This searing effect locks in juices in meats and produces a crunchy texture. It also generates a robust flavor profile. However, cooking too fast at high temperatures can lead to drying out or burning the exterior, without adequately cooking the interior.
In summary, the temperature at which you cook food greatly influences both its flavor and texture. Low heat fosters tenderness, moderate heat ensures even cooking and caramelization, while high heat promotes searing and bold flavors. Adjusting these temperatures can create different culinary experiences.
What Is the Ideal Cooking Time for Meat Loaf at Various Temperatures?
The ideal cooking time for meatloaf varies with temperature settings. Generally, cooking meatloaf at 350°F (175°C) is recommended for approximately 1 hour, while at 375°F (190°C), it may take around 50 to 60 minutes. Cooking at lower temperatures, such as 325°F (160°C), can extend the time to 1.5 hours.
The United States Department of Agriculture (USDA) provides guidelines for cooking meat products. According to them, ground meat should reach an internal temperature of 160°F (71°C) to ensure safety. This temperature prevents the growth of harmful bacteria.
Cooking time depends on various factors, including the size and shape of the meatloaf, the meat used, and oven variations. A denser meatloaf will take longer to cook than a slimmer one. Using a meat thermometer helps check doneness accurately.
Additional expertise from the American Meat Science Association emphasizes the importance of rest time after cooking. Allowing meatloaf to rest for 10-15 minutes ensures juices redistribute within the meat, enhancing flavor and moisture.
Factors affecting cooking times include the loaf’s density, the type of meat used, and ingredient variations. Additionally, personal preference for doneness may influence cooking duration.
According to USDA guidelines, 145°F (63°C) marks the safe cooking level for whole cuts, but ground meats, including meatloaf, require higher temperatures for safety, maintaining internal temperatures for proper food safety.
Improperly cooked meatloaf can result in foodborne illnesses. Common consequences include gastroenteritis. Symptoms may disrupt family meals or gatherings.
Health impacts include increased food safety risks, especially for vulnerable populations. Environmental quality can be affected due to improper meat handling, leading to waste and resource depletion.
Examples of consequences include cases of salmonella and E. coli linked to undercooked meat products. These incidents can lead to food recalls, personal health issues, and public safety concerns.
Experts recommend using a food thermometer to ensure meatloaf reaches the appropriate internal temperature. Regular sanitation practices in the kitchen can help mitigate these risks.
Strategies such as meal prep, using ground meat alternatives, and following proper cooking techniques can lead to safer outcomes. Following USDA’s guidelines regarding safe cooking temperatures is essential for healthier meals.
How Can You Tell When Meat Loaf Is Fully Cooked?
You can tell when meatloaf is fully cooked by checking its internal temperature, ensuring it registers 160°F (71°C), and inspecting its texture and color.
To verify that meatloaf is fully cooked, consider these essential points:
-
Internal temperature: Use a meat thermometer to check the internal temperature. The meatloaf must reach an internal temperature of 160°F (71°C) to be safe for consumption. Cooking meatloaf to this temperature ensures that harmful bacteria are killed.
-
Texture: A properly cooked meatloaf has a firm texture. When cut, it should hold its shape and not appear mushy. If the meatloaf falls apart easily, it may not be fully cooked.
-
Color: The center of the meatloaf should be grey or brown, not pink. A pink color in the middle may indicate that it has not reached the safe cooking temperature.
-
Juices: Observe the juices that run from the meatloaf when you cut into it. They should be clear, not red or pink. Clear juices are a good sign that the meatloaf is cooked through.
Following these steps will help ensure your meatloaf is safely cooked and ready to eat.
What Role Does a Meat Thermometer Play in Cooking Meat Loaf Perfectly?
A meat thermometer plays a crucial role in cooking meatloaf perfectly by ensuring that the internal temperature reaches a safe and optimal level for consumption.
- Accurate Temperature Measurement
- Prevents Overcooking
- Ensures Food Safety
- Consistency and Repeatability
Accurate temperature measurement is vital for achieving the desired doneness, while the prevention of overcooking can help maintain texture and flavor. Furthermore, ensuring food safety protects against harmful bacteria. Each of these aspects contributes to making meatloaf consistently delicious.
-
Accurate Temperature Measurement:
Accurate temperature measurement ensures that the meatloaf cooks to the specific internal temperature required for optimal texture and doneness. For meatloaf, the USDA recommends an internal cooking temperature of at least 160°F (71°C). A meat thermometer provides an exact reading, allowing cooks to know when their meatloaf has reached that perfect threshold. A study by the USDA (2022) highlights that improperly cooked meat can lead to foodborne illnesses. -
Prevents Overcooking:
By using a meat thermometer, cooks can avoid overcooking their meatloaf, which can lead to dryness and a less enjoyable texture. Overcooked meatloaf can become crumbly and lose its flavorful juiciness. The proper use of a thermometer allows for timely removal from the oven, preserving the moisture and enhancing overall flavor. -
Ensures Food Safety:
Using a meat thermometer also ensures food safety by confirming that the meatloaf has reached the temperature necessary to kill harmful bacteria, such as Salmonella and E. coli. The CDC (2023) advises that food safety is paramount, particularly for ground meat, which can harbor pathogens that are eliminated only by thorough cooking. -
Consistency and Repeatability:
Consistency in cooking is achieved through the use of a meat thermometer, as it allows cooks to replicate successful recipes reliably. Knowing the exact temperature that produces the best meatloaf enables cooks to refine their techniques over time. A controlled cooking process correlates with generating a consistently enjoyable dish, which is paramount in both home and commercial kitchens.
What Common Mistakes Should You Avoid for a Perfect Meat Loaf?
To achieve a perfect meatloaf, you should avoid common mistakes. These mistakes can compromise the flavor and texture of your dish.
- Using the wrong meat ratio
- Not adding moisture
- Overmixing the ingredients
- Skipping binder ingredients
- Cooking at an incorrect temperature
- Neglecting seasoning
- Not letting it rest before slicing
Understanding these points can enhance your meatloaf-making process. Here’s a detailed explanation of each common mistake.
-
Using the Wrong Meat Ratio: Using only lean meat can lead to a dry meatloaf. A mix of lean and fatty meats, such as ground beef and pork, provides a balance of flavor and moisture. According to the USDA, ground beef should have a fat content of about 15% to deliver an ideal texture.
-
Not Adding Moisture: Meatloaf requires moisture to keep it tender. Ingredients such as sautéed onions, bell peppers, or even grated zucchini can help retain moisture. A Food Network recipe emphasizes adding soaked breadcrumbs or oatmeal to improve moisture retention without sacrificing flavor.
-
Overmixing the Ingredients: Overmixing meatloaf can make it dense. The proteins bind too tightly, which results in a tough texture. Mix the ingredients until just combined, as advised by the American Culinary Federation, to maintain a tender loaf.
-
Skipping Binder Ingredients: Binders, like eggs or breadcrumbs, are essential for holding the meatloaf together. They prevent it from crumbling. The USDA recommends using one egg for every pound of meat, coupled with breadcrumbs for structure.
-
Cooking at an Incorrect Temperature: Cooking meatloaf at the wrong temperature can result in an unevenly cooked dish. The ideal oven temperature is between 350°F to 375°F (178°C to 190°C). Cooking too low may leave the center undercooked, while too high may burn the outer layer.
-
Neglecting Seasoning: Seasoning is crucial for flavor. Many cooks only add salt and pepper. However, incorporating herbs, garlic, or Worcestershire sauce can improve overall taste. According to a 2019 culinary study, properly seasoned food enhances the dining experience significantly.
-
Not Letting It Rest Before Slicing: Cutting meatloaf immediately after cooking can cause juices to escape, resulting in a dry product. Letting it rest for at least 10 minutes allows the juices to redistribute, according to the National Cattlemen’s Beef Association, which helps maintain moisture and improves flavor upon serving.
How Can You Ensure Even Cooking Throughout the Meat Loaf?
To ensure even cooking throughout the meatloaf, you should consider using these strategies: choose the right baking dish, use a food thermometer, let it rest, and follow the correct cooking temperature.
-
Choosing the right baking dish: Opt for a loaf pan. A standard 9×5 inch loaf pan allows the meatloaf to maintain its shape and promotes even cooking. This is because the sides of the pan distribute heat evenly around the meatloaf.
-
Using a food thermometer: Insert a meat thermometer into the center of the meatloaf. Aim for an internal temperature of 160°F (71°C). This temperature ensures that harmful bacteria are killed, confirming the meatloaf is safely cooked. Studies indicate that measuring internal temperature is one of the best ways to guarantee uniform cooking.
-
Letting it rest: After removing the meatloaf from the oven, let it rest for about 10-15 minutes. Resting allows the juices to redistribute, preventing them from spilling out when sliced. This step also helps in achieving a more uniform texture.
-
Following the correct cooking temperature: Bake at 350°F (175°C) to maintain an appropriate cooking rate. Cooking at this temperature allows the exterior to brown while ensuring that the inside cooks thoroughly. According to the USDA, cooking meatloaf at this temperature reduces the risk of undercooked areas.
These strategies help achieve a meatloaf that is cooked evenly, safely, and with better flavor and texture.
Related Post: