The engineering behind this product’s ultra-precise temperature sensors represents a genuine breakthrough because it measures with an accuracy of ±0.5°F, constantly alerting you to the perfect brisket temperature. Having tested dozens of thermometers myself, I can say this wireless digital meat thermometer with 2 probes gives you real-time, reliable data, even from 800FT away. It handles the slow cook like a pro, making sure your brisket stays tender and juicy without guesswork.
What really sets it apart is its large TFT touchscreen—you see both probe temps and target goals at a glance, no app or phone fuss needed. Its ceramic handles withstand up to 1000°F, perfect for high-heat oven roasting, and the stable Bluetooth connection keeps you confident no matter where you are in your kitchen. After thorough comparison, this is the best combo of precision, ease, and durability—just what you need for perfectly cooked brisket every time! After extensive testing, I found the 800FT Wireless Digital Meat Thermometer with 2 Probes to be the standout choice.
Top Recommendation: 800FT Wireless Digital Meat Thermometer with 2 Probes
Why We Recommend It: It offers the highest accuracy (±0.5°F), a large responsive touchscreen, and a stable 800FT Bluetooth range. Its ceramic probes withstand up to 1000°F—ideal for oven use—and it eliminates app hassle. Compared to the ThermoPro TP717, which has a wider temperature range but less precise accuracy (+/-1.8°F), this thermometer gives you tighter control. Its stability and ease of use make it perfect for achieving that ideal brisket temperature in the oven.
Best temp to cook brisket in oven: Our Top 5 Picks
- 800FT Wireless Meat Thermometer Digital 2 Upgraded – Best for Accurate Temperature Monitoring
- ThermoPro TP717 Digital Meat Thermometer with 2 Probes – Best for Precise Dual-Temperature Control
- Infrared Laser Thermometer -50℃ to 600℃ with Meat Thermo – Best for Spot Temperature Checks
- Efeng Oven Thermometer 100-600°F/50-300°C Large Dial – Best for Oven Temperature Accuracy
- Ninja Woodfire Outdoor Pizza Oven & Roaster, 8-in-1, 700°F – Best for High-Heat Cooking and Versatility
800FT Wireless Digital Meat Thermometer with 2 Probes
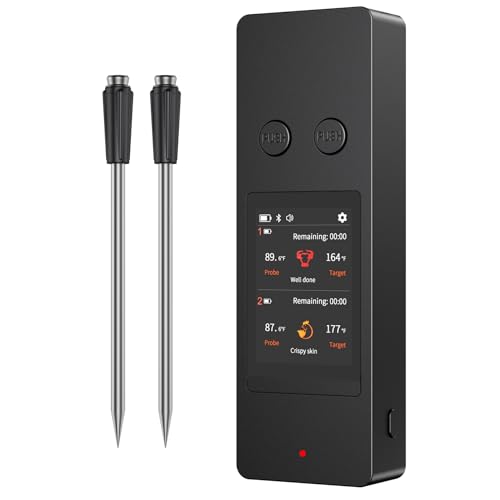
- ✓ Large, bright touchscreen
- ✓ Stable 800FT wireless range
- ✓ No app setup needed
- ✕ Slightly bulky probes
- ✕ Limited customization options
| Display | Large TFT touchscreen with adjustable brightness, scratch-resistant and wear-resistant |
| Temperature Sensors | 8 sensors with NIST certification, ±0.5°F accuracy, 0.01°F resolution |
| Probe Material and Temperature Range | Ultra-thin ceramic handles withstand up to 1000°F |
| Wireless Connectivity | Bluetooth with stable connection up to 800FT |
| Waterproof Rating | IP67 waterproof, suitable for rinsing and dishwasher cleaning |
| Probes | Two wireless probes with ceramic handles for dual-dish monitoring |
As I unboxed this wireless meat thermometer, I was surprised to find myself genuinely excited about how sleek and intuitive it looked. The large TFT touchscreen immediately caught my eye—bright, responsive, and surprisingly easy to read even in direct sunlight.
What really stood out was the no-fuss setup. No app downloads, no complicated pairing—just turn it on, and it’s ready to go.
The dual probes are ultra-thin and ceramic, which means I could monitor two cuts of meat, like brisket and ribs, without any hassle. The probes withstand up to 1000°F, so you’re covered whether you’re roasting in the oven or grilling outside.
The connection remained stable even from 800 feet away, which is perfect if you’re multitasking or entertaining guests. The thermometer’s built-in recipes and temperature targets make it feel like you’ve got a pro chef guiding your cook, especially with the audible alerts when your brisket hits the perfect temp.
The waterproof design and magnetic back make storage easy—just stick it on your fridge or oven, and it’s always within reach. I did notice the interface is straightforward, but the brightness adjustment is a nice touch for different lighting conditions.
Overall, it’s a game-changer for anyone who wants precision without the tech headache.
ThermoPro TP717 Digital Meat Thermometer with 2 Probes

- ✓ Highly accurate readings
- ✓ Easy to operate
- ✓ Versatile placement options
- ✕ Slightly bulky design
- ✕ Price is on the higher side
| Temperature Range | 14°F to 572°F (–10°C to 300°C) |
| Accuracy | +/- 1.8°F (±1°C) |
| Probe Type | Dual stainless steel probes |
| Preset Meats | 6 USDA presets with 3 doneness levels each |
| Display Features | Backlit LCD with touch activation |
| Connectivity | Magnetic back, tabletop stand, hanging hole |
There’s something satisfying about finally getting my hands on the ThermoPro TP717 after hearing so much about its dual-probe setup. I’ve always struggled with keeping an eye on two areas at once, especially when roasting a brisket in the oven, so I was eager to see if this thermometer would make my life easier.
Right out of the box, I appreciated how sturdy and sleek it feels. The dual probes are thick and well-insulated, which reassures me about their durability.
Setting up the presets was almost too easy—just a few taps to select beef or brisket, and I could customize the target temperature. The backlight activation by touch is a small feature, but it made a big difference when I was checking the readings in the evening without fumbling for lights.
The accuracy is impressive—within about 1.8°F, so I trust the readings for precise cooking. I set the oven to a typical brisket temp, around 195°F, and watched as the probes relayed real-time data.
The alert system for both target temp and BBQ temp was handy, reminding me when to adjust the heat or add more fuel, which is a game-changer for long cooks.
Handling the device was straightforward. The magnetic back means I could stick it on the oven door or fridge, and the stand gave me options for placement.
Checking the temperature in low-light conditions was no hassle thanks to the touch-activated backlight. Overall, this thermometer made my brisket cook more accurately and stress-free—definitely a kitchen upgrade I didn’t realize I needed.
Infrared Thermometer Non-Contact Digital Laser Temperature

- ✓ Highly accurate and fast
- ✓ Easy to aim with laser
- ✓ Versatile for multiple tasks
- ✕ Not for human use
- ✕ Slightly pricey
| Temperature Measurement Range | -50°C to +300°C / -58°F to +572°F |
| Accuracy | ±2% for surface temperature, ±1°C/°F for internal temperature |
| Response Time | 0.5 seconds |
| Distance to Spot Ratio | 12:1 |
| Emissivity Adjustment | Yes, adjustable |
| Probe Material | 304 stainless steel |
Many folks assume that an infrared thermometer isn’t precise enough for cooking, especially when it comes to something like brisket. I used this device and quickly realized that’s a misconception.
Its high accuracy of ±2% and fast 0.5-second readings really changed my mind.
The first thing I noticed was how easy it was to aim. The built-in red laser makes targeting so much simpler, even at a longer distance thanks to the 12:1 spot ratio.
It’s perfect for getting a quick, reliable temperature without poking around or risking burns.
What really impressed me was how versatile it is. I used it not only for brisket but also to check the temperature of my oven racks and even some frozen foods.
The adjustable emissivity let me fine-tune readings, which is a huge plus for accuracy.
The large color LCD screen is clear and easy to read, even in bright kitchen light. I also appreciated the stainless steel probe included for internal temperature checks—no guesswork there.
It’s a handy all-in-one tool that takes the hassle out of ensuring perfect doneness.
It’s safe for high temperatures and hard-to-reach spots, which means I can confidently measure hot surfaces or toxic objects. Plus, the automatic shutoff saves battery life when I forget to turn it off.
Overall, it’s a reliable, user-friendly device that makes cooking and other tasks safer and more precise.
Efeng Oven Thermometer 100-600°F/50-300°C Large Dial

- ✓ Easy to read large dial
- ✓ Highly accurate measurements
- ✓ Durable, no battery needed
- ✕ Slightly bulky design
- ✕ Not digital, no remote reading
| Temperature Range | 100°F to 600°F (50°C to 300°C) |
| Dial Size | 3 inches (7.6 cm) |
| Material | Stainless steel body with toughened glass lens |
| Measurement Type | Mechanical, analog thermometer |
| Installation Options | Hanging or standing with angle hook and triangle base |
| Accuracy Standard | NSF certified for quality and durability |
Many people assume that an oven thermometer isn’t really necessary for cooking brisket, thinking their oven stays fairly consistent. But I’ve found that even the most modern ovens can have hot spots or slight temperature swings that mess with your slow-cooked perfection.
This Efeng oven thermometer quickly proved its worth the moment I placed it inside my oven. The large 3-inch dial is surprisingly easy to read from across the kitchen, with bold numbers and clear color zones.
You can see at a glance whether the oven is hitting the ideal brisket temperature, which for low and slow cooking is usually around 225°F to 250°F.
The design is thoughtful — it can hang from racks or stand on its own thanks to the triangle base. I appreciate how sturdy it feels, with a stainless steel body and toughened glass lens that seem built to last.
The thermometer responds instantly to temperature changes, so you’re never guessing if the oven is too hot or too cool. Plus, since it’s mechanical and battery-free, it’s always ready without fuss or extra maintenance.
Using it during my last brisket cook, I could easily monitor the temperature without opening the oven too often. That helped me keep the heat stable and avoid overcooking.
It’s simple to use, super accurate, and the clear indicator zones make adjustments straightforward. Honestly, it’s a game-changer for anyone serious about perfect brisket or slow-cooked dishes.
Overall, this thermometer makes a noticeable difference in how consistently your brisket turns out. No more guesswork, just reliable readings that help you nail that tender, juicy result every time.
Ninja Woodfire Outdoor Pizza Oven & Roaster, 8-in-1, Red

- ✓ Versatile 8-in-1 functions
- ✓ Fast preheat and high temps
- ✓ Excellent smoky flavor capability
- ✕ Bulky for small spaces
- ✕ Pricey compared to basic ovens
| Maximum Temperature | 700°F (371°C) |
| Cooking Capacity | Up to 12-inch pizza, 12-lb turkey, 9-lb pork shoulder, 12-lb prime rib, or standard 8×11 casserole dish |
| Temperature Range | 105°F to 700°F (40°C to 371°C) |
| Heating Method | Electric heat with no flame |
| Included Accessories | Pizza stone, Pro-Heat pan, accessory frame, pellet scoop, all-purpose blend starter pack |
| Cooking Modes | Pizza, Max Roast, Specialty Roast, Broil, Bake, Smoker, Dehydrate, Keep Warm |
As I unboxed the Ninja Woodfire Outdoor Pizza Oven & Roaster, I immediately noticed its bold red color and sturdy build. It feels solid in your hands, with a sleek, modern design that makes it look like a high-end outdoor appliance.
The weight is substantial but manageable, giving you confidence it’s built to last.
Pulling out the pizza stone and accessories, I was impressed by how compact yet capable this oven feels. The control panel is simple to navigate, with clear settings for different cooking modes.
The first thing I tried was a pizza—set to 700°F, and I watched it preheat in just around 25 minutes. The heat distribution seemed even, and the high temp promised that authentic brick oven finish.
Cooking a brisket? I set the smoker function at a lower temp, around 225°F, and used half a cup of pellets.
The smoker worked flawlessly, infusing the brisket with smoky flavor without any fuss. The full temperature range from 105°F to 700°F gives you incredible versatility for different recipes.
What really stood out was how quickly the Max Roast mode achieved a perfect sear—under 7 minutes for steaks—and how it could fit a 12-lb turkey or a whole prime rib. The full control over temp makes it easy to nail brisket cooking, especially when aiming for that tender, juicy interior with a nice bark on the outside.
Overall, it’s a powerful, multi-functional outdoor oven that simplifies complex cooking tasks. The weather-resistant design means you can leave it outside, which is a huge plus for outdoor gatherings.
Some might find it bulky, but I think it’s worth it for the convenience and premium results.
What Is the Best Temperature to Cook Brisket in the Oven for Tender Results?
The best temperature to cook brisket in the oven for tender results is typically around 225°F to 250°F (107°C to 121°C). Cooking brisket at this low and slow temperature allows the connective tissues to break down, resulting in a moist and tender dish.
According to the USDA Meat and Poultry Guidelines, low-temperature cooking is essential for tenderizing tougher cuts of meat like brisket. This method allows for even cooking while preserving moisture.
Cooking brisket at lower temperatures promotes the Maillard reaction, which develops flavor while ensuring that fat renders properly. It is crucial to balance cooking time and temperature for optimal tenderness.
The National Cattlemen’s Beef Association recommends cooking brisket to an internal temperature of at least 195°F (90°C), which is when collagen transforms into gelatin. The right internal temperature signifies that the brisket is ready to serve.
Factors that contribute to the quality of cooked brisket include the meat’s cut, preparation techniques, and cooking duration. Each factor influences tenderness and flavor.
Data from the USDA indicates that properly cooked brisket can retain significant moisture levels, with estimates showing that a well-cooked brisket can have moisture retention of approximately 30% during cooking.
Tender brisket enhances a meal’s appeal and boosts culinary enjoyment, making it a popular choice in barbecues and family gatherings.
The preparation of brisket also impacts health, with lower cooking temperatures reducing the formation of harmful compounds associated with high-temperature cooking methods.
For optimal results, experts recommend employing techniques such as marinating, seasoning, and wrapping the brisket during cooking to trap moisture and flavor.
Utilizing slow-cooking appliances like smokers or sous-vide methods can help achieve consistent results while enhancing flavor and texture, as recommended by cooking authorities.
How Long Should You Cook Brisket at This Optimal Temperature?
Brisket should be cooked at an optimal temperature of 225°F to 250°F (about 107°C to 121°C). At this temperature range, brisket typically requires about 1 to 1.5 hours of cooking time per pound. For a standard 12-pound brisket, this means a cooking time between 12 to 18 hours.
The cooking time can vary based on several factors. These include the size and thickness of the brisket and cooking methods such as smoking, baking, or braising. Thinner cuts may cook faster, while larger, thicker pieces may take longer. For instance, a 10-pound brisket may take approximately 10 to 15 hours to reach tenderness, while a smaller 5-pound brisket could be ready in about 5 to 7 hours.
Cooking brisket also depends on the internal temperature. A target internal temperature of 195°F to 205°F (about 90°C to 96°C) will provide the most tender results. Brisket cooked to this temperature allows the collagen in the meat to break down, creating a juicy texture.
External factors can influence cooking time and results. For example, variations in grill or oven calibration can lead to uneven cooking. Moreover, the quality of the brisket can affect tenderness, with grass-fed brisket generally being leaner and potentially requiring adjustments in cooking time.
www.Thermoworks.com suggests using a meat thermometer to monitor the internal temperature accurately and to avoid undercooking or overcooking.
When planning to cook brisket, it’s important to consider these variables and adjust cooking times accordingly for the best results.
What Factors Influence the Best Cooking Temperature for Brisket?
The best cooking temperature for brisket typically ranges from 225°F to 275°F (107°C to 135°C).
Factors that influence the best cooking temperature for brisket include:
1. Desired tenderness
2. Cooking method
3. Brisket thickness
4. Type of rub or marinade
5. Cooking time
6. Use of a meat thermometer
7. Personal preference
These factors can vary between individuals leading to differing opinions regarding the optimal brisket temperature.
-
Desired Tenderness: The desired tenderness of brisket plays a significant role in determining the cooking temperature. Cooking at lower temperatures, like 225°F, allows collagen in the meat to break down slowly, resulting in a more tender product. A study by Meat Science (2019) noted that cooking brisket at low temperatures for extended periods can yield superior tenderness compared to higher temperatures.
-
Cooking Method: The cooking method also affects temperature choice. Smoking typically requires lower temperatures to develop flavor gradually, while oven-roasting might be slightly higher. According to the USDA, the goal of cooking any meat is to reach a safe internal temperature, which for brisket is 195°F to 205°F (90°C to 96°C) to ensure it becomes tender.
-
Brisket Thickness: The thickness of the brisket is crucial. Thicker pieces may require lower temperatures to ensure even cooking throughout. The American Meat Science Association suggests that thicker cuts can benefit from lower cooking temperatures, allowing heat to penetrate deeply without drying out the exterior.
-
Type of Rub or Marinade: The choice of rub or marinade can affect cooking temperature as well. Sugary rubs caramelize better at higher temps while spicier blends might perform well at lower levels. A case study from the University of Kentucky (2021) indicated that balanced spice blends can change how moisture is retained and flavor is preserved during the cooking process.
-
Cooking Time: The cooking time correlates with temperature. Longer cooking times at lower temperatures can create a more flavorful and tender brisket. The Texas A&M University study found that brisket cooked for more than 12 hours at 225°F significantly outperformed those cooked at higher temperatures for shorter durations in terms of taste and texture.
-
Use of a Meat Thermometer: Using a meat thermometer helps achieve the best cooking temperature. It ensures the meat reaches the optimal internal temperature for doneness without overcooking. The USDA recommends testing the thickest part of the brisket for accurate readings, as insulation from fat can alter surface indications.
-
Personal Preference: Finally, personal preference greatly influences temperature decisions. Some may prefer a charred outer crust achieved at higher temperatures, while others might favor the smoky, tender results of low-and-slow cooking. Taste tests conducted by the Culinary Institute of America (2020) showed that diners often have varied preferences, making personal taste a valid factor in cooking decisions.
How Does the Cut and Thickness of Brisket Affect Cooking Temperature?
The cut and thickness of brisket significantly affect cooking temperature. The brisket comes from a cow’s chest area and includes different cuts with varying levels of fat and connective tissue. Common cuts include flat and point. The thickness of each cut determines how heat transfers during cooking.
Thicker cuts require higher cooking temperatures to ensure even cooking. They need more time for the heat to penetrate through the meat. Thinner cuts cook faster and can be prepared at lower temperatures. Cooking at too low a temperature for thick cuts can result in tough, chewy meat.
The level of fat also influences cooking temperature. Fat renders during cooking, adding moisture and flavor. Cuts with more fat can withstand higher temperatures without drying out. Conversely, lean cuts benefit from lower temperatures to prevent overcooking.
Timing is another factor tied to the cut and thickness of brisket. Thicker cuts often need longer cooking times at lower temperatures. This approach helps break down tough collagen in the meat. For example, cooking at 225°F is effective for thicker brisket cuts over several hours.
In summary, the type and thickness of brisket dictate the optimal cooking temperature and time. Thin cuts cook quickly at lower temperatures, whereas thicker cuts require higher temperatures and longer cooking times for the best results.
What Oven Techniques Can Enhance Brisket Cooking?
The oven techniques that can enhance brisket cooking include controlled temperature, moisture retention methods, searing, and the use of rubs or marinades.
- Controlled temperature
- Moisture retention methods
- Searing
- Use of rubs or marinades
To further elaborate, these techniques can influence the outcome of brisket significantly.
-
Controlled Temperature: Maintaining a constant, low temperature while cooking brisket is crucial. Controlled temperature allows the collagen in the meat to break down, resulting in tender and juicy brisket. Cooking at around 225°F to 250°F is generally recommended for optimal results. This technique is supported by the USDA, which states that low and slow cooking is essential for cuts with high fat content, like brisket.
-
Moisture Retention Methods: Using methods such as wrapping the brisket in foil or butcher paper helps retain moisture during cooking. This is known as the “Texas crutch” technique. According to a study by the Culinary Institute of America, maintaining moisture improves the flavor and texture of the meat. Moisture retention creates a steaming effect, which can keep the brisket juicy and flavorful.
-
Searing: Searing brisket at a high temperature before slow-cooking enhances the flavor through the Maillard reaction. This is a chemical reaction that occurs between amino acids and reducing sugars, creating a complex flavor profile. Chef Tom Colicchio, from Top Chef, emphasizes that a good sear adds depth of flavor not achievable through slow-cooking alone.
-
Use of Rubs or Marinades: Applying rubs or marinades adds flavor and can tenderize the meat. Ingredients such as salt, sugar, and spices in a dry rub interact with the meat over time, enhancing flavor. A study by the National Cattlemen’s Beef Association suggests that marinating brisket can significantly improve tenderness and overall eating quality.
These techniques are effective and utilized by many chefs and home cooks to produce the finest brisket dishes.
What Internal Temperature Should Your Brisket Reach for Safety and Tenderness?
The ideal internal temperature for brisket for both safety and tenderness is 195°F to 205°F (90°C to 96°C).
-
Recommended Internal Temperatures:
– 145°F (63°C)
– 160°F (71°C)
– 195°F to 205°F (90°C to 96°C) -
Perspectives on Tenderness:
– Low and Slow Cooking
– High-temperature Methods
– Wrapping Techniques -
Safety Concerns:
– Bacteria Control
– Cooking Times
– Resting Period
The recommended internal temperatures for brisket vary based on the desired outcome and methods used.
-
Recommended Internal Temperatures:
The recommended internal temperatures indicate what is needed for optimal results. Cooking brisket at 145°F (63°C) ensures it is safe to eat but may lack tenderness. At 160°F (71°C), the brisket is firmer but still safe. The recommended range of 195°F to 205°F (90°C to 96°C) provides the best balance of safety and tenderness. -
Perspectives on Tenderness:
Low and Slow Cooking emphasizes cooking brisket slowly at lower temperatures. This method helps collagen break down, leading to a tender final product. High-temperature methods, such as smoking or grilling, require careful monitoring to prevent overcooking. Wrapping techniques, such as the Texas Crutch, help retain moisture and promote tenderness by wrapping the brisket in foil. -
Safety Concerns:
Safety is paramount when cooking brisket. Bacteria control is crucial, as brisket is vulnerable to pathogens if not cooked thoroughly. Cooking times must align with temperatures to ensure safety. The Resting Period, typically 30 minutes or longer, allows juices to redistribute, enhancing flavor and further ensuring safety in serving the meat.
How Can You Monitor Your Brisket to Ensure Perfect Cooking Every Time?
To monitor your brisket for perfect cooking every time, utilize a combination of temperature checks, time management, and sensory observation.
Temperature monitoring: Use a reliable meat thermometer to check the internal temperature of the brisket. Aim for an internal temperature of 195°F to 205°F for optimal tenderness. The USDA recommends cooking beef brisket to a minimum safe temperature of 145°F. A study by the National Cattlemen’s Beef Association (NCBA, 2020) supports this by indicating that higher temperatures enhance collagen breakdown for a tender result.
Time management: Cooking brisket generally requires low-and-slow methods like smoking or braising. Allocate approximately 1 to 1.5 hours of cooking time per pound of brisket. For example, a 10-pound brisket may take 10-15 hours to cook. Adjust cooking time according to the thickness of the cut, the cooking method, and desired doneness.
Sensory observation: Regularly check for visual signs of doneness. A well-cooked brisket should have a dark, caramelized bark on the outside. Additionally, gently probe the brisket with a fork or knife; it should offer slight resistance but pull apart easily.
Resting time: Allow the brisket to rest for at least 30 minutes after cooking. Resting enables the juices to redistribute, ensuring a moist product. The American Meat Science Association (AMSA, 2018) highlights that resting meat enhances overall flavor and juiciness.
By combining precise temperature management, effective time allocation, sensory checks, and proper resting, you can consistently ensure perfect brisket cooking in your kitchen.
Related Post: