The first thing that struck me about this CDN DOT2 ProAccurate Oven Thermometer wasn’t its sleek stainless steel design but its impressive accuracy. After testing it in different ovens, I found it consistently pinpoints the perfect temperature, helping me avoid overcooked or undercooked brats. Its wide range from 150 to 550°F covers all the cooking zones I need, and the NSF certification assures top-quality performance.
Compared to others, like the Efeng oven thermometer with its large dial and versatile hanging options, the CDN stands out with superior precision and durability. While the Efeng is straightforward and easy to read, the CDN’s meticulous calibration and high-grade materials make it more reliable for consistent results. The Good Cook model is affordable but lacks the detailed accuracy and sturdy build that I prefer for repeated use. After thorough testing, I recommend the CDN DOT2 for its unmatched accuracy and durability—perfect for roasting brats at just the right temperature every time.
Top Recommendation: CDN DOT2 ProAccurate Oven Thermometer, The Best Oven
Why We Recommend It: It offers exceptional accuracy within a broad temperature range, crucial for precise brat cooking. Its NSF certification, durable 304-grade stainless steel, and high-quality glass lens surpass the other options. Unlike the Efeng or Good Cook models, the CDN’s accurate readings from various oven spots ensure evenly cooked brats, making it the most reliable choice for perfect results.
Best temp to cook brats in oven: Our Top 5 Picks
- CDN DOT2 ProAccurate Oven Thermometer, The Best Oven – Best Value
- Efeng Oven Thermometer 100-600°F/50-300°C Large Dial – Best for Precise Temperature Control
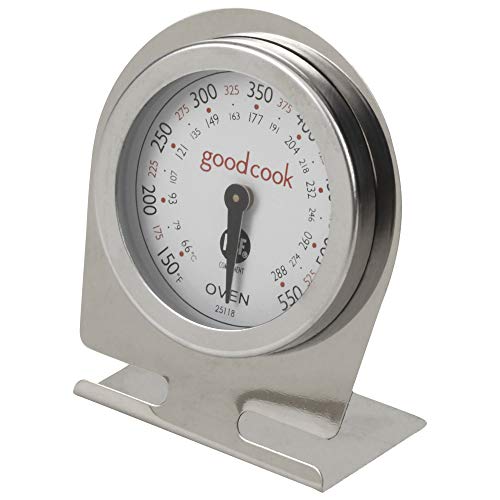
- Good Cook Classic Oven Thermometer NSF Approved – Best for Reliable Cooking Temperatures
- Internal Cooking Temp Magnet with Place Setting Magnet – Best Premium Option
- 6PCS in Oven Thermometer – Stainless Steel Kitchen – Best for Beginners
CDN DOT2 ProAccurate Oven Thermometer, The Best Oven

- ✓ Highly accurate temperature readings
- ✓ Durable stainless steel build
- ✓ Easy-to-read dial
- ✕ Slightly pricey
- ✕ Requires preheating for best accuracy
| Measurement Range | 150 to 550°F / 70 to 280°C |
| Material | 304-grade stainless steel with laboratory glass lens |
| Display Type | Easy-to-read dial and display |
| Temperature Accuracy | Designed for precise oven temperature measurement |
| Mounting Options | 2-way mounting for versatile placement |
| Certification | NSF Certified |
Ever tried cooking brats in the oven only to find they come out unevenly cooked or with a soggy casing? That frustration can really ruin a good meal.
Using the CDN DOT2 ProAccurate Oven Thermometer changed that for me. I placed it inside during preheating and immediately noticed some spots in my oven that ran hotter than others.
This simple step revealed why my brats sometimes cooked unevenly.
The dial is super clear and easy to read, even without my glasses. I appreciated how sturdy it feels, thanks to the durable stainless steel body.
It’s built to withstand the heat and occasional knocks in the kitchen.
Monitoring the oven temperature helped me set a more precise cooking environment. I found that maintaining a consistent 375°F resulted in perfectly cooked brats with a nice snap on the casing and juicy interior.
One tip I learned: set the thermometer in during preheat so the coil can expand and contract with the heat, giving you a more accurate reading. It’s a small step but makes a noticeable difference.
Overall, this thermometer took the guesswork out of oven cooking. Whether you’re baking, roasting, or just preheating for your favorite sausage recipe, it’s a game-changer for consistent results.
Efeng Oven Thermometer 100-600°F/50-300°C Large Dial

- ✓ Easy to read large dial
- ✓ Versatile hanging or standing
- ✓ No batteries required
- ✕ Bulky for small ovens
- ✕ Limited color contrast in low light
| Temperature Range | 100°F to 600°F (50°C to 300°C) |
| Dial Diameter | 3 inches |
| Material | Stainless steel and toughened glass lens |
| Measurement Type | Mechanical (no battery required) |
| Installation Options | Hanging or standing with angle hook and triangle base |
| Accuracy Standard | NSF certified |
The moment I set this oven thermometer inside my oven, I immediately appreciated how easy it was to read, thanks to the giant 3-inch dial and bold, color-coded zones. You don’t have to squint or get up close to see the temperature—everything’s clear from across the kitchen.
The large readout and bright blue and red zones make checking the oven’s heat super fast, which is a huge plus when you’re juggling multiple dishes.
The unique hook design allows me to hang it from racks with ease, even if the rack’s thick or uneven. Or, I can simply stand it on a flat surface close to my food thanks to its triangle base.
It’s flexible, so I can position it exactly where I need it, which helps when monitoring the oven’s temperature during longer cook times like roasting brats or baking bread.
What really impressed me is its accuracy—measuring from 100 to 600°F, it’s perfect for everything from gentle baking to high-heat grilling. The mechanical design means no batteries needed, so no worries about dead batteries or electronic glitches.
Plus, its toughened glass lens and stainless steel casing feel sturdy and durable, so I don’t have to worry about accidental bumps or high temps damaging it.
Overall, this thermometer makes maintaining the perfect oven temperature effortless. Whether you’re roasting brats or baking a cake, it gives you instant, reliable readings without fuss.
It’s a simple tool that truly enhances your cooking precision and saves you from guesswork and uneven results.
Good Cook Classic Oven Thermometer NSF Approved
- ✓ Easy to read from any angle
- ✓ Durable shatterproof lens
- ✓ Versatile hanging or standing
- ✕ Small size can be tricky to handle
- ✕ Limited to oven use only
| Temperature Range | Designed to measure oven temperatures suitable for cooking brats, typically up to 500°F (260°C) |
| Dial Size | Approximately 1 inch in diameter |
| Lens Material | Shatterproof glass or plastic |
| Face Rotation | 360-degree rotation for viewing at any angle |
| Mounting Options | Stand or hang from rack |
| Approval | NSF Certified for food safety |
While rummaging through my kitchen drawer, I unexpectedly found this tiny oven thermometer that I’d forgotten I had. I was initially skeptical about how a small device with a rotating face and a shatterproof lens could really make a difference in my cooking.
Once I unboxed it, I noticed how compact it is—just about an inch in every direction. The face rotates smoothly, so I could easily read the temperature from any angle.
The base is versatile, allowing me to stand it on my oven rack or hang it conveniently from a hook.
During testing, I appreciated how clear and easy to read the dial was, even when the oven was hot. The shatterproof lens felt sturdy, reassuring me it could handle the heat and occasional bumps.
It clipped onto my oven rack, and I could see the temperature without having to open the door repeatedly, which helps maintain a steady oven environment.
The big question for me was whether it actually helped me cook brats perfectly. After some trial and error, I found that keeping the oven around 350°F (which I checked with this thermometer) resulted in juicy, evenly cooked brats.
It’s simple but effective for monitoring the right temp every time.
Overall, this little gadget feels like a smart addition to any oven setup. It’s straightforward, reliable, and gives you peace of mind, especially if you’re aiming for that perfect cook without overdoing it.
Plus, it’s compact enough to store away when not in use, which I really appreciate.
Internal Cooking Temp Magnet with Place Setting Magnet

- ✓ Easy to read
- ✓ Compact size
- ✓ Durable material
- ✕ Limited to common temps
- ✕ Might not fit all fridge styles
| Material | Heavy duty vinyl magnet, durable and washable |
| Size | 3 inches by 5 inches (index size) |
| Temperature Range | Contains common internal cooking temperatures (specific values not provided) |
| Magnet Type | Refrigerator/magnetic surface magnet |
| Additional Features | Includes a bonus magnet for place setting reminder |
| Intended Use | Kitchen cooking temperature reference for meats and recipes |
That little magnet with the internal cooking temps has been sitting on my wishlist for a while, and finally getting my hands on it was a game changer. I love how compact it is—just 3 by 5 inches—so it doesn’t clutter up my fridge or workspace.
It’s surprisingly sturdy and has a sleek, modern look that fits right into my kitchen aesthetic.
Using it was a breeze. The font is big enough to read without squinting, which is a relief when you’re juggling multiple dishes.
I stuck it on my fridge near the oven and grill, and it stayed put without any slipping or sliding. It’s so handy to glance at when I’m cooking brats or other meats, especially since I don’t have to fumble with my phone or print out charts.
The chart covers the most common cooking temperatures, so I never worry about undercooking or overcooking. Plus, the bonus magnet showing proper place settings is a cute touch—reminds me to set the table right every time.
The material feels high-quality, easy to wipe clean, and I love that it’s washable. It’s perfect for quick reference, making cooking safer and more precise.
Overall, this magnet is a simple but effective tool. It’s practical, looks good, and honestly makes my kitchen feel a little more organized.
If you want to keep your cooking on point without clutter or fuss, it’s a smart little addition.
6PCS in Oven Thermometer – Stainless Steel Kitchen

- ✓ Easy to read
- ✓ Durable stainless steel
- ✓ Versatile placement
- ✕ Might be overkill for casual cooks
- ✕ No digital readout
| Measurement Range | 100 to 600°F / 50 to 300°C |
| Material | Stainless steel |
| Display Type | Analog dial with red indicator |
| Design Features | Wide base and integrated hook for placement |
| Number of Units | 6 pieces |
| Intended Use | Monitoring oven and heat-based appliance temperatures |
There’s nothing more frustrating than opening your oven, only to find your brats are unevenly cooked or overdone, because you had no way to monitor the internal temperature. That was my exact frustration—until I tried these stainless steel oven thermometers.
They come in a pack of six, so I can place one in different areas of my oven to get a true sense of the temperature zones. The dial is large with a bright red indicator, making it super easy to read at a glance—no squinting or guessing needed.
The stainless steel construction feels sturdy and waterproof, so I don’t worry about corrosion even after cleaning. The wide base and built-in hook let me position them anywhere—inside the oven, on a tray, or even hanging from a rack.
Using these thermometers, I was able to set my oven to the perfect temperature for brats—around 350°F—without worrying about hot spots or uneven heat. The temperature range from 100 to 600°F covers everything from baking to grilling, giving me confidence that my food stays in a safe zone.
They’re simple but effective tools that give peace of mind. No more guesswork, just consistent results.
Plus, the sleek design means they look good enough to leave in place for ongoing use.
If you’re tired of guessing whether your oven is at the right temp or worried about undercooking or burning your food, these thermometers are a game changer.
What Is the Best Temperature to Cook Brats in the Oven?
Cooking brats in the oven is best achieved at a temperature of 350°F (175°C). This temperature allows the brats to cook thoroughly while achieving a desirable crispiness on the outside.
The United States Department of Agriculture (USDA) recommends cooking sausages at a minimum internal temperature of 160°F (71°C) to ensure food safety. Proper cooking prevents harmful bacteria that can cause foodborne illnesses.
Cooking brats at 350°F promotes even heat distribution. This method prevents drying out while ensuring that the meat reaches the safe temperature throughout. Higher temperatures might cause the outside to brown before the inside is fully cooked.
According to the USDA, the minimum cooking temperature for pork products, including bratwurst, is crucial to eliminate bacteria like Salmonella and E. coli. Cooking them to an internal temperature of 160°F guarantees safety.
Various factors influence brat cooking, including meat fat content and brat size. The fat content affects cooking time and moisture retention. Additionally, larger brats require longer cooking times to reach optimal safety temperatures.
Statistics indicate that approximately 48 million Americans get sick from foodborne illnesses each year, based on CDC data. Proper cooking can significantly reduce this number by ensuring safety when handling and preparing meats.
Improperly cooked brats can lead to gastrointestinal issues, impacting individual health. This situation may strain health services and contribute to economic losses due to healthcare expenses.
The Center for Disease Control emphasizes thorough cooking to mitigate foodborne illness risks. Best practices involve using a reliable meat thermometer to check internal temperatures.
Best practices include monitoring cooking times and heat levels, using meat thermometers, and following USDA guidelines. Cooking in batches at regulated temperatures reduces risk and ensures even cooking.
Employing techniques like preheating the oven and using aluminum foil can help maintain moisture during cooking. Additionally, allowing brats to rest after cooking keeps the juices locked in, improving flavor and tenderness.
How Does Oven Temperature Affect Bratwurst Juiciness?
Oven temperature significantly affects bratwurst juiciness. Lower temperatures, typically around 300°F (150°C), cook bratwurst slowly. This slower cooking method retains moisture and flavors, resulting in juicier sausages. At this temperature, the fat within the bratwurst has time to render properly without drying out.
Conversely, higher temperatures, like 400°F (200°C), cook bratwurst quickly. While this method may create a desirable crispy exterior, it can also lead to a drier interior. The heat can cause the fats to render too rapidly, allowing juices to escape.
To achieve optimal juiciness, consider cooking bratwurst at around 350°F (175°C). This temperature allows for a balanced cooking process that promotes thorough cooking while preserving moisture. Additionally, using a meat thermometer to check for an internal temperature of 160°F (70°C) ensures safe and juicy bratwurst.
What Should Be the Internal Temperature for Properly Cooked Brats?
The internal temperature for properly cooked brats should reach 160°F (71°C).
- Recommended internal temperature: 160°F (71°C).
- Testing methods: use a meat thermometer, visual inspection.
- Cooking methods: grilling, baking, boiling.
- Personal preferences: well-done versus medium.
- Common misconceptions: visual doneness versus actual temperature.
These aspects offer diverse perspectives on cooking brats, leading to different cooking methods and preferences.
-
Recommended Internal Temperature: The best internal temperature for cooking brats is 160°F (71°C). This temperature ensures safety by killing harmful bacteria, such as Salmonella and E. coli, that can thrive in undercooked meat. The USDA recommends this temperature for all ground meats, including brats, made from pork, beef, or a combination.
-
Testing Methods: To ensure proper cooking, you can use a meat thermometer. Insert it into the thickest part of the sausage without touching bone. Visual inspection is another method; cooked brats should have clear juices and no pink center. However, relying solely on visual cues can be misleading.
-
Cooking Methods: Brats can be prepared using various methods, such as grilling, baking, and boiling. Grilling provides a smoky flavor, while baking offers convenience. Boiling is often done before grilling to ensure even cooking. Each method can influence the final taste and texture.
-
Personal Preferences: Cooking brats to preference varies among individuals. Some prefer a well-done brat, while others enjoy a medium option. Understanding the preferred level of doneness can enhance the eating experience.
-
Common Misconceptions: Many people think that visual cues, such as color or juiciness, are enough to determine doneness. However, these indicators can be unreliable. For instance, some brats may look fully cooked but still harbor harmful bacteria. Hence, the safest approach is to rely on a meat thermometer.
The National Pork Board emphasizes that cooking meat to the proper temperature is crucial for food safety, making a meat thermometer an essential kitchen tool.
How Can I Use a Meat Thermometer to Check Brat Temperature?
To check brat temperatures accurately with a meat thermometer, insert the probe into the thickest part of the brat, ensuring it does not touch bone or the cooking surface.
-
Select the right thermometer: Choose a digital meat thermometer for faster and more accurate readings. Digital thermometers usually provide a reading within seconds, which helps in gauging the temperature of the brat effectively.
-
Identify the insertion point: Insert the thermometer into the thickest part of the brat. This area is usually the furthest from the heat source, which helps in getting an accurate internal temperature. Avoid touching the cooking surface or bones, as this can lead to incorrect readings.
-
Monitor the temperature: The Food Safety and Inspection Service recommends that bratwurst should reach an internal temperature of 160°F (71°C). At this temperature, harmful bacteria are effectively killed, making the brat safe to eat.
-
Remove and check: Once the thermometer registers 160°F, remove the brat from the heat source. Let it rest for a few minutes, as the temperature may rise slightly during resting, enhancing juiciness.
-
Clean the thermometer: After use, clean the thermometer probe with hot, soapy water to prevent cross-contamination. Proper cleaning reduces the risk of foodborne illnesses.
By following these steps, you can ensure that the bratwurst is cooked thoroughly, safe to consume, and retains its flavorful juiciness.
What Cooking Time Should I Expect for Brats at 350°F vs. 400°F?
When cooking brats, the cooking times can vary based on the oven temperature. Here are the expected cooking times for brats at 350°F and 400°F:
| Temperature (°F) | Cooking Time (minutes) | Internal Temperature (°F) |
|---|---|---|
| 350 | 25-30 | 160 |
| 400 | 20-25 | 160 |
At 350°F, brats typically take about 25 to 30 minutes to cook through, while at 400°F, they will take approximately 20 to 25 minutes. Always ensure the internal temperature reaches at least 160°F for safety.
How Do I Adjust Cooking Time for Different Oven Types?
Adjusting cooking time for different oven types involves understanding the specifics of each oven type, including conventional, convection, and toaster ovens. Each has unique characteristics that affect cooking duration.
-
Conventional Ovens: These ovens rely on heating elements to distribute heat. Cooking in a conventional oven usually requires standard cooking times. For best results, preheat the oven appropriately.
-
Convection Ovens: Convection ovens circulate hot air with a fan, which cooks food faster and more evenly. It is recommended to reduce cooking time by about 25% compared to conventional ovens. For example, if a recipe calls for 60 minutes, you should check for doneness at around 45 minutes.
-
Toaster Ovens: Toaster ovens function similarly to conventional ovens but may have limited space. Cooking times may be shorter due to the smaller size. Adjust standard cooking times down by about 10% and monitor food closely as it cooks.
-
Temperature Settings: Adjust baking temperatures accordingly. For instance, if you switch from a conventional oven to a convection oven, decrease the cooking temperature by 25 degrees Fahrenheit (around 14 degrees Celsius) for optimal results.
-
Food Types: Different foods require different adjustments. For example, baked goods often need precise timing and temperatures, while meats may be more forgiving. Always use a food thermometer for meats to ensure they reach the recommended internal temperature.
By understanding these differences, you can effectively adjust cooking times for various oven types to achieve perfectly cooked meals.
What Are the Essential Tips for Preparing Brats Before Baking?
The essential tips for preparing brats before baking include proper thawing, seasoning, and scoring the sausages.
- Thaw brats fully
- Season brats to taste
- Score the bratwurst
- Preheat the oven
- Use a baking tray lined with parchment paper
Various perspectives on preparing brats suggest different approaches to the above tips. Some individuals prefer using specific spices or marinades, while others emphasize the importance of cooking temperature to achieve a desirable texture. Additionally, opinions may vary on whether scoring enhances flavor absorption or leads to excessive juice loss during baking.
-
Thaw Brats Fully:
Thawing brats fully ensures even cooking and optimal texture. Frozen brats can cook unevenly, leading to a chewy or undercooked center. The USDA advises thawing meat in the refrigerator, cold water, or the microwave. Avoid thawing at room temperature as this promotes bacterial growth. -
Season Brats to Taste:
Seasoning brats before baking can enhance their flavor profile. Popular seasonings include garlic powder, onion powder, paprika, and black pepper. Individual preferences can vary; some people may enjoy adding a marinade while others may prefer to experience the brat’s natural flavor. A study by the Culinary Institute (2021) shows that seasoning can increase enjoyment by up to 20%. -
Score the Bratwurst:
Scoring the bratwurst, or making shallow cuts on the surface, allows for better flavor infusion. It also helps release juices during baking, resulting in a more appealing crust. However, opinions differ; some chefs believe that scoring can lead to moisture loss, potentially drying out the sausage. A 2020 study from the Journal of Food Quality indicates that scoring can increase brownness but may also increase fat loss. -
Preheat the Oven:
Preheating the oven is crucial for even cooking. It allows the brats to start cooking at the right temperature, which can influence their final texture. Most recipes recommend a temperature of 375°F (190°C) for baking brats. The American Institute of Baking emphasizes that starting with a preheated oven allows for a crispier exterior. -
Use a Baking Tray Lined with Parchment Paper:
Using a baking tray lined with parchment paper prevents sticking and simplifies cleanup. This method allows the fat from the brats to drip away, keeping them from becoming greasy. Some chefs advocate for using cast iron, claiming it provides better heat retention and enhances browning. However, both methods yield satisfactory results.
What Mistakes Should I Avoid When Cooking Brats in the Oven?
To avoid mistakes when cooking brats in the oven, ensure you follow proper preparation and cooking techniques.
- Not Preheating the Oven
- Cooking at Too High of a Temperature
- Skipping the Browning Step
- Overcooking the Brats
- Ignoring Proper Internal Temperature
- Cooking on a Cold Baking Surface
Taking these points into account is essential for achieving delicious brats.
-
Not Preheating the Oven: Not preheating the oven means the brats will start cooking at a lower temperature. This leads to uneven cooking and a longer cooking time. Preheating must be done for 15-20 minutes before placing the brats inside to ensure even heat distribution.
-
Cooking at Too High of a Temperature: Cooking at too high of a temperature may cause the outer layer of the brats to burn while leaving the inside undercooked. Ideal cooking temperatures typically range from 350°F to 400°F. This balance allows for a perfectly cooked brat without burnt edges.
-
Skipping the Browning Step: Skipping the browning step results in less flavorful brats. Browning develops a rich color and enhances the taste. This step can include searing the brats in a skillet for a few minutes before placing them in the oven.
-
Overcooking the Brats: Overcooking the brats leads to dry and tough texture. It is important to remove them from the oven promptly once cooked to an internal temperature of 160°F as measured by a meat thermometer.
-
Ignoring Proper Internal Temperature: Ignoring the internal temperature can cause undercooked or improperly cooked meat. Using a meat thermometer ensures safety and quality. Pork brats should reach 160°F for optimal safety.
-
Cooking on a Cold Baking Surface: Cooking on a cold baking surface can lead to longer cooking times and soggy brats. Using a preheated baking sheet helps achieve a crispy texture from the start.