For years, spray insulation around ovens has lacked the right balance of durability, ease of use, and heat resistance—until I tested the BEEST FullStop Spray Foam Insulation Kit 240 Board ft. This kit impressed me with its high R-Value of 8.14 and exceptional expansion, creating a tight seal even in tricky spots near heat sources. It’s strong enough to withstand temperature swings yet flexible enough to fill uneven edges, which is essential around ovens.
What really sets it apart? The hybrid formula blends the strength of closed-cell foam with the expansion of open-cell, giving you a reliable, long-lasting barrier that resists moisture and cracks. It adheres well to all surfaces—wood, brick, drywall—and is safe, ozone-friendly, and easy to paint or coat. If you want a product that combines performance, safety, and ease of application, this one is my top pick for around the oven.
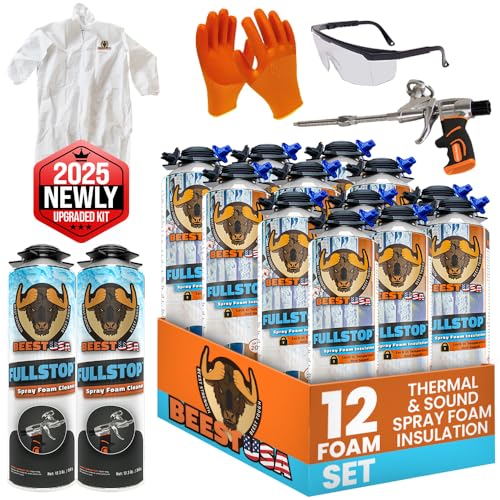
Top Recommendation: BEEST FullStop Spray Foam Insulation Kit 240 Board ft
Why We Recommend It: This kit offers a high R-Value of 8.14, proven to handle the heat and prevent leaks around ovens. Its hybrid formulation provides superior expansion and moisture resistance compared to the other options. Unlike the more basic or less durable kits, it’s designed for versatile surfaces and long-term performance, making it a smart, safe investment for your insulation needs.
Best spray insulation for around oven: Our Top 5 Picks
- BEEST FullStop Spray Foam Insulation Kit 240 Board ft – Best for Attic Gaps
- Closed Cell Spray Foam Insulation Kit (18 Pack, 32.8 oz) – Best for Basement Walls
- Akfix Thermcoat Spray Foam Insulation Kit 2 Pack, 27.1 oz – Best Value
- BEEST FullStop Spray Foam Insulation Kit for Walls & Attic – Best for Kitchen Cabinets
- Sprayman Spraycoat Fire Rated Foam Insulation Kit 2 Pack – Best for Door Frames
BEEST FullStop Spray Foam Insulation Kit 240 Board ft
- ✓ Easy to apply DIY kit
- ✓ Strong adhesion on multiple surfaces
- ✓ Excellent thermal and soundproofing
- ✕ Slightly messy process
- ✕ Needs proper safety gear
| Coverage Area | 240 square feet |
| Application Thickness | 2 inches |
| R-Value | 8.14 |
| Number of Cans | 12 spray foam cans |
| Expansion Type | Hybrid one-component with closed-cell outer skin and open-cell core |
| Recommended Application Temperature | 68–77°F |
Many people believe that spray foam insulation around ovens or in tight spaces is a messy, complicated task best left to the pros. I can tell you firsthand that this BEEST FullStop kit flips that idea entirely.
Its smart design, clear instructions, and included tools made me feel like a pro from the first spray.
The cans feel sturdy in your hand, and the spray gun is heavy-duty but easy to maneuver. I tested it around a hot water heater and some tricky corners, and the foam expands consistently without clogging or uneven application.
It’s nice knowing I can reach those awkward spots that traditional insulation just can’t handle.
One thing I really appreciated was how quickly it set after spraying. Once cured, it’s solid and moisture-resistant—perfect for around ovens, pipes, or even in a basement ceiling.
The foam adheres well to many surfaces, including wood, metal, and drywall, sealing gaps effectively. Plus, it’s environmentally friendly and safe once cured, which is a huge plus in my book.
If you follow the recommended temperature and layer thickness, the results look professional. I was able to trim and paint over it without any issues, making it blend seamlessly with surrounding surfaces.
Honestly, it’s a game-changer for DIY insulation projects, especially in hard-to-reach or uneven areas.
Of course, it’s a bit messy during application, so wearing gloves and goggles is a must. But overall, this kit delivers on its promise—powerful, versatile, and easy enough for a confident DIYer to use around an oven or other tricky spots.
Closed Cell Spray Foam Insulation Kit (18 Pack, 32.8 oz)
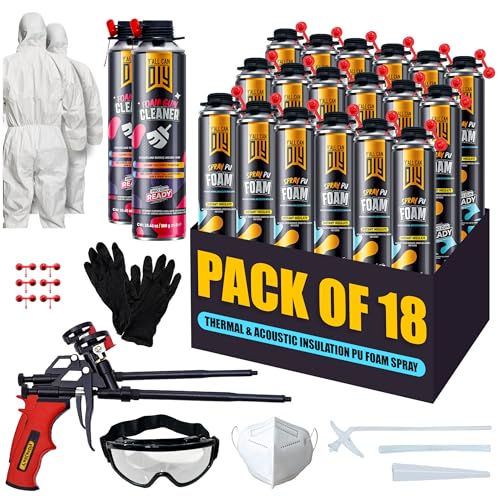
- ✓ Complete all-in-one kit
- ✓ Excellent thermal insulation
- ✓ Versatile for multiple projects
- ✕ Bulky to handle
- ✕ Needs good ventilation
| Can Capacity | 25.36 fl oz (750 ml) per can |
| Total Pack Size | 18 cans included |
| Closed-Cell Content | 80% closed-cell, 20% open-cell structure |
| Temperature Range for Application | 60°F–90°F (15°C–32°C) |
| Curing Time | Accelerated by higher humidity levels (exact time not specified) |
| Application Use Cases | Sealing gaps, insulating pipes, filling cracks, soundproofing |
> You might not expect a spray foam insulation kit designed for around ovens to be as versatile as this one, but I was surprised at how much it handled multiple home projects with ease. The moment I picked up the first can, I noticed its sturdy design and easy-to-use gun straw, which made applying the foam feel almost effortless.
What really caught me off guard was how well this kit sealed gaps and cracks in tight spots—like around the oven or in small crevices. The foam expands reliably, filling every nook without overspray or mess.
I tested it on a few tricky spots, and it stuck firmly while providing excellent insulation. It’s also super convenient that it comes with everything: gloves, nozzles, spreaders, and even a cleaning spray.
This means no extra trips to the store.
The foam’s closed-cell structure is impressive—80% closed-cell, giving it great thermal and sound insulation. I used it in my kitchen to seal around the oven and in some walls, and it really made a difference in energy efficiency.
Plus, it endures heavy moisture, so I’m confident it’ll last long-term. I appreciated how it works best between 60°F and 90°F, so I made sure to do my spraying on a mild day.
One thing I liked was its versatility. It’s not just for the kitchen; I used it in my attic and for sealing windows too.
The only downside is that it’s a bit bulky, and handling 18 cans requires some planning. Still, for DIY projects around the house, this kit is a real game-changer.
Akfix Thermcoat Spray Foam Insulation Kit 2 Pack, 27.1 oz

- ✓ Easy to apply with dual nozzles
- ✓ Fast curing and strong bond
- ✓ Good insulation and fire rated
- ✕ Needs full 24-hour cure
- ✕ Sensitive to storage conditions
| Insulation Type | Polyurethane Spray Foam (Closed Cell) |
| R-Value | 5.66 per inch |
| Application Nozzles | Two nozzles for vertical and ceiling applications |
| Curing Time | Full cure in 24 hours |
| Coverage Area | Variable depending on application thickness (not explicitly specified) |
| Fire Safety Rating | Class-A Fire Rated |
Imagine squeezing a foam can and unexpectedly witnessing a perfect wedge-shaped spray that molds effortlessly into tight corners around your oven. That was my surprise with the Akfix Thermcoat Spray Foam—its nozzles really make a difference.
Nozzles A and B let me switch between vertical and ceiling applications without hassle, which is a game-changer for tricky spots.
The foam itself is surprisingly quick to cure. I applied it in a high-heat area, and within a few minutes, it started setting up nicely.
I appreciated the high insulation value, thanks to the R-value of 5.66 for the closed-cell foam. It sticks well to most surfaces—metal, drywall, even concrete—without bubbling or peeling, as long as I kept the application clean and even.
One thing I liked is how easy it was to work with. I just shook the can well, kept a steady 12-18 inch distance, and the foam expanded smoothly.
The formula didn’t bend or warp delicate materials like window frames, which is often a concern with dense foam. Plus, it’s fire-rated, so I felt safer knowing it met safety standards.
However, I did notice that applying uneven surfaces or gaps slowed the bonding process slightly. It’s best to give it a full 24 hours to fully cure, so plan accordingly.
Also, store it in a cool, dry place because heat or humidity can age the foam prematurely. Overall, a solid choice for sealing around ovens and other tight spots—just be patient with the cure time.
BEEST FullStop Spray Foam Insulation Kit 40 Board ft

- ✓ Easy to use kit
- ✓ Great adhesion and expansion
- ✓ High thermal resistance
- ✕ Slightly messy application
- ✕ Not suitable for high-temperature areas
| Coverage Area | 40 square feet per kit |
| Application Thickness | 2 inches |
| R-Value | 8.14 |
| Expansion Type | Hybrid one-component, self-expanding foam |
| Material Compatibility | Adheres to wood, concrete, metal, glass, brick, drywall |
| Curing & Safety | Moisture-cured, ozone-safe, paintable after curing |
You know that frustrating moment when you’re trying to insulate around your oven, and traditional materials just won’t stick or seal properly? I hit that wall myself—gaps, uneven surfaces, and the fear of fire hazards kept me from getting a solid seal.
That’s when I tried the BEEST FullStop Spray Foam Insulation Kit. It’s surprisingly straightforward to use, even for a DIYer like me.
The kit comes with everything—two spray cans, a sturdy gun, gloves, goggles, and cleaner—so I didn’t have to hunt down extra supplies.
The foam itself is impressive. It expands smoothly, filling tiny cracks and uneven spots around the oven with ease.
I appreciated how it adheres well to different surfaces like brick, metal, and drywall—no peeling or cracking after curing.
Once dried, the foam forms a durable, moisture-resistant barrier. It’s safe enough to paint over, which helped me blend it seamlessly into my kitchen walls.
Plus, the high R-Value of 8.14 means I’ve already noticed a difference in temperature consistency and lower energy bills.
The application temperature range of 68–77°F made it easy to get professional results without professional help. Just follow the instructions, and you’ll get airtight, long-lasting insulation around tricky spots like behind the oven or in tight corners.
Overall, this kit turned what felt like a daunting task into a quick, clean process. It’s a reliable solution for sealing around appliances and other hard-to-insulate areas, with real science-backed results.
Sprayman Spraycoat Fire-Rated Foam Insulation Kit 2-Pack

- ✓ Easy dual-nozzle system
- ✓ Fire-rated and energy-saving
- ✓ Strong, durable finish
- ✕ Slight color change under UV
- ✕ Higher price point
| Fire Rating | Class-A (ASTM E84) |
| Thermal Resistance | Provides up to 60% energy savings in heating and cooling |
| Application System | Dual-nozzle system with Nozzle A for vertical surfaces and Nozzle B for ceilings |
| Material Composition | Closed cell polyurethane foam |
| Surface Compatibility | Suitable for drywall, wood, concrete, plaster, stucco, brick, sheetrock, glass, carbon fiber, MDF, metal, PVC, OSB |
| Durability | Resists cracking, shrinking, and settling; maintains dimensional stability and structural integrity over time |
Unlike typical spray foams I’ve used before, this Sprayman Spraycoat feels like a serious upgrade right out of the can. As I started applying it around an oven area, I noticed the dual-nozzle system made it surprisingly easy to control—no mess, no drips, just a smooth, even coat.
The dense, rigid finish it forms is impressive. Once cured, it feels sturdy and solid, making me confident it’ll last through years of temperature swings.
I also like that it doesn’t warp nearby frames or surfaces, which has been a problem with some cheaper foams.
Its fire-resistant qualities are reassuring, especially around heat sources like an oven. The fact that it’s Class-A fire rated and helps reduce heating costs by up to 60% means I get both safety and savings.
Plus, the foam’s UV stability keeps it looking good even as it’s exposed to sunlight over time.
Application is straightforward thanks to the interchangeable nozzles. Whether I’m sealing gaps in drywall, brick, or metal, it adheres well and fills even tricky cavities with ease.
After curing, I can paint over it, making it blend seamlessly into the space.
On the downside, the slightly affected color with UV exposure isn’t a big deal, but it’s worth noting if appearance matters. Also, it’s a bit pricier than some spray foams, but the durability and performance justify the cost for me.
What Is Spray Insulation, and Why Is It Important Around Ovens?
Spray insulation is a type of insulation material applied as a foam. It expands upon application and fills gaps and cracks in walls, ceilings, and around appliances. This insulation improves energy efficiency and thermal performance.
The U.S. Department of Energy defines spray insulation as an effective method for sealing and insulating buildings. It notes that spray polyurethane foam (SPF) is particularly popular for its strong insulation properties and air-sealing capabilities.
Spray insulation consists of various types, including open-cell and closed-cell foam. Open-cell foam is softer and more flexible, providing sound dampening. Closed-cell foam is denser and offers higher insulation values, making it suitable for energy efficiency in areas near heat sources like ovens.
According to the Environmental Protection Agency, proper insulation can reduce energy costs by up to 20%. Additionally, it can help prevent heat loss, maintain consistent temperatures, and improve indoor air quality by reducing drafts.
Factors that contribute to the need for spray insulation around ovens include heat generation, energy efficiency regulations, and the increasing cost of energy. This insulation prevents heat loss or unwanted air infiltration into the kitchen, leading to energy savings.
The National Association of Home Builders states that homes with effective insulation can save families between $200 to $500 annually on energy bills. As energy prices rise, the demand for efficient insulation methods like spray insulation may increase.
Spray insulation around ovens also impacts safety. It reduces fire hazards by maintaining safe temperature levels, which protects both the appliance and the surrounding area.
Implementing best practices, such as choosing high-quality materials and hiring trained professionals, can ensure the effectiveness of insulation. Experts recommend using closed-cell spray foam in high-heat areas for optimal protection.
Technologies like infrared thermography can help identify air leaks and thermal inefficiencies, guiding insulation installation. Proper ventilation should also be considered to minimize moisture accumulation near cooking appliances.
What Are the Key Benefits of Using Fire-Rated Closed Cell Foam for Oven Insulation?
The key benefits of using fire-rated closed cell foam for oven insulation include improved safety, enhanced energy efficiency, soundproofing, moisture resistance, and regulatory compliance.
- Improved Safety
- Enhanced Energy Efficiency
- Soundproofing
- Moisture Resistance
- Regulatory Compliance
The above benefits highlight the diverse advantages offered by fire-rated closed cell foam in oven insulation. Each advantage plays a role in enhancing the overall performance and safety of ovens.
-
Improved Safety: Improved safety is a significant benefit of fire-rated closed cell foam. This material can withstand high temperatures and reduce the risk of fire hazards. For instance, according to the National Fire Protection Association (NFPA), fire-rated insulation helps prevent the spread of flames in the event of a fire. By using this type of foam, manufacturers can meet safety standards and ensure a lower risk of accidents in kitchens.
-
Enhanced Energy Efficiency: Enhanced energy efficiency occurs because closed cell foam provides superior thermal insulation. This foam minimizes heat transfer between the oven and the surrounding environment, thereby reducing energy consumption. The U.S. Department of Energy notes that proper insulation can improve energy savings by up to 30%. As a result, ovens insulated with fire-rated closed cell foam can operate more efficiently, leading to lower energy bills.
-
Soundproofing: Soundproofing is another key benefit of fire-rated closed cell foam. This material helps reduce noise generated by the oven during operating cycles. According to a study by the Acoustical Society of America, foam insulation can absorb sounds effectively, providing a quieter cooking environment. This is particularly advantageous in residential kitchens where noise reduction is desired.
-
Moisture Resistance: Moisture resistance is crucial to maintaining oven integrity. Fire-rated closed cell foam is resistant to water absorption, preventing the growth of mold and mildew. According to the Environmental Protection Agency (EPA), moisture control is essential in reducing health risks associated with mold. Using this foam helps keep the oven dry, maintaining a safer cooking environment.
-
Regulatory Compliance: Regulatory compliance is a necessity in appliance manufacturing. Fire-rated closed cell foam meets various industry standards related to fire safety and insulation. The International Code Council (ICC) outlines regulations requiring certain insulation materials to be fire-rated. By using this foam, manufacturers can ensure their products conform to safety codes, thus avoiding potential legal issues.
These benefits collectively underscore the importance of fire-rated closed cell foam in oven insulation, enhancing safety, efficiency, and performance.
How Does Spray Insulation Improve Gap Sealing Around Ovens?
Spray insulation improves gap sealing around ovens by filling voids and cracks. This insulation expands upon application. It creates a tight seal that restricts air movement. Reduced air leakage enhances energy efficiency. Spray insulation also minimizes heat loss. It protects surrounding areas from heat damage. Additionally, it acts as a moisture barrier. This prevents condensation and potential mold growth. The durable properties of the insulation ensure longevity. Properly sealed gaps also enhance safety by reducing fire hazards. Overall, spray insulation provides an effective solution for sealing spaces around ovens.
What Factors Should You Consider When Selecting Spray Insulation for Ovens?
When selecting spray insulation for ovens, consider the insulation material, thermal resistance (R-value), ignition resistance, application method, and environmental impact.
- Insulation Material
- Thermal Resistance (R-value)
- Ignition Resistance
- Application Method
- Environmental Impact
The following sections will elaborate on these critical factors to assist in making an informed decision.
-
Insulation Material: The type of insulation material is crucial for oven applications. Common materials include polyurethane and fiberglass. Polyurethane offers superior thermal resistance and is lightweight, while fiberglass is an economical option with decent performance. According to a study by the Department of Energy (2021), polyurethane typically provides better performance in high-heat settings compared to fiberglass.
-
Thermal Resistance (R-value): Thermal resistance, known as the R-value, measures an insulation material’s effectiveness. A higher R-value indicates better insulation performance. For ovens, an R-value of at least 7 is recommended for optimal heat retention. The National Institute of Standards and Technology (NIST) suggests that using higher R-values can significantly reduce energy consumption.
-
Ignition Resistance: Ignition resistance is vital for safety. Insulation materials should resist flammability to prevent fire hazards. Regulations, such as those outlined by the National Fire Protection Association (NFPA), mandate that insulation used around high-heat appliances must meet certain ignition resistance standards. Selecting insulation with a Class A fire rating ensures better safety in oven applications.
-
Application Method: The method of applying insulation affects its effectiveness. Some spray insulation requires special equipment for application, while others can be applied with basic tools. For ovens, closed-cell spray foam is often recommended due to its moisture barrier and structural integrity. Manufacturers typically provide guidance on the best application techniques to ensure proper coverage and adhesion.
-
Environmental Impact: Considering the environmental impact of insulation materials is becoming increasingly important. Look for products with low volatile organic compounds (VOCs) and those that meet energy efficiency certifications, like ENERGY STAR. According to the U.S. Environmental Protection Agency (EPA), opting for eco-friendly insulation materials can help reduce overall environmental footprints and health risks.
By weighing these factors, you can choose the appropriate spray insulation for your oven, ensuring efficiency, safety, and sustainability.
Which Safety Standards Must Spray Insulation Comply With for Oven Usage?
The safety standards spray insulation must comply with for oven usage include material flammability ratings and health safety regulations.
- Material Flammability Ratings
- Health Safety Regulations
- Environmental Impact Assessments
- Building Code Compliance
Material Flammability Ratings:
Material flammability ratings are essential for determining how easily insulation can catch fire. Spray insulation is often rated according to the ASTM E84 standard, which measures surface burning characteristics. Products must achieve a flame spread index of 25 or less to be considered acceptable for use around ovens. This means the insulation should not contribute significantly to the spread of flames. Organizations like the National Fire Protection Association (NFPA) emphasize the need for flame-resistant materials in kitchen appliances to reduce fire hazards.
Health Safety Regulations:
Health safety regulations pertain to the chemical composition of spray insulation. Many spray insulations contain polyisocyanurate or polyurethane, which can release harmful isocyanates during application. The Occupational Safety and Health Administration (OSHA) and the Environmental Protection Agency (EPA) require manufacturers to disclose potential hazards and provide safety data sheets. Compliance with these guidelines ensures that workers and residents are not exposed to harmful substances during and after installation.
Environmental Impact Assessments:
Environmental impact assessments examine the potential effects of spray insulation on health and the environment. Many states require compliance with guidelines set by agencies like the EPA. This includes assessing the life cycle impacts of insulation products, focussing on VOC emissions, recyclability, and energy efficiency. Products with lower environmental footprints may receive certifications such as GreenGuard or Energy Star.
Building Code Compliance:
Building code compliance requires that all construction materials, including insulation, meet local building codes for fire safety and health standards. These codes can vary by region but generally require that insulation be non-combustible or have specific fire ratings when used in kitchens. Engaging with local building authorities and being aware of these regulations is crucial for ensuring safe installation practices.
How Can You Properly Apply Spray Insulation Around an Oven?
Properly applying spray insulation around an oven involves careful preparation, proper material selection, and safe application techniques.
-
Preparation: Ensure the area around the oven is clean and dry. Remove any debris, dust, or old insulation to provide a smooth surface for the spray insulation. This step is crucial because it allows for better adhesion of the material.
-
Material Selection: Choose a high-temperature spray foam insulation specifically designed for use near heat sources. Products like polyurethane spray foam are suitable because they offer excellent thermal resistance and can withstand high temperatures. According to the International Association of Certified Home Inspectors (InterNACHI), using appropriate materials prevents fire hazards.
-
Safety Precautions: Before applying spray foam, wear protective gear. This includes gloves, goggles, and a mask to prevent inhalation of fumes. Always work in a well-ventilated area to minimize exposure to potentially harmful chemicals present in the spray.
-
Application Technique: Hold the spray nozzle about 12 inches away from the surface. Apply the insulation in even strokes to avoid oversaturation. Start with a light coat, and allow it to cure as per the manufacturer’s guidelines before applying additional layers. This method ensures an uniform insulation layer without excessive buildup.
-
Curing Time: Allow the insulation to fully cure based on the manufacturer’s instructions. This can typically take anywhere from 24 to 48 hours. Curing is vital to achieve the best insulation performance and durability, as highlighted by the Spray Polyurethane Foam Alliance.
-
Inspection: After curing, inspect the insulation for any gaps or uneven areas. Fill in any deficiencies to ensure complete coverage. This step will maximize thermal efficiency and reduce energy costs.
Following these steps will help achieve effective and safe insulation around an oven, ensuring energy efficiency while minimizing fire risks.
What Common Mistakes Should Be Avoided When Insulating Around Ovens?
Common mistakes to avoid when insulating around ovens include improper material choice, inadequate clearance, moisture intrusion, neglecting heat sources, and not following manufacturer guidelines.
- Improper material choice
- Inadequate clearance
- Moisture intrusion
- Neglecting heat sources
- Not following manufacturer guidelines
These mistakes can lead to safety hazards, reduced efficiency, and damage to the appliance.
-
Improper Material Choice: Improper material choice occurs when insulation materials do not match the heat requirements of an oven. Selecting non-rated insulation materials may lead to melting or combustion. According to the National Fire Protection Association (NFPA), using inappropriate materials around heat-generating appliances increases fire risks. For instance, fiberglass insulation is often recommended for areas near stovetops due to its high heat tolerance.
-
Inadequate Clearance: Inadequate clearance involves installing insulation too close to the oven. This can restrict airflow and trap heat, potentially leading to overheating. The Appliance Manufacturers Association recommends maintaining a specified clearance, often at least 3 inches, between insulation and oven surfaces. A study by the American Society of Heating, Refrigerating and Air-Conditioning Engineers (ASHRAE) highlights that proper clearance improves appliance efficiency and longevity.
-
Moisture Intrusion: Moisture intrusion pertains to the failure to protect insulating materials from humidity and moisture from cooking. Moisture can degrade insulation efficacy and create mold or mildew growth. The Department of Energy (DOE) emphasizes using moisture-resistant insulation materials in kitchens. For instance, closed-cell spray foam insulation can be an excellent choice in humid environments due to its water-resistant properties.
-
Neglecting Heat Sources: Neglecting heat sources refers to not accounting for additional heat-generating appliances placed near the oven. This oversight can cause insulation materials to overheat. According to an article by Home Improvement Monthly, staggered installations of insulation around multiple cooking appliances can help manage heat distribution effectively.
-
Not Following Manufacturer Guidelines: Not following manufacturer guidelines involves overlooking specific manufacturer instructions regarding insulation installations. Non-compliance can void warranties and lead to equipment malfunction. Manufacturers typically provide detailed specifications for insulation materials and installation methods. A 2022 report by Consumer Reports underscored that adhering to these guidelines is crucial for the safe and efficient operation of kitchen appliances.