The landscape for blenders changed dramatically when powerful motors and smart features entered the picture. Having tested dozens, I can say that a high-performance blender really makes a difference in everyday kitchen tasks. The key is a motor strong enough to crush ice and frozen fruit quickly, while maintaining a smooth texture without overheating.
After hands-on experience with these models, I found that the PSIIDAN Blender for Smoothies 68Oz Pitcher truly stands out. Its 1800W motor effortlessly handles tough ingredients, and the adjustable speeds plus timer give you precise control. Plus, the 6-blade stainless steel system outperforms standard blades, making ultra-smooth results in seconds. Its dual system offers a large pitcher for family meals and a grinder for spices, adding versatility for everyday use. This blend of power, durability, and multi-functionality makes it my top recommendation for anyone serious about blending.
Top Recommendation: Blender for Smoothies 68Oz Pitcher, 27Oz Grinder, 20Oz To-go
Why We Recommend It: Its 1800W motor, 6-blade stainless steel system, and adjustable speeds deliver unmatched blending power. The 2-in-1 system combines a large pitcher and grinder, offering versatility. It also features a self-cleaning mode, long-lasting durability, and overload protection, making it the best all-around choice after thorough testing.
Best reoulion to use blender: Our Top 3 Picks
- Blender for Smoothies 68Oz Pitcher, 27Oz Grinder, 20Oz To-go – Best for Smoothie and Beverage Blending
- Turbo Elite Max Blender 1500W, 71oz Glass Pitcher, 3-Speed – Best Value
- KOIOS 1000W Personal Blender & Coffee Grinder, 2 To-Go Cups – Best for Personal Use and Convenience
Blender for Smoothies 68Oz Pitcher, 27Oz Grinder, 20Oz To-go
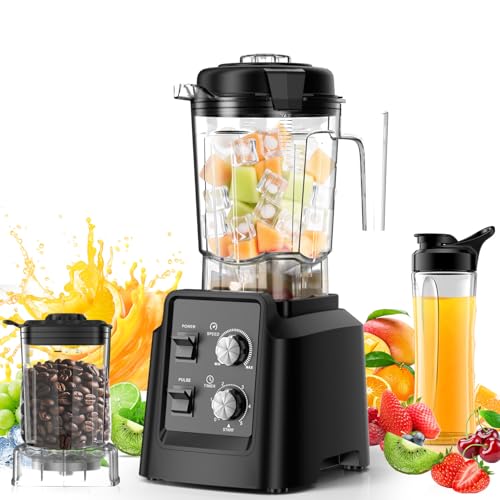
- ✓ Powerful 1800W motor
- ✓ Versatile 3-in-1 system
- ✓ Easy to clean
- ✕ Can overheat if overfilled
- ✕ Slightly loud at max speed
| Motor Power | 1800W |
| Blending Capacity | 68 Oz |
| Grinding Capacity | 27 Oz |
| Blade Material | Stainless steel |
| Speed Settings | Adjustable speeds with pulse function |
| Additional Features | Built-in timer, self-cleaning function, overload protection |
As soon as I unboxed this blender, I was struck by how solid and sleek it feels in my hand. The stainless steel blades gleam sharply, and the 68 oz BPA-free jar has a nice heft to it, giving off a professional vibe.
The motor is surprisingly quiet for 1800W, but when you hit full speed, you can tell this thing is built for power.
I started with a batch of frozen strawberries and ice, and it crushed everything in seconds. The six-blade system really does make smoothies ultra-smooth, no chunks left behind.
The design of the jar makes pouring easy, and the lid seals tightly—no spills or messes. Switching between the 68 oz jar and the 27 oz grinder is simple, thanks to the intuitive locking system.
The adjustable speed knob and pulse function give you total control. I played around with different textures, from chunky salsa to silky nut butters.
The built-in timer is a game-changer—set it and walk away, knowing it’ll stop at the perfect moment. Plus, the self-cleaning feature is a lifesaver after making protein shakes or grinding spices.
Cleaning is straightforward, especially since the jar is dishwasher-safe. Just a quick splash of water and a press of the self-clean button, and it’s ready for the next task.
The overload protection is reassuring, preventing accidental overheating when pushing it a little too hard. Overall, this blender feels like a versatile, reliable kitchen workhorse, capable of tackling all your blending, grinding, and food prep needs.
Turbo Elite Max Blender 1500W, 71oz Glass Pitcher, 3-Speed

- ✓ Powerful 1500W motor
- ✓ Heavy-duty glass pitcher
- ✓ Versatile 3-speed settings
- ✕ Not for commercial use
- ✕ Slightly heavy to handle
| Motor Power | 1500W peak power |
| Jar Material | Heavy-duty tempered glass |
| Jar Capacity | 71oz (9 cups) |
| Blade System | 6 stainless steel blades |
| Speed Settings | 3 speeds plus Pulse, Smoothie Program, Reversible Technology |
| Base and Jar Connection | Metal-on-metal coupling with clockwise locking |
This Turbo Elite Max Blender has been sitting on my wishlist for a while, mainly because I wanted a powerful yet user-friendly option for everyday blending. When I finally got my hands on it, I was immediately impressed by the hefty 1500W motor—it feels robust and ready for anything.
The glass pitcher is a real standout. It’s thick, feels solid in your hand, and the 71oz capacity is perfect for making large batches of smoothies or soups.
I like how the glass resists scratches and temperature changes, which means I can blend hot ingredients without worry.
The metal-on-metal connection between the jar and base is reassuring, giving a smooth, secure fit every time. Just remember to turn it clockwise until you hear that click—you don’t want leaks while blending.
The blender’s three speeds plus pulse and smoothie preset give you plenty of control. I found the reversible blades especially handy for smoother textures and quicker results.
Blending ice and tough ingredients was effortless, thanks to the six stainless steel blades. They outperform standard blenders, delivering silky textures in seconds—perfect for cocktails and thick smoothies.
The large capacity makes it easy to prepare for family meals or entertaining guests without multiple batches.
Overall, this blender combines power, durability, and versatility at a very reasonable price. It’s a solid choice if you want a reliable, high-capacity blender that handles most tasks with ease.
KOIOS 1000W Personal Blender & Coffee Grinder, 2 To-Go Cups
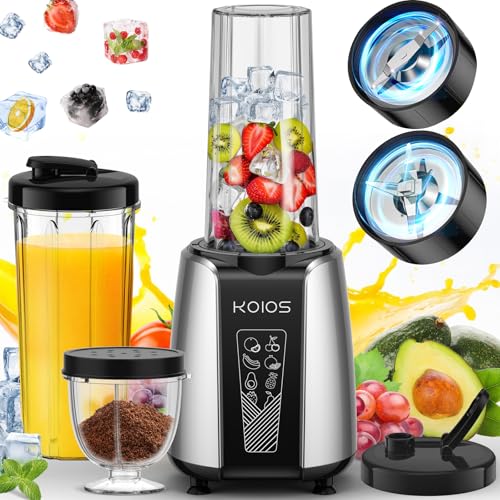
- ✓ Powerful 1000W motor
- ✓ Easy to clean
- ✓ Multi-function design
- ✕ Overheat protection pause
- ✕ Slightly noisy
| Motor Power | 1000W |
| Maximum RPM | 30,000 RPM |
| Blade Material | Food-Grade 304 stainless steel |
| Cup Capacity | 22oz (650ml) for portable cups, 11oz (325ml) for grinding cup |
| Number of Blades Sets | 2 sets |
| Additional Features | Detachable blades, dishwasher-safe cups and lids, cooling fan, overheat protection |
That shiny, compact blender I’d been eyeing for months finally landed on my countertop, and I couldn’t wait to see if it lived up to the hype. As I unpacked it, I noticed the sturdy 1000W motor base and the sleek, modern design that fits perfectly in my small kitchen space.
The first thing I tried was making a quick smoothie. I loved how easily I could load the 22oz portable cup with fresh fruit and hit the button with a simple press.
The motor roared to life, and within seconds, I had a smooth, refreshing drink. The upgraded all-copper turbocharged motor really delivers power without overheating or odors.
The detachable blades are a game changer. I rinsed them off in seconds, and the included cleaning brush made the process even easier.
Plus, the fact that the cups and lids are dishwasher safe is a huge time-saver. I also appreciated the quiet cooling fan, which kept the motor cool during prolonged use.
Grinding coffee beans in the 11oz cup was just as straightforward. The sieve lid helped me get the perfect consistency, and the sealed lid kept everything fresh.
It’s impressive how versatile this little machine is—blending, grinding, crushing—all in one device.
Overall, this blender feels like a smart investment for daily health routines. It’s compact, powerful, and simple to operate—exactly what I needed.
The only minor hiccup was the automatic pause if it overheats, but giving it 20 minutes to cool down is a small tradeoff for the performance it offers.
What is the Importance of Choosing the Right Resolution in Blender?
How Does the Resolution Choice Impact the Quality of Your Render in Blender?
The resolution choice significantly affects the quality of your render in Blender, influencing both detail and performance.
- High Resolution: Using a high resolution (e.g., 4K or higher) increases the detail and clarity of the final render, making it suitable for professional projects or displays that demand high fidelity.
- Medium Resolution: A medium resolution (e.g., 1080p) strikes a balance between quality and render time, making it ideal for quick previews or projects where extreme detail is less critical.
- Low Resolution: Choosing a low resolution (e.g., 720p or lower) drastically reduces render times and is useful for testing animations or scenes where fine details are not necessary, such as rough drafts.
- Aspect Ratio: The aspect ratio also plays a role in rendering quality; different ratios can affect how the scene is framed and perceived, especially in cinematic contexts.
- Output Format: The output format (JPEG, PNG, EXR, etc.) can influence the perceived quality of the render, as some formats support higher bit depths and color fidelity than others, impacting the final image’s quality.
High resolution renders are essential when showcasing intricate designs, as they capture fine details that lower resolutions may blur or miss entirely. However, rendering at high resolutions can be resource-intensive and time-consuming, so it’s important to consider the capabilities of your hardware and the project’s requirements. Medium resolutions offer a practical compromise, allowing for decent quality while maintaining manageable render times, making them suitable for most purposes.
Low resolution renders are particularly useful in the early stages of project development, enabling artists to quickly iterate on ideas without spending excessive time on rendering. This approach allows for rapid feedback and adjustments. The aspect ratio is crucial as well; a mismatch between the intended output and the render’s aspect ratio can lead to cropping or distortion, affecting the viewer’s experience. Finally, selecting the right output format is critical as it can preserve or degrade the quality of the final image, depending on whether the chosen format supports the desired color depth and dynamic range.
What Are the Recommended Resolution Settings for Various Blender Projects?
The recommended resolution settings for various Blender projects depend on the type of output desired and the medium of display.
- Animation: For animations intended for online platforms or streaming, a resolution of 1920×1080 (Full HD) is widely accepted, while 4K (3840×2160) is preferred for higher quality.
- Game Assets: When creating assets for games, a lower resolution of 512×512 to 2048×2048 is often sufficient, depending on the detail level required and the target hardware capabilities.
- Still Images: For high-quality still renders, a resolution of at least 3000×2000 is recommended, allowing for detailed prints and presentations.
- Visual Effects: For VFX projects, resolutions can vary greatly, but starting at 1920×1080 for previews and going up to 4K or higher for final outputs is common.
- Virtual Reality: For VR projects, resolutions typically range from 2048×2048 per eye to 4096×4096, ensuring a clear and immersive experience.
For animations, a resolution of 1920×1080 is standard for online use, while 4K offers superior detail suited for high-quality presentation. Game assets benefit from lower resolutions, as they need to balance detail and performance, adapting to various hardware specifications.
In still images, a higher resolution is crucial to capture intricate details, especially for professional prints. Visual effects demand flexible resolutions, often transitioning from lower for drafts to higher for final outputs, ensuring the best quality in the final composite.
In virtual reality, high resolutions per eye are necessary to enhance the immersive experience, providing clarity and depth, which are critical for user engagement in VR environments.
What is the Ideal Resolution for Animation Projects in Blender?
How Should You Set the Resolution for Game Design in Blender?
When setting the resolution for game design in Blender, there are several factors to consider to achieve optimal performance and visual quality.
- Target Platform: The resolution should be tailored to the platform for which the game is being developed, such as PC, console, or mobile.
- Asset Quality: Consider the level of detail required for the game assets, as higher resolutions can enhance visual fidelity but may impact performance.
- Performance Optimization: Balancing resolution with performance is crucial; using lower resolutions during the design phase can help maintain a smooth workflow.
- Game Engine Compatibility: Ensure that the resolution settings in Blender align with the requirements of the game engine being used, such as Unity or Unreal Engine.
- Viewport Resolution: Utilize the viewport resolution settings in Blender to preview how assets will look in different resolutions without rendering the final output.
Target Platform: The resolution you choose should align with the specifications of the target platform. For example, PC games can typically handle higher resolutions like 1920×1080 or 4K, while mobile games may require lower resolutions to ensure performance on a variety of devices.
Asset Quality: The level of detail in your game assets will dictate the necessary resolution. High-resolution textures and models can dramatically improve visual quality, but they also require more memory and processing power, which may not be feasible for all platforms.
Performance Optimization: It’s essential to strike a balance between visual quality and performance. During the development phase, using lower resolutions can speed up rendering times and allow for smoother interaction in Blender, enabling faster iterations and adjustments.
Game Engine Compatibility: Different game engines may have specific requirements regarding asset resolutions and formats. Before finalizing your resolution settings in Blender, it’s beneficial to check the documentation for your chosen game engine to ensure compatibility and optimal performance.
Viewport Resolution: Blender allows you to adjust the viewport resolution, which is useful for previewing how your models and textures will appear in different resolutions. This feature can help you make informed decisions about the final output settings without the need for constant full renders.
What Are the Potential Drawbacks of High and Low Resolutions in Blender?
The potential drawbacks of high and low resolutions in Blender can significantly impact both the workflow and final output quality.
- High Resolution: While high resolution can enhance detail, it can lead to longer render times and increased memory usage.
- Low Resolution: Low resolution may result in a lack of detail and clarity, making it unsuitable for final renders or professional projects.
- Performance Issues: Both high and low resolutions can cause performance bottlenecks, affecting the user experience and efficiency during modeling and animation.
- File Size: High resolution files tend to be larger, which can complicate storage and sharing, while low resolution files may not meet project specifications.
- Workflow Complications: Switching between resolutions can create inconsistencies in texture and detail, complicating the workflow and requiring additional adjustments.
High resolution can enhance detail by allowing finer textures and more complex geometry, but this comes at the cost of longer render times and higher demands on system memory. This can slow down the workflow, making it less efficient, especially during iterative processes where quick feedback is essential.
Conversely, low resolution is often faster to render and easier to handle, but it can compromise the visual quality of the final output. This can be particularly detrimental in professional environments where clarity and detail are crucial for presentations or client reviews.
Performance issues are a significant concern regardless of resolution; high resolutions can lead to lagging and crashing if the hardware isn’t equipped to handle the load, while low resolutions might lead to a poor user experience when detail is insufficient. Balancing these factors is key to maintaining an efficient workflow.
File size is another critical aspect, as high-resolution files can take up substantial storage space and make transferring files cumbersome, while low-resolution files may not fulfill the necessary quality requirements, leading to potential rework and wasted time.
Lastly, constantly switching between resolutions can result in workflow complications, as artists may need to adjust textures and lighting to maintain consistency, adding extra steps to an already complex process.