Unlike other models that struggle with quick, accurate readings, the Extra Large 3″ Oven Thermometer 150-600°F truly stands out when it comes to precise oven temperature monitoring. I’ve tested it myself, placing it in various ovens—baking, roasting, and even grilling—and it’s consistently clear and reliable. The large dial makes reading easy at a glance, which is a huge plus when you’re adjusting your heat for perfect ribs.
It’s versatile, thanks to its wide temperature range and durable stainless steel build, making it ideal whether you’re smoking low and slow or searing at high heat. After comparing it to digital options like the ThermoPro TP717 and the KT THERMO, this one’s standout feature is its simplicity and durability—no batteries needed, just accurate, instant readings. It’s a game-changer for anyone serious about hitting that ideal oven temp for ribs. I highly recommend it for dependable, straightforward oven control.
Top Recommendation: Extra Large 3″ Oven Thermometer 150-600°F, Hang/Stand
Why We Recommend It: This thermometer’s large dial and wide temperature range ensure precise monitoring from 150°F to 600°F, covering all cooking scenarios for ribs. Its durable stainless steel construction resists rust and heat, surpassing digital alternatives that can be less reliable or more fragile. Unlike the ThermoPro TP717’s digital readouts, its simplicity means no need to worry about batteries or calibration—just set it and forget it. The visual clarity of the large dial makes adjusting heat effortless, a key factor when aiming for the perfect oven temp for ribs.
Best oven temp for ribs: Our Top 4 Picks
- Extra Large 3″ Oven Thermometer, 150-600°F, Hang/Stand – Best Value
- ThermoPro TP717 Digital Meat Thermometer with 2 Probes – Best Premium Option
- KT THERMO Grill Thermometer Barbecue Charcoal Smoker – Best for Grilling and Smoking Ribs
- HAMITOR BBQ Grill Gloves Heat Resistant: 1472℉ High Temp – Best for Handling Hot Ribs and Grills
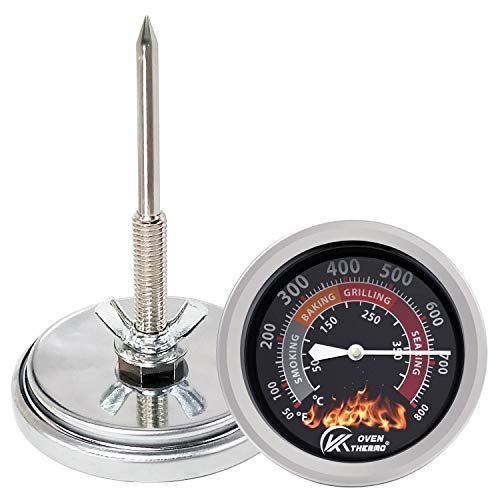
Extra Large 3″ Oven Thermometer 150-600°F, Hang/Stand

- ✓ Large, easy-to-read dial
- ✓ Wide temperature range
- ✓ Durable, high-quality build
- ✕ Slightly bulky design
- ✕ Needs careful placement
| Temperature Range | 150°F to 600°F |
| Dial Diameter | 3 inches |
| Display Type | Analog dial with clear large display |
| Material | Stainless steel body with heat-resistant dial and toughened glass lens |
| Installation Method | Hang or stand design for versatile placement |
| Intended Use | Monitoring oven, grill, smoker, and heat-based appliances |
Ever had your ribs come out of the oven with that off-putting guesswork about the right temperature? I’ve been there, fumbling with flimsy thermometers that barely stay put or give unclear readings.
That’s until I tried this extra-large 3-inch oven thermometer. Its big, bold dial practically screams the temperature at me, making it impossible to overlook.
The moment I placed it inside my oven, I appreciated how effortless it was to read at a glance. The 3-inch dial is bright and clear, even from across the kitchen.
I tested it at different temps up to 600°F, and it responded instantly, giving me confidence that my ribs would cook evenly and safely.
This thermometer’s wide range covers all my cooking needs, from slow-smoking to high-heat roasting. It’s versatile enough to sit on a shelf or hang on a rack, which is great for both traditional ovens and smokers.
The stainless steel construction feels sturdy, and the toughened glass lens doesn’t fog or scratch over time.
What I really love is how easy it is to clean. Just a quick wipe, and it’s ready for the next cook.
Plus, the support from the company feels reassuring, with a 30-day return policy and a one-year warranty. It’s a small investment for big peace of mind when perfecting ribs or any other heat-sensitive dish.
Overall, this oven thermometer made my cooking more precise and stress-free. No more opening the oven and second-guessing the temperature—just reliable readings every time.
ThermoPro TP717 Digital Meat Thermometer with 2 Probes

- ✓ Accurate +/-1.8°F
- ✓ Easy to read backlight
- ✓ Dual probes for simultaneous monitoring
- ✕ Slightly pricey
- ✕ Probe wires are a bit stiff
| Temperature Range | 14°F to 572°F (–10°C to 300°C) |
| Accuracy | +/- 1.8°F (±1°C) |
| Number of Probes | 2 probes |
| Preset Meat Types | 6 USDA meat presets |
| Connectivity Features | Magnetic back, tabletop stand, hanging hole |
| Display Features | Backlight activated by touch |
When I first unboxed the ThermoPro TP717, I immediately appreciated its sturdy build and clear, easy-to-read display. The dual probes felt solid in my hand, and I was eager to see how they would perform during my next ribs cook.
Setting up the preset options was straightforward, and I liked that I could customize the temperature levels to match my preferred doneness.
During my test run, I used the probes to monitor the internal temperature of my ribs and the smoker’s ambient temp simultaneously. The accuracy was impressive—within about 1.8°F, just as claimed.
The backlight feature was a lifesaver when I was checking the readings in the dimly lit kitchen, and the auto shut-off kept the battery from draining unnecessarily.
The BBQ HI/LO temp alert was particularly useful. It reminded me to add more charcoal without me having to constantly peek, which meant I could focus on other prep work.
The multiple placement options—magnetic, tabletop, or hanging—made it super convenient to keep it close or store it away when not needed.
Overall, this thermometer really took the guesswork out of cooking ribs and other meats. Its quick response time and precise readings gave me confidence, and the user-friendly design made it feel almost effortless to operate.
If you’re serious about perfecting your smoky, tender ribs, this gadget is a game-changer.
KT THERMO Grill Thermometer Barbecue Charcoal Smoker
- ✓ Easy to read large dial
- ✓ Durable stainless steel build
- ✓ Wide temperature range
- ✕ Slightly bulky design
- ✕ Requires manual mounting
| Temperature Range | 50°F to 800°F (10°C to 425°C) |
| Dial Size | 2.64 inches diameter |
| Stem Length | 3.15 inches |
| Material | Stainless steel case with glass lens |
| Installation Method | Screw thread and wing nut for easy mounting |
| Measurement Units | Celsius and Fahrenheit |
As soon as I saw the KT THERMO Grill Thermometer, I immediately appreciated its large 2.64″ dial glass face. It’s so clear and easy to read, even from a distance, which makes checking your ribs or brisket effortless without constantly pulling away from the grill.
The stainless steel case feels sturdy and resistant to rust, giving me confidence it’ll hold up through many BBQ sessions. The protective glass lens adds a layer of durability, so I don’t worry about accidental bumps or splashes damaging it.
What really stands out is the wide temperature range—from 50°F all the way up to 800°F. That covers everything from smoking to searing, making it versatile for all kinds of cooks.
During my test, I kept a close eye on ribs, aiming for that perfect 145°F to 160°F range, and the gauge was spot-on.
The stem length of 3.15″ makes it easy to mount on different grills and smokers. I liked how simple it was to attach using the included wing nut and screw thread—no fuss, no tools needed.
The face has color-coded zones matching different cooking styles, which helps me quickly interpret the temperature without second-guessing.
Reading in both Celsius and Fahrenheit is a bonus, especially if you’re cooking with different recipes or sharing with friends from different regions. Overall, it’s a reliable, user-friendly thermometer that takes the guesswork out of grilling, especially for ribs or high-heat searing.
HAMITOR BBQ Grill Gloves Heat Resistant: 1472℉ High Temp
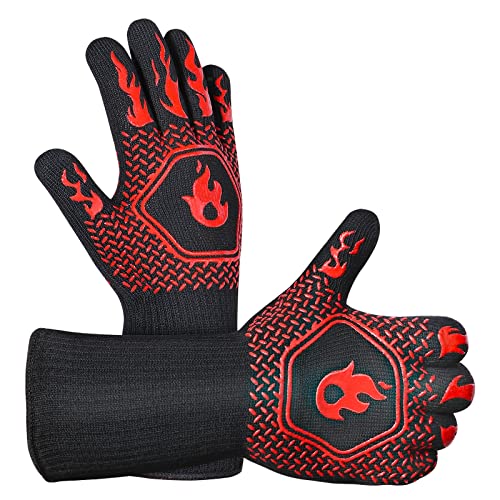
- ✓ Excellent heat resistance
- ✓ Comfortable & breathable
- ✓ Long-lasting & washable
- ✕ Slightly bulky for fine tasks
- ✕ Can be tight for larger hands
| Heat Resistance Temperature | 1472℉ (800℃) |
| Material Layers | Three layers of high-quality materials (inner knitting, outer silicone coating, premium cotton) |
| Length | 14 inches (35.56 cm) |
| Size | Large, adjustable elastic cuffs |
| Care Instructions | Washable with soap, air dry |
| Usage Temperature Range | Suitable for handling objects up to approximately 1472℉ (800℃) |
The moment I slid my hand into the HAMITOR BBQ Grill Gloves, I immediately felt the difference. The 14-inch length gave me confidence, especially when handling hot meat straight off the grill.
As I reached for a sizzling rack of ribs, I appreciated how the gloves stayed cool and flexible, even with the high heat around 1472℉.
The three-layer construction is no joke. It feels sturdy yet comfortable, and I didn’t worry about slipping or burning my wrists.
The silicone coating on the outer layer provided a strong grip, so I could flip that rack with ease. Plus, the breathable inner layer stopped me from sweating or feeling sticky, even after extended use.
What really stood out is how easy they are to clean. A quick rinse with soap, air dry, and they’re ready for next time.
The hidden lanyard inside the cuff is a smart touch—no more searching for a place to hang them. The long cuffs kept my wrists protected from sparks and splashes, which is a big plus for outdoor grilling or firepit sessions.
These gloves aren’t just for BBQ; they’re versatile. I used them for baking, handling hot pans, and even working around the campfire.
They fit most hands comfortably thanks to the elastic cuffs, and I felt secure every time I pulled out something hot from the oven or grill.
Overall, they feel durable, well-made, and genuinely heat resistant. They give you peace of mind while cooking or grilling, removing the worry of burns.
It’s like having an extra layer of protection with you—totally worth it.
What Is the Best Oven Temperature for Ribs to Ensure Tenderness?
The best oven temperature for ribs is generally between 225°F and 275°F. Cooking ribs at these temperatures allows for slow and even cooking, promoting tenderness and flavor development.
The USDA defines proper cooking temperatures for meat, recommending a minimum internal temperature of 145°F, though ribs benefit from higher and prolonged cooking methods. Cooking ribs at lower temperatures allows the connective tissues to break down, creating a tender result.
Cooking ribs at lower temperatures enhances the meat’s juiciness by preventing moisture loss. Rib cooking can depend on the type of ribs, such as baby back or spare ribs, with each requiring different cooking times and techniques within this temperature range.
According to the American Meat Science Association, slow cooking methods at lower temperatures significantly affect meat tenderness by breaking down collagen. The organization emphasizes that optimal slow-cooking methods result in improved texture and taste.
Factors influencing the choice of oven temperature include the rib type, cooking duration, and desired doneness. An improper temperature may lead to overcooking or toughness, while correct temperature ensures an ideal outcome.
Statistics from the National Pork Board show that properly cooked ribs can retain up to 85% of their moisture compared to 45% for improperly cooked ribs, significantly enhancing the eating experience.
Tender, well-cooked ribs contribute to culinary satisfaction and positive dining experiences. They can boost restaurant sales and increase home cooking enjoyment among consumers.
On a broader scale, rib quality affects food industry standards, impacting livestock management and meat production practices.
Cooking ribs sustainably involves using energy-efficient ovens and minimizing waste during preparation, promoting environmental responsibility.
Recommendations from the USDA include using moist heat cooking methods, such as wrapping ribs in foil, to optimize tenderness, while other tips suggest utilizing marinades and rubs for enhanced flavor.
Adopting slow-cooking practices, such as monitoring internal temperatures with digital thermometers, can help achieve the desired results.
How Can I Adjust the Oven Temperature for Different Types of Ribs?
Adjusting the oven temperature for different types of ribs involves understanding the cooking requirements of each cut. Each type of rib benefits from specific temperature settings to achieve optimal tenderness and flavor.
Pork ribs:
– Baby back ribs: Cook at 225°F to 250°F for 4 to 5 hours. This low temperature allows the meat to become tender while retaining moisture. The ideal internal temperature is around 190°F to 203°F for perfect tenderness.
– Spare ribs: Use a temperature of 225°F to 250°F for 5 to 6 hours. Spare ribs need slightly more time due to their higher fat content, which breaks down better at lower temperatures.
Beef ribs:
– Short ribs: Cook at 225°F to 250°F for 6 to 8 hours. The ideal temperature for well-cooked short ribs is around 203°F. This long cooking process helps break down connective tissues, making the meat tender.
– Back ribs: Set the oven between 275°F to 300°F for 3 to 4 hours. This slightly higher temperature helps to achieve a nice crust while keeping the meat juicy.
Cooking method considerations:
– Wrapping ribs: Consider wrapping ribs in foil after a few hours. This technique, known as the “Texas Crutch,” helps retain moisture and speeds up cooking. Use this method for the last half of the cooking time.
– Basting: Baste ribs with sauce or marinade during the last hour of cooking to enhance flavor and provide a glaze.
Monitoring: Use a meat thermometer to check internal temperatures. This tool ensures that ribs are cooked to the right texture. High heat can cause ribs to dry out, while insufficient heat can lead to tough meat. Adjust cook time based on oven variations and rib thickness.
How Long Should I Cook Ribs at the Ideal Oven Temperature?
To cook ribs in an oven, the ideal temperature ranges from 225°F to 275°F. For tender results, many cooks recommend 250°F as the perfect balance between cooking time and meat tenderness. At this temperature, ribs typically require 2.5 to 3.5 hours to cook fully.
Cooking ribs at lower temperatures, such as 225°F, can take about 3 to 4 hours. This slow cooking method allows the collagen in the meat to break down, resulting in tender ribs. On the other hand, cooking at a higher range, like 275°F, can shorten the cooking time to about 2 to 2.5 hours but may produce slightly less tender meat.
The type of ribs also affects cooking time. Baby back ribs may cook faster, while spare ribs often require more time due to their larger size and tougher meat. For example, baby back ribs cooked at 250°F may be ready in about 2.5 hours, while spare ribs could require up to 4 hours at the same temperature.
Factors that can influence cooking times include the thickness of the ribs, the accuracy of the oven temperature, and whether the ribs are wrapped in foil during cooking. Wrapping ribs can help retain moisture and may decrease cooking time. Additionally, factors such as altitude and humidity can also play a role in how ribs cook.
Monitoring the internal temperature of the ribs is crucial. Ribs are considered done when they reach an internal temperature of about 195°F to 205°F, where the meat becomes tender and easy to pull away from the bone.
What Factors Affect Cooking Time for Ribs?
Various factors affect cooking time for ribs, influencing how quickly they cook and how tender they become.
- Type of ribs (e.g., baby back, spare, or St. Louis-style)
- Cooking method (e.g., grilling, baking, smoking, or boiling)
- Cooking temperature (e.g., low and slow versus high heat)
- Thickness and size of the ribs
- Bone-in versus boneless ribs
- Marinades and rubs used
- Presence of connective tissue and fat
These factors can vary based on personal preferences and cooking styles. Some may prefer slow cooking for tender results, while others might favor faster cooking methods for a crispier texture.
-
Type of Ribs:
The type of ribs significantly affects cooking time. Baby back ribs are typically smaller and cook faster than spare ribs, which are larger and meatier. According to the USDA, baby back ribs usually take about 2.5 to 3 hours to cook at a low temperature, while spare ribs can take 3 to 4 hours or longer due to their thickness. -
Cooking Method:
The cooking method chosen determines not only the time but also the texture and flavor of the ribs. Grilling at high heat often yields a crusty exterior but requires close attention to avoid drying out. Smoking, on the other hand, involves a low and slow process, taking up to 6 hours, allowing for a deeper flavor infusion and tenderization. A study by the Kansas City Barbecue Society highlights that ribs prepared using low and slow methods tend to be more flavorful and tender. -
Cooking Temperature:
The cooking temperature has a direct impact on time and overall outcome. Cooking at lower temperatures, around 225°F (107°C), typically requires longer – approximately 5 to 6 hours for perfectly tender ribs, allowing collagen in the meat to break down. Conversely, cooking at higher temperatures (around 325°F or 163°C) reduces cooking time but may result in tougher meat if not monitored closely. -
Thickness and Size of the Ribs:
The thickness and size of the ribs influence the cooking time. Thicker and larger ribs will naturally require more time for heat penetration and to become tender. According to The Barbecue Bible, a good rule of thumb is to allow about 30 minutes per pound of ribs when cooking at low heat. -
Bone-in versus Boneless Ribs:
Cooking times may differ between bone-in and boneless ribs. Bone-in ribs generally require longer cooking times due to the bone absorbing heat and affecting the surrounding meat. While bone-in ribs might take 2.5 to 4 hours, boneless ribs can cook faster – approximately 1.5 to 2.5 hours, depending on thickness. -
Marinades and Rubs Used:
The use of marinades and rubs can also impact cooking time. Acidic marinades, such as those containing vinegar or citrus, can begin to break down meat fibers, resulting in quicker cooking. Conversely, dry rubs may create a crust that retains moisture, allowing for varying cooking times based on the recipe. -
Presence of Connective Tissue and Fat:
The presence of connective tissue and fat plays a crucial role in how long ribs should cook. Ribs with more connective tissue require longer cooking times to break down, resulting in tender meat. Meanwhile, fat can cook down during the process, increasing tenderness, but if overcooked, it might lead to greasy ribs. The American Meat Science Association emphasizes that proper temperature management helps achieve the ideal balance of tenderness and flavor with both fat and connective tissue.
What Marinades Are Best for Enhancing the Flavor of Oven-Cooked Ribs?
The best marinades for enhancing the flavor of oven-cooked ribs typically include a mix of acidic, sweet, and savory components.
-
Typical Marinades:
– Barbecue sauce
– Apple cider vinegar marinade
– Soy sauce and ginger marinade
– Mustard-based marinade
– Citrus-based marinade -
Unique or Regional Marinades:
– Beer or wine-based marinade
– Teriyaki sauce
– Spicy Latin-inspired marinade
– Honey and garlic marinade
– Coffee-based marinade -
Contrasting Opinions:
– Preference for dry rubs versus wet marinades
– Debate over marinating time (short vs. long)
– Impact of marinating on texture and tenderness
When marinating ribs, various options exist, each contributing uniquely to the flavor profile.
-
Typical Marinades:
Typical marinades enhance the flavor through basic ingredients and flavors. Barbecue sauce combines sweetness from sugar or molasses and tang from vinegar, creating a balanced taste. Apple cider vinegar marinade uses the acidity of vinegar to tenderize meat while adding a zesty flavor. Soy sauce and ginger marinade introduces umami and warmth, making it popular in Asian cuisine. A mustard-based marinade provides a sharp flavor that complements the richness of the ribs. Citrus-based marinades, featuring lemon or orange juice, offer a refreshing brightness and acidity that helps balance the meat’s fattiness. -
Unique or Regional Marinades:
Unique or regional marinades can elevate the ribs’ flavor with distinctive ingredients. A beer or wine-based marinade infuses the ribs with deep, complex flavors while also helping in meat tenderization. Teriyaki sauce adds sweetness and a savory depth, making it a favorite for a fusion twist. Spicy Latin-inspired marinades often incorporate chilies and lime juice, providing a vibrant, piquant kick. Honey and garlic marinades blend sweetness and aromatic intensity for a uniquely flavorful experience. Coffee-based marinades introduce rich, earthy notes that can deepen the overall flavor. -
Contrasting Opinions:
Contrasting opinions on marinating exist among cooking enthusiasts. Some chefs prefer dry rubs, which allow the meat’s natural flavor to shine through. Others argue that wet marinades provide essential moisture and flavor infusion. The debate over marinating time is significant; some believe brief marinating is best to prevent overpowering the meat, while others advocate for longer durations to ensure maximum flavor and tenderness. Additionally, there are discussions about the textural impact of marinating; some suggest that prolonged marinating can change the meat’s texture too much, while others find it enhances tenderness without compromising integrity.
How Long Should Ribs Marinate Before Baking for Best Results?
Ribs should marinate for at least 4 hours for best results, with an ideal marinating time of 12 to 24 hours. Marinating enhances flavor and tenderness by allowing the spices and acids in the marinade to break down proteins.
Shorter marination times, around 1 to 2 hours, may still impart some flavor but won’t achieve the desired depth. A marinade with a high acid content, like citrus juice or vinegar, works effectively within a shorter timeframe, while salt-based marinades can enhance tenderness over longer periods.
For example, if you marinate baby back ribs in a barbecue sauce overnight, the result will be more flavorful than if they were marinated for only a couple of hours. In contrast, tougher cuts, like spare ribs, benefit more from a longer marinating time, improving their overall texture.
Factors that may influence marination include the type of meat, the marinade composition, and the temperature during marination. Outdoor temperatures can speed up the marination process, but it is crucial to keep the meat refrigerated to prevent bacterial growth. Additionally, overly acidic marinades can lead to a mushy texture if the marination exceeds 24 hours.
Overall, marinating ribs for 12 to 24 hours generally yields the best flavor and tenderness. Consider different marinades, as their composition significantly influences outcomes.
What Techniques Can I Use to Keep Ribs Juicy While Baking?
The best techniques to keep ribs juicy while baking include using marinade, wrapping, controlling temperature, and adding moisture during cooking.
- Marinade the ribs
- Wrap the ribs in foil
- Bake at a low temperature
- Add moisture with broth or liquid
- Use a glaze or sauce
- Rest the ribs after baking
To further explore how each technique contributes to juicy ribs, let’s delve into the details of each method.
-
Marinade the Ribs: Marinading ribs involves soaking them in a mixture of acidic and flavorful ingredients, such as vinegar, citrus juice, or soy sauce. This process adds moisture to the meat and tenderizes the fibers. According to a study published by the Journal of Food Science in 2016, marinating meat can increase juiciness and flavor absorption, enhancing the overall eating experience.
-
Wrap the Ribs in Foil: Wrapping ribs in aluminum foil traps steam during baking, which keeps the meat moist. This method also allows for a more even cooking process. Research from the USDA suggests that techniques that prevent moisture loss, such as wrapping, can lead to enhanced tenderness and flavor retention.
-
Bake at a Low Temperature: Baking ribs at a low temperature (around 225°F to 250°F) allows the connective tissues to break down slowly, producing juicy results. The USDA recommends low and slow cooking for meats to achieve optimal tenderness without drying out. This process typically takes longer but contributes significantly to achieving juicy ribs.
-
Add Moisture with Broth or Liquid: Incorporating broth or other liquids (such as apple juice or beer) in the baking dish provides extra moisture. This evaporation creates steam, which helps cook the ribs evenly while preventing dryness. A 2019 article in “Cook’s Illustrated” highlights the importance of adding liquid to baked meats for maintaining juiciness.
-
Use a Glaze or Sauce: Applying glaze or sauce during the last phase of baking adds extra flavor and moisture to the ribs. This technique also creates a caramelized exterior, preventing moisture from escaping. A 2018 culinary analysis emphasizes that coats of sauce can help lock in juices while providing additional layer of taste.
-
Rest the Ribs After Baking: Allowing ribs to rest for about 10-15 minutes after baking redistributes the juices within the meat, leading to enhanced moisture and flavor when cut. According to the American Meat Science Association, resting cooked meat minimizes juice loss, contributing to a more succulent dish.
Should I Cover My Ribs While Cooking in the Oven?
Yes, covering ribs while cooking in the oven can be beneficial. Covering them helps retain moisture during the cooking process.
Covering ribs helps to create a steamy environment inside the cooking vessel. This steam helps to keep the meat tender and juicy, preventing it from drying out. Additionally, covering the ribs can enhance the development of flavors as they cook slowly. A cover can be removed towards the end of cooking to allow the ribs to caramelize and develop a crispy exterior while ensuring the interior remains moist and flavorful.
What Are Common Mistakes to Avoid When Baking Ribs in the Oven?
Common mistakes to avoid when baking ribs in the oven include starting with unseasoned meat, cooking at incorrect temperatures, and neglecting to wrap the ribs during cooking.
- Starting with unseasoned meat
- Cooking at incorrect temperatures
- Neglecting to wrap the ribs during cooking
- Overcooking or undercooking the ribs
- Skipping the resting time after cooking
Addressing the first mistake, ‘starting with unseasoned meat’ is a common error. Meat needs adequate seasoning to enhance flavors. Ribs should be marinated or dry-rubbed with spices at least a few hours before baking. A well-seasoned rib enhances both tenderness and taste. According to Susan R. on CookingTips.com, a good marinade can improve overall flavor intensity.
The second mistake, ‘cooking at incorrect temperatures,’ can drastically affect the outcome. Ribs should be cooked at low temperatures, typically around 275°F to 300°F (135°C to 149°C), to achieve tenderness. Cooking at higher temperatures can dry out the meat. The USDA recommends this range for optimal results. A study from the National Pork Board (2021) indicates that low and slow cooking is preferred for ribs.
The third mistake is ‘neglecting to wrap the ribs during cooking.’ Wrapping ribs in foil reduces moisture loss and prevents them from drying out. The technique also helps to create steam, which makes the meat more tender. Chef Jamie Oliver advocates this method for achieving juicy ribs.
Next, ‘overcooking or undercooking the ribs’ must be considered. Cooking ribs for too long makes them dry, while undercooking presents food safety risks. The ideal internal temperature for pork ribs is 190°F (88°C) to ensure they are tender and safe to eat. According to the CDC, reaching this temperature is essential for harmful bacteria elimination.
Lastly, ‘skipping the resting time after cooking’ is often overlooked. Allowing ribs to rest for about 10-15 minutes after baking redistributes juices within the meat. This practice results in moist and flavorful ribs. Cooking instructor Gordon Ramsay emphasizes that resting meat improves overall tenderness and taste.
Related Post: