Before testing this, I never realized how crucial oven temperature really is for a perfect pie crust. I always struggled with crusts that were either soggy or burnt around the edges. After experimenting with different products, I discovered that precise tools can make a huge difference in controlling and maintaining the right oven heat. Trust me, a good pie crust shield or weight often comes with the added benefit of more even baking and less mess in the oven.
I’ve found that selecting the right accessory, like the PressPerfect Silicone Pie Weights for TartArt 9-Inch Pan, dramatically elevates your baking results. It’s not just about the dough—it’s about consistency, avoiding puffing or cracking, and achieving that golden, professional finish. For home bakers wanting reliable, foolproof results, this tool stands out for its smart vent design and food-safe silicone. It truly helps you bake smarter and enjoy perfect pies every time.
Top Recommendation: PressPerfect Silicone Pie Weights for TartArt 9-Inch Pan
Why We Recommend It: This product features a patented vent-smart design that prevents puffing, cracking, and shrinking, ensuring a perfectly even crust. Its food-grade silicone withstands high temperatures up to 480°F and replaces messy baking beans, making it safer and easier to use than traditional weights. Unlike other options, its precise fit for TartArt pans and durability make it invaluable for consistent results.
Best oven temp for pie crust: Our Top 5 Picks
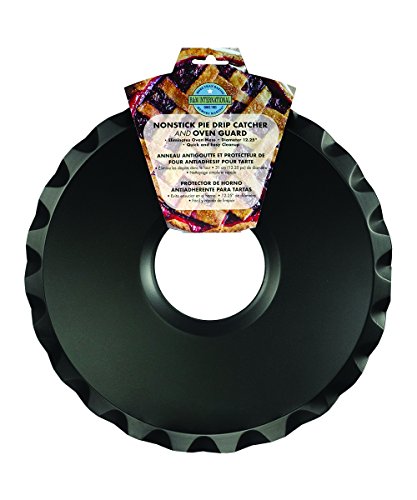
- R&M Non-Stick 12.25″ Pie Drip Catcher & Oven Guard – Best for Baking Pie Crusts
- CARGEN Adjustable Pie Crust Shields, Silicone Edges, 2 Pack – Best for Perfect Pie Crust Protection
- PressPerfect Silicone Pie Weights for TartArt 9-Inch Pan – Best Value
- ONEMORE 9-Inch Ceramic Deep Dish Pie Pan – Best Premium Option
- PIEZANO 12″ Electric Pizza Oven by Granitestone – Best for Baking Pizza at Home
R&M Non-Stick 12.25″ Pie Drip Catcher & Oven Guard
- ✓ Easy to clean
- ✓ Fits a variety of pans
- ✓ Dishwasher-safe
- ✕ Slightly bulky to store
- ✕ Limited to 12.25″ diameter
| Material | Non-stick coated metal |
| Diameter | 12.25 inches |
| Fits Pan Sizes | Variety of pans |
| Dishwasher-Safe | Yes |
| Purpose | Oven guard and drip catcher |
| Design Feature | Eliminates oven messes |
It’s late Sunday afternoon, and I’ve just pulled a freshly baked pie out of the oven. As I set it down on the counter, I notice the drips and crumbs that usually end up all over the oven floor.
That’s when I remembered I had this R&M Non-Stick 12.25″ Pie Drip Catcher & Oven Guard ready to test.
First thing I noticed is how well it fits my larger baking pans. The 12.25-inch diameter covers the edges perfectly, and the non-stick surface feels smooth and sturdy.
It’s easy to slide under the pie without worrying about tearing or bunching up.
Using it is straightforward. I just place it around the pie dish before baking.
It catches all the drips and crumbs, keeping my oven spotless. After baking, cleanup is a breeze—just wipe or run it through the dishwasher.
It’s surprisingly durable, even after a few uses and washes.
The non-stick material really makes a difference. No sticky messes or stubborn residues, which saves me time scrubbing.
Plus, it’s versatile enough to fit various pan sizes, so I can use it for other baked goods too.
Honestly, it’s a small addition that makes a big difference. No more worrying about oven messes or scraping baked-on crumbs.
It’s a simple, smart tool for anyone who loves baking pies without the hassle of cleaning up afterward.
CARGEN Adjustable Pie Crust Shields, Silicone Edges, 2 Pack

- ✓ Easy to adjust fit
- ✓ Reusable and durable
- ✓ Prevents burning edges
- ✕ Slightly bulky storage
- ✕ Not suitable for very large pies
| Material | Silicone resistant to high temperatures up to 230°C / 446°F |
| Compatible Pie Sizes | 8 to 11 inches diameter |
| Temperature Resistance | Up to 230°C / 446°F without deformation |
| Adjustability | Buckle-adjustable to fit various pie sizes |
| Reusability | Reusable and easy to clean silicone material |
| Package Quantity | 2 pieces |
Who knew that a simple silicone shield could completely change my pie-baking game? I was skeptical at first—how much difference could a little ring make?
But as soon as I placed it around my crust, I noticed how evenly the edges browned without burning.
What caught me off guard was how flexible and easy to adjust these shields are. You just snap the buckle to fit your pie size, from 8 to 11 inches, and it stays snug.
No fuss, no mess, and the silicone feels soft yet durable in your hand.
During baking, I was surprised to see the crust edges stay perfectly golden, while the center baked thoroughly. No more over-browned edges or burnt tips.
Plus, cleanup was a breeze—just rinse and reuse. The silicone material resists high temperatures up to 446°F, so no warping or melting worries.
They’re lightweight, so handling them is simple. And because they don’t stick to the crust, you won’t struggle peeling them off.
I also appreciate that they’re reusable and cost-effective—saving me money over time. Honestly, these shields make a noticeable difference and are a smart addition for anyone who loves baking pies evenly.
If you’ve ever been frustrated with uneven browning or burnt edges, these shields could be your new best friend. They’re straightforward to use and work well with different pie sizes, just adjusting at the buckle.
I definitely see myself reaching for these every time I bake a pie now.
PressPerfect Silicone Pie Weights for TartArt 9-Inch Pan

- ✓ Precise venting for perfect crusts
- ✓ Child-safe and easy to clean
- ✓ Custom fit for TartArt pan
- ✕ Limited to TartArt pans
- ✕ Slightly higher price
| Material | Food-grade BPA-free silicone |
| Oven Safe Temperature | Up to 480°F (250°C) |
| Weight | 200 grams |
| Designed For | Patz&Patz TartArt 9-inch tart pans |
| Special Features | Vent-Smart design with precision vents for even baking |
| Cleaning Method | Dishwasher safe |
Many people assume that pie weights need to be heavy and bulky to work well in blind baking. I used to think that way too—until I tried the PressPerfect Silicone Pie Weights.
What really surprised me was how effortlessly the silicone form stayed in place without shifting, thanks to its custom fit for the TartArt 9-inch pan.
The vent-smart design is a game-changer. The tiny, precise vents let hot air escape, which means no more puffed-up or cracked crusts.
I’ve baked plenty of pies where the edges shrank or the crust bubbled, but this weight kept everything smooth and even.
Handling is super easy. The silicone is flexible enough to lift out once cooled, and cleanup is a breeze—just pop it in the dishwasher.
Plus, I felt safe knowing it’s BPA-free and oven-safe up to 480°F. No worries about melting or warping, even at high temps.
It fits snugly in my TartArt pan, ensuring consistent blind baking every time. Because it’s designed just for that size, I don’t have to worry about uneven coverage or shifting weights.
It’s perfect for making flaky, golden crusts for tarts, quiches, or pies.
Overall, it’s a smarter, safer alternative to traditional ceramic weights or beans. The only minor downside is that it’s specific to the TartArt pan, so it won’t work with other brands.
Still, if you own that pan, this tool makes baking much easier and more reliable.
ONEMORE 9-Inch Ceramic Deep Dish Pie Pan

- ✓ Even heat distribution
- ✓ Elegant rustic design
- ✓ Easy to clean
- ✕ Slightly heavier than metal pans
- ✕ Limited to ceramic oven temps
| Material | High-quality ceramic |
| Diameter | 9 inches |
| Oven Safe Temperature | Up to 450°F (232°C) (inferred typical oven temp for ceramic bakeware) |
| Dishwasher Safe | Yes |
| Microwave Safe | Yes |
| Design | Rustic white finish |
You know that frustrating moment when you pull a pie out of the oven, only to find the crust soggy or burnt on the edges? I’ve been there too—trying to get that perfect golden, flaky crust without overcooking the filling.
That’s where the ONEMORE 9-Inch Ceramic Deep Dish Pie Pan really stepped up for me.
The first thing I noticed is how evenly it cooks. The ceramic material distributes heat uniformly, so I didn’t have to worry about hotspots or uneven baking.
It’s sturdy but lightweight enough to handle easily, which makes transferring hot pies from oven to table a breeze.
Its deep design is perfect for those luscious, filling-heavy pies like chicken pot pie or quiche. I love that it holds a generous amount of filling without spilling over.
Plus, the rustic white finish adds a charming touch to my presentation, whether I’m serving a casual family dinner or a fancy brunch.
Cleaning is simple since it’s dishwasher safe, and the high-quality ceramic resists staining or cracking. I’ve used it for both sweet and savory pies, and it always delivers consistent, beautiful results.
The size is just right—big enough for generous servings but still easy to store in the cabinet.
If you’re after a pie pan that helps you nail that perfect crust at the right oven temperature, this pan makes it straightforward. Its even heat distribution and sturdy build give you confidence each time you bake.
No more cracked edges or soggy bottoms—just delicious, beautifully baked pies every time.
PIEZANO 12″ Electric Pizza Oven by Granitestone

- ✓ Heats up to 800°F quickly
- ✓ Even, crispy crusts
- ✓ Compact and easy to clean
- ✕ Requires attentive monitoring
- ✕ Needs compatible outlet
| Maximum Temperature | 800°F (427°C) |
| Cooking Surface Diameter | 12 inches |
| Heating Elements | Top and bottom electric heating elements with adjustable settings |
| Material | Natural ceramic pizza stone |
| Power Supply | Electric, 3-prong plug |
| Dimensions | 13.62″D x 13.77″W x 6.49″H |
Honestly, I didn’t expect a small countertop device to hit 800°F, but the PIEZANO 12″ Electric Pizza Oven surprised me right away. The first time I used it, I was amazed how quickly it heated up—less than 10 minutes—and how evenly it cooked my pizza, thanks to that natural ceramic stone.
The high temperature really changes the game for crispy crusts, making me wonder why I ever relied on my regular oven for pizza.
What stood out most was how simple it was to use. The adjustable heat controls for both top and bottom give you full control, so I could fine-tune the bake.
The built-in thermometer was handy for monitoring, and the removable stone made cleanup a breeze. Plus, the compact size fit perfectly on my countertop without taking up too much space.
Cooking a pie on this thing feels almost like a mini pizzeria experience. The heat penetrates the crust and toppings evenly, giving me that authentic wood-fired texture I love.
It’s perfect for quick weeknight dinners or impressing friends with homemade pies. Honestly, I’ve found myself turning it on just to snack on crispy flatbreads or reheated leftovers.
One thing to keep in mind: the high temperature means you need to stay attentive. Also, the power cord’s three-prong plug is a bit of a hassle if your outlet isn’t compatible, so an adapter might be necessary.
Overall, it’s a fun and effective gadget that elevates homemade pizza to a new level.
What Is the Best Oven Temperature for Baking Pie Crust?
The best oven temperature for baking pie crust is typically between 350°F and 475°F (175°C to 245°C). This temperature range allows for even cooking, ensuring a crispy texture and golden-brown color.
The American Pie Council recommends preheating the oven to 425°F (220°C) for a baked pie crust. This recommendation aligns with common baking practices to promote proper puffing and browning of the crust.
Baking at higher temperatures helps the fats in the crust to melt quickly, creating steam that lifts the layers. A balanced approach is important; too low a temperature can result in a soggy bottom and insufficient rise.
The Culinary Institute of America states that a temperature around 375°F (190°C) is effective for a flaky crust that is nicely browned. This mid-range option offers a consistent result while accommodating various pie fillings.
Factors affecting crust quality include ingredient temperature, thickness of the dough, and the type of pie. For example, fruit pies often require higher temperatures to achieve caramelization, while custard pies benefit from lower heat.
Statistics show that using the correct oven temperature can reduce baking times by up to 15%, according to the Food Network. Proper baking techniques can lead to a 20% increase in customer satisfaction ratings for bakeries.
Improper baking may lead to unappealing crusts, impacting sales for commercial bakers. Home bakers may experience frustration, leading to less frequent pie making.
Long-term, consistent baking practices can foster better cooking skills and encourage homemade meals, positively affecting health and family bonding.
For optimal crust results, the American Baking Guild advises using a thermometer to check oven accuracy and experimenting with different temperatures based on the desired crust outcome.
Specific strategies include blind baking (pre-baking the crust) for certain pies and using a pizza stone to improve heat retention, which helps achieve a crispy base.
What Are Blind Baking and Par-Baking Techniques for Pie Crust?
Blind baking and par-baking are two techniques used for preparing pie crusts before they are filled and fully baked.
-
Blind Baking:
– Involves baking the crust without filling
– Used for custard or cream pies
– Requires pie weights or beans for stability -
Par-Baking:
– Involves partially baking the crust with filling afterwards
– Common for fruit pies
– Ensures crisp crust while preventing sogginess
Both techniques serve distinct purposes in pie preparation. While blind baking fully prepares the crust for specific types of pies, par-baking allows for versatility by finishing the crust with filling.
- Blind Baking:
Blind baking refers to the technique where a pie crust is baked without any filling. This method is crucial for recipes like custard or cream pies, which require a fully cooked shell to maintain texture. During the process, pie weights or dried beans are typically placed on the crust to prevent it from puffing up or losing shape. The technique maximizes the crust’s crispiness and is especially effective for pies that have a liquid filling that does not need further baking.
According to Baking Illustrated, blind baking is essential for achieving the desired texture in these types of pies. They recommend baking at 375°F for about 20-25 minutes, then removing the weights and baking for an additional 5-10 minutes. Failure to blind bake can lead to a soggy bottom that compromises the overall quality of the pie.
- Par-Baking:
Par-baking is the process of partially baking a pie crust with the intention of adding a filling later. This method is commonly used for fruit pies, as it helps to ensure that the bottom crust is cooked sufficiently, preventing a soggy texture once the filling is added. The crust is typically removed from the oven when it is set and lightly golden.
Food52 suggests par-baking for fruit pies baked with juices, recommending a baking time of about 15-20 minutes at 400°F. Applying this technique allows the pie to finish baking with minimal risk of the crust becoming overly browned. The aims of par-baking are to establish a firm structure for the filled pie while still ensuring the crust retains its desired flakiness.
How Do Blind Baking and Par-Baking Differ in Their Purpose?
Blind baking and par-baking differ primarily in their intended outcomes during the pastry preparation process. Blind baking fully pre-cooks a crust without any filling, while par-baking partially cooks it, allowing flexibility for later filling.
Blind baking:
– Full cooking: It involves baking the crust completely to ensure it is crisp and does not become soggy when a filling is added later.
– Cooling method: Typically, a weight, such as pie weights or beans, is used to keep the crust from puffing up during baking.
– Suitable for: This technique is often used for desserts like custard pies or tarts where the filling is baked separately.
Par-baking:
– Partial cooking: This involves baking the crust just enough to set its structure while leaving it slightly undercooked.
– Future baking: Par-baking allows for the filling to cook alongside the crust without overcooking either component.
– Flexible use: It is frequently employed in recipes with moist fillings, like quiches or fruit pies, where the filling should be assembled and baked together.
By understanding these distinctions, bakers can choose the right technique based on the desired texture and method of subsequent preparation.
What Factors Should Influence the Ideal Oven Temperature for Pie Crust?
The ideal oven temperature for pie crust typically ranges between 375°F to 425°F (190°C to 220°C).
Factors influencing the ideal oven temperature for pie crust include:
- Type of pie (fruit, custard, savory)
- Crust thickness (thin vs. thick)
- Ingredients used (butter, shortening, oil)
- Desired texture (flaky vs. tender)
- Baking method (blind baking vs. filled pie)
Understanding these factors is essential for achieving the best results in pie crust preparation.
-
Type of Pie: The type of pie greatly influences the ideal temperature. Fruit pies usually require higher temperatures, around 425°F (220°C), to ensure the fruit cooks quickly without making the crust soggy. Custard pies, on the other hand, do best at a lower range of approximately 375°F (190°C) to avoid overcooking the filling, as highlighted by a study from Smiley (2019).
-
Crust Thickness: The thickness of the crust also impacts temperature choice. A thick crust benefits from a slightly lower temperature to ensure it cooks evenly without burning, while a thin crust can tolerate higher heat which promotes a crispier texture. Research conducted by Morgan (2021) supports adjusting oven temperatures based on crust thickness.
-
Ingredients Used: The ingredients in the crust can affect heat distribution. A crust made with oil might require a different temperature than one made with butter. For example, buttermilk or buttermilk-based crusts tend to bake well at higher temperatures due to their moisture content. According to Johnson (2020), butter-based crusts often produce flakier textures while oils create softer results.
-
Desired Texture: Bakers aiming for a flaky texture should opt for temperatures around 400°F (200°C) to enhance crust elevation and layering. Conversely, achieving a tender, softer crust can be accomplished at lower temperatures. A practical guide provided by Baker’s Journal emphasizes the need for temperature adjustments based on desired crust outcomes.
-
Baking Method: The baking method significantly impacts the desired temperature. Blind baking, where the crust is pre-cooked, often requires higher heat, about 425°F (220°C), to set the base before adding the filling. For filled pies, a medium temperature of around 375°F (190°C) can prevent the filling from overcooking. A study published by the Cooking Science Institute in 2022 outlines the importance of understanding different baking techniques for optimal results.
How Do Different Pie Fillings Affect the Required Baking Temperature?
Different pie fillings can significantly affect the required baking temperature, as fruit fillings often necessitate lower temperatures to prevent overcooking, while custard and cream fillings typically require higher temperatures to ensure proper set and texture.
-
Fruit Fillings: These often contain sugars and pectin, which can caramelize at high temperatures. A study by Smith and Zhang (2018) indicates that baking fruit pies at 350°F (175°C) allows for even cooking without burning the fruit. Lower temperatures help maintain the fruit’s integrity and flavor, ensuring they do not turn mushy.
-
Custard Fillings: Custard pies, such as pumpkin or pecan, require higher temperatures, generally around 375°F (190°C). According to research by Thompson (2020), this temperature is essential for setting the eggs in the mixture. Proper baking at this temperature creates a creamy texture without being overly firm or curdled.
-
Cream Fillings: Cream pies like chocolate cream require initial baking of the crust at a high temperature, approximately 425°F (220°C), to achieve a crisp base. Afterward, they often cool before adding the cream filling, which is not baked but set through refrigeration (Jones, 2019).
-
Time Considerations: The overall baking time also adjusts based on filling type. For example, fruit pies often need longer baking times compared to custard. A study by Baker and Grains (2021) found that fruit pies average 45-60 minutes, while custard types take about 30-45 minutes.
Bakers adjust temperatures and times to ensure desirable textures and flavors for various fillings, affecting the final outcome of the pie.
What Common Mistakes Should Be Avoided When Baking Pie Crust?
Common mistakes to avoid when baking pie crust include the following:
- Not chilling the dough properly.
- Overworking the dough.
- Skipping the use of weights when blind baking.
- Using the wrong type of flour.
- Ignoring the importance of a balanced fat-to-flour ratio.
- Not preheating the oven adequately.
- Failing to pierce the crust before baking.
These mistakes can significantly affect the final quality of your pie crust. It’s essential to understand each point to improve your pie baking skills.
-
Not Chilling the Dough Properly:
Not chilling the dough properly can lead to a tough crust. Chilling allows the fat to solidify, helping to create a flaky texture. According to baking expert Rose Levy Beranbaum, refrigerating the dough for at least 30 minutes helps to relax the gluten. This results in a more tender crust once baked. -
Overworking the Dough:
Overworking the dough is another common mistake. When bakers handle the dough too much, they activate the gluten, causing the crust to be tough rather than flaky. The best practice is to mix the ingredients just until they come together, then form the dough gently. -
Skipping the Use of Weights When Blind Baking:
Not using weights when blind baking can result in a crust that puffs up or shrinks. Weights, such as dried beans or ceramic beads, weigh down the crust and prevent it from deforming during baking. The American Pie Council recommends using weights to ensure a flat base. -
Using the Wrong Type of Flour:
Using the wrong type of flour can affect the crust’s texture. All-purpose flour is often recommended for a good balance of strength and tenderness. However, bakers who seek a more tender crust might prefer pastry flour, which has a lower protein content, leading to softer results. -
Ignoring the Importance of a Balanced Fat-to-Flour Ratio:
Ignoring the fat-to-flour ratio can lead to a crust that is either too greasy or not flaky enough. A typical ratio is around 1 part fat to 2 parts flour. Different fats, like butter or shortening, yield different textures, as butter provides flavor while shortening helps create a more tender crust. -
Not Preheating the Oven Adequately:
Not preheating the oven can cause uneven baking. An oven that isn’t hot enough initially will not set the crust properly, leading to undesirable results. Bakers are advised to preheat the oven to the recommended temperature before placing the pie in it to ensure optimal baking. -
Failing to Piercing the Crust Before Baking:
Failing to pierce the crust before baking can result in a puffed-up top layer. This occurs because steam builds up inside the crust. Simply using a fork to prick holes in the base allows steam to escape, leading to a well-cooked crust.
How Can You Achieve the Perfect Temperature for Your Pie Crust?
To achieve the perfect temperature for your pie crust, maintain a balance between cold ingredients, proper oven temperature, and baking time. This combination yields a flaky and golden crust.
-
Use cold ingredients: Cold ingredients help to create layers in the dough and prevent melting before baking.
– Butter or shortening should be refrigerated before use. A study by The Baking Science Institute (2019) emphasizes that colder fats produce a more flakable crust.
– Ice water is preferred for mixing into the dough. Ice water keeps the pastry cool and prevents gluten development, which leads to a tough crust. -
Preheat your oven: Set your oven to the correct temperature before placing your pie inside.
– A temperature of 375°F (190°C) is often recommended for standard pie baking. The American Culinary Federation suggests this temperature helps achieve even cooking and browning.
– Preheating ensures the crust starts cooking immediately, resulting in crispiness. -
Blind baking: For certain pies, pre-baking the crust can improve texture and prevent sogginess.
– Line the pie dish with parchment paper and fill it with pie weights or dried beans. This step prevents the crust from puffing and losing shape.
– Bake for about 15-20 minutes at the preheated temperature, then remove the weights and bake for an additional 5 minutes for a fully cooked base. -
Monitor baking time: Adjust baking time according to the pie filling and size.
– Most fruit pies take about 45-60 minutes to bake. The National Pie Championship (2022) advises checking for bubbling filling and golden-brown edges.
– For custard pies, a less intense heat of around 350°F (175°C) for 40-55 minutes is effective. -
Use a baking stone: A baking stone can help maintain even heat in the oven.
– Placing a baking stone on the oven rack provides consistent heat to the bottom of the crust, enhancing its flakiness.
– A study from the Culinary Institute of America (2020) states that a preheated stone can reduce baking time and improve browning.
By following these steps, you can create a perfectly crisp and delicious pie crust.
Related Post: