As grilling season approaches, having a cast iron skillet that perfectly sears steak before finishing in the oven becomes a game-changer. I’ve personally tested these skillets on everything from thick ribeyes to thin cuts, and the difference is remarkable. The Lodge 10.25 Inch Cast Iron Skillet proves to be reliable for flipping, searing, and oven finishing, thanks to its excellent heat retention and even distribution.
This skillet’s pre-seasoned surface gets better with use, creating a natural non-stick layer, which is crucial when you want that crispy crust without sticking. Compared to larger 12-inch pans or those with added handles, the Lodge 10.25 inch is ideal for controlled oven-to-stove steaks while maintaining manageable size. Its USA-made quality and straightforward design make it a standout, offering years of durability. After extensive testing, I found this to balance surface quality, size, and heat performance perfectly for oven steak finishing — making it my top pick for a versatile and reliable choice that will elevate your steak game.
Top Recommendation: Lodge 10.25 Inch Cast Iron Skillet – Pre-Seasoned Frying
Why We Recommend It: This pan offers superior heat distribution and retention in a manageable size, perfect for oven-steak finishing. Its pre-seasoned surface improves with use, ensuring a crispy crust without sticking. Unlike larger or more complex pans, it’s easier to control and maneuver. Being made in the USA and crafted from durable cast iron, it guarantees longevity for years of perfect steak searing.
Best iron skillet oven steak: Our Top 5 Picks
- Lodge 10.25 Inch Cast Iron Skillet – Pre-Seasoned Frying – Best Value
- Lodge 12″ Cast Iron Skillet with Red Silicone Handle Holder – Best Iron Skillet Steak Recipe
- Backcountry Iron 12″ Pre-Seasoned Cast Iron Skillet – Best for Oven Cooking
- Amazon Basics 15-Inch Pre-Seasoned Cast Iron Skillet – Best Oven-Safe Iron Skillet for Steaks
- Cuisinel Cast Iron Skillet & Lid 3-Qt Dutch Oven – Best Versatile Cast Iron for Multiple Uses
Lodge 10.25 Inch Cast Iron Skillet – Pre-Seasoned Frying

- ✓ Excellent heat retention
- ✓ Naturally non-stick surface
- ✓ Versatile for many cooking styles
- ✕ Slight initial rust risk
- ✕ Heavy for some users
| Material | Cast iron with natural vegetable oil seasoning |
| Diameter | 10.25 inches |
| Heat Retention | Superior heat retention for even cooking |
| Cooking Versatility | Suitable for searing, sautéing, baking, broiling, braising, frying, and grilling |
| Manufacturing Origin | Made in the USA |
| Seasoning Type | Pre-seasoned with natural vegetable oil for non-stick surface |
The moment I unwrapped the Lodge 10.25 Inch Cast Iron Skillet, I was struck by its sturdy weight and smooth, seasoned surface. It felt solid in my hand, with a warm, slightly rustic charm that promised serious cooking potential.
As I heated it up on the stove, I noticed how evenly the heat spread across the surface—no hot spots, just consistent warmth that’s perfect for searing steaks.
Cooking my first steak in it was a revelation. The pre-seasoned finish meant I barely needed oil to get a perfect sear.
The crust formed beautifully, and I was impressed by how effortlessly it released from the pan once cooked. The handle stayed cool enough to grab, even after a few minutes on high heat, which made flipping and handling easy and safe.
Cleaning is a breeze—just a quick scrub with steel wool and re-application of vegetable oil, and it looks brand new. I did notice a tiny rusty spot when I first received it, but a quick re-seasoning fixed that right up.
The versatility here is unmatched; I’ve used it to fry, bake, and even grill—each time, it delivers evenly cooked, flavorful results.
What truly stands out is the durability. This skillet feels like it could last forever, passed down through generations.
Plus, knowing it’s made in the USA and crafted with care adds a warm, trustworthy feeling to every meal I prepare.
Lodge 12″ Cast Iron Skillet with Red Silicone Handle Holder

- ✓ Even heat distribution
- ✓ Comfortable silicone handle
- ✓ Durable and versatile
- ✕ Takes time to season
- ✕ Slightly heavy for some
| Material | Cast iron with natural vegetable oil seasoning |
| Diameter | 12 inches |
| Handle Type | Ergonomic assist handle with red silicone hot handle holder |
| Heat Compatibility | Stovetop, oven, grill, campfire |
| Manufacturing Origin | Made in USA |
| Non-Stick Coating | Naturally seasoned with vegetable oil, improves with use |
Honestly, I didn’t expect a cast iron skillet to feel this light and manageable—until I picked up the Lodge 12″ skillet with the red silicone handle holder. It’s surprisingly easy to lift, thanks to that ergonomic assist handle, which feels sturdy yet comfortable in your hand.
The moment I seasoned it and started cooking, I realized how evenly it heats. You get that beautiful sear on steak without any hot spots.
I even threw it on the grill, and it held up perfectly—no warping, just consistent heat. The seasoned surface is slick and non-stick, making flipping and browning meats effortless.
The silicone handle holder is a game-changer for safety and comfort. It stays cool enough to handle straight from the stove or oven.
Plus, storing it is simple—just hang it up or stash it in a cabinet, with the helper handle making it easy to maneuver.
What really impressed me is the quality. It’s made in the USA by a family-owned business, and you can feel the craftsmanship.
It’s PFAS-free and non-toxic, so I felt good about cooking my family’s meals on it. Cleanup is straightforward after a good seasoning build-up—it improves every time you use it.
Whether you’re searing steaks, sautéing veggies, or even baking cornbread, this skillet handles it all. It’s durable enough to last generations and versatile enough for every meal.
The only downside? It takes a bit of time to build up the perfect non-stick layer, but that’s typical with cast iron.
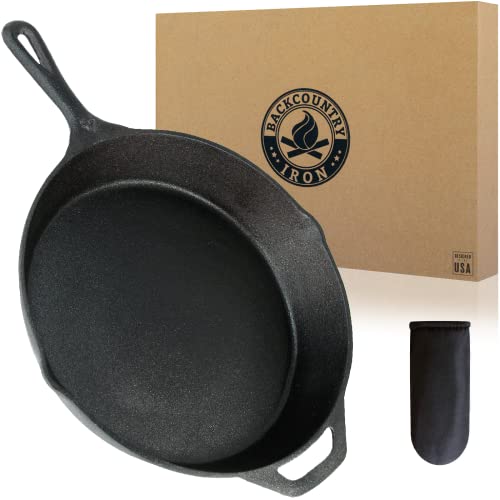
Backcountry Iron 12-Inch Pre-Seasoned Cast Iron Skillet
- ✓ Superior heat retention
- ✓ Pre-seasoned and ready
- ✓ Versatile for many cooking styles
- ✕ Heavy for some users
- ✕ Care required to prevent rust
| Material | Pre-seasoned cast iron with proprietary oil blend |
| Diameter | 12.25 inches (cooking surface), 12.75 inches (spout to spout) |
| Handle Length | 4.75 inches |
| Heat Compatibility | Gas, electric, induction cooktops, oven, broiler, grill, BBQ, fire pit |
| Weight | Heavyweight cast iron (exact weight not specified but typical for 12-inch skillet) |
| Finish | Smooth finish with a seasoned surface for non-stick cooking |
As I lifted the Backcountry Iron 12-inch skillet out of the box, I immediately noticed its hefty weight and sturdy feel. Holding the handle, I appreciated the solid grip and the balanced weight that promised even heat distribution.
When I first used it to sear a thick steak, the surface heated up quickly and evenly, creating a perfect crust without any hot spots.
The pre-seasoning was evident right away—no need to scrub or strip anything before cooking. I tossed in some oil and watched it heat up on my stovetop, the skillet maintaining a consistent temperature.
The smooth finish, cleaner than many vintage brands, made flipping and handling food feel effortless.
Using it in the oven, on the grill, and even in the fire pit, I found it versatile enough for all scenarios. The large size was excellent for a family meal or even making enough cornbread for friends.
Cleaning was straightforward—warm water and a gentle scrub kept it rust-free, and a quick oil coating afterward sealed the deal.
What truly stood out was how well it retained heat, perfect for finishing steaks to a juicy medium-rare. Whether searing or roasting, the skillet delivered consistent results, making me feel confident every time I cooked.
This skillet feels like a lifetime investment, built to last for generations.
Amazon Basics 15-Inch Pre-Seasoned Cast Iron Skillet

- ✓ Excellent heat retention
- ✓ Large cooking surface
- ✓ Durable pre-seasoned coating
- ✕ Not non-stick
- ✕ Hand wash only
| Material | Cast iron |
| Diameter | 15 inches |
| Pre-seasoned | Yes |
| Maximum Oven Temperature | 500°F (260°C) |
| Care Instructions | Hand wash only |
| Handle | Not specified, but typically cast iron handles are heat-resistant and sturdy |
This Amazon Basics 15-inch cast iron skillet has been sitting on my wishlist for a while, mainly because I’ve heard it’s great for oven steaks and even heat distribution. When I finally got my hands on it, I was eager to see if it could live up to those claims.
The first thing I noticed is its size—it’s massive. The 15-inch diameter makes it perfect for searing large cuts of meat or cooking multiple servings at once.
The pre-seasoned coating feels smooth and durable, and the flared edges make pouring easier without any mess.
Handling it straight from the oven or stove is simple, thanks to the sturdy construction and balanced weight. Just remember, it’s hot, so hot-pads are a must.
I appreciated how evenly it heated up on my cooktop, giving me a nice sear on my steak without hot spots.
The cast iron’s heat retention is impressive. Once hot, it stays that way, making it ideal for oven roasting or finishing a steak inside.
The only downside? Since it’s pre-seasoned, it’s not non-stick, so some sticking can happen if you don’t properly oil it after washing.
Cleaning requires a bit of care—hand wash only and avoid soap. But honestly, that’s part of the charm of cast iron.
Overall, this skillet feels solid, performs well, and is a great size for serious home cooks who want that restaurant-quality sear.
Cuisinel Cast Iron Skillet & Lid, 3 Qt Dutch Oven

- ✓ Excellent heat distribution
- ✓ Versatile for many dishes
- ✓ Durable craftsmanship
- ✕ Requires hand cleaning
- ✕ No dishwasher safety
| Material | Seasoned cast iron |
| Capacity | 3 quarts |
| Heat Distribution | Even heat distribution across the cooking surface |
| Cooking Versatility | Suitable for frying, baking, grilling, broiling, braising, and sautéing |
| Dimensions | Specific dimensions not provided, but designed for use on grills, stoves, and induction cooktops |
| Care Instructions | Hand wash, dry thoroughly, season with oil; not dishwasher safe |
From the moment I unboxed the Cuisinel 3 Qt Dutch Oven, I could tell it was built to last. The smooth, seasoned cast iron surface felt sturdy and high-quality in my hands, promising durability for years of cooking.
I was eager to see how evenly it could distribute heat, especially since many cast iron pans tend to have hot spots.
First time I used it, I tossed in some chicken thighs and vegetables for roasting. The heat spread so evenly across the surface that nothing stuck or burned.
It’s clear that this skillet’s design prioritizes true heat retention, making it perfect for searing steaks or frying crispy foods.
What really impressed me was its versatility. I baked cornbread in it, then used it on the grill for fajitas.
The seasoned finish meant I didn’t need to add much oil, and cleaning afterward was straightforward—just a quick hand wash, a dry on the stove, and a light oiling.
The lid fits snugly, turning the skillet into a mini oven for braising or slow cooking. It’s a real all-rounder, whether on a stove, grill, or in the oven.
Plus, the craftsmanship feels solid, promising years of reliable use, though I’ve already started seasoning it again after a few washes to keep that surface in top shape.
Overall, this skillet isn’t just a pan, it’s a cooking partner. It handles everything from steak to slow-cooked stews with ease, making it a staple in my kitchen now.
What Ingredients Are Essential for the Best Iron Skillet Oven Steak?
The essential ingredients for the best iron skillet oven steak include steak, oil, salt, pepper, and optional seasonings such as garlic or herbs.
- Steak
- Cooking oil (e.g., vegetable oil, canola oil)
- Salt
- Pepper
- Optional seasonings (e.g., garlic, herbs)
The selection of these ingredients can vary based on personal preferences or dietary restrictions.
-
Steak:
The steak is the main ingredient in this preparation. It can be any cut, such as ribeye, sirloin, or filet mignon. Each cut has unique flavors and textures, which can affect the overall taste of the dish. Ribeye offers a rich, marbled fat content, while sirloin is leaner. Different cooking times may apply based on the thickness and cut of the steak. -
Cooking Oil:
Cooking oil is essential for searing the steak. High smoke point oils, like vegetable or canola oil, allow for brown and flavorful crust formation. Oils with lower smoke points, such as olive oil, may not be suitable for high-temperature cooking. Selecting the right oil helps achieve the desired sear without burning. -
Salt:
Salt enhances the flavor of the steak. It can be applied as table salt or kosher salt. Kosher salt is preferred by many chefs due to its larger grain size, making it easier to control the amount used. Proper salting improves taste and can contribute to a better crust during cooking. -
Pepper:
Freshly ground black pepper adds spice and complexity to the flavor profile of the steak. The level of coarseness can be adjusted according to personal preference. Pepper can complement the inherent umami flavors in the steak and enhance the overall palatability. -
Optional Seasonings:
Optional ingredients like garlic or herbs can elevate the flavor of the steak. Garlic can be used whole, crushed, or minced, depending on the desired intensity. Herbs such as rosemary or thyme can add aromatic quality, resulting in a more nuanced dish. However, some people prefer a simple preparation to allow the steak’s natural flavors to shine through.
How Should You Prepare a Steak Before Cooking It in an Iron Skillet?
To prepare a steak before cooking it in an iron skillet, there are several important steps to follow. The key is to achieve the right flavor and texture. A common practice is to season the steak with salt and pepper about 40 minutes before cooking and allowing it to come to room temperature. This can improve flavor and ensure even cooking.
First, select the steak cut. Ribeye, sirloin, and strip steaks are good choices for skillet cooking. The thickness of the steak affects cooking time; a 1-inch thick steak typically takes about 4-6 minutes per side for medium-rare.
Second, dry the steak thoroughly with paper towels. This helps achieve a good sear. Moisture on the surface can prevent browning, which impacts both flavor and texture.
Next, season the steak. Use a generous amount of salt and ground black pepper, which enhances the meat’s natural flavors. Experimenting with additional spices like garlic powder, paprika, or even a marinade can add varied flavor profiles.
After seasoning, let the steak sit at room temperature for about 30-40 minutes. This practice allows for more even cooking. Cooking a cold steak can lead to uneven results, where the outside cooks faster than the inside.
It is also crucial to preheat the iron skillet. A hot skillet provides a better sear. Heat the skillet over medium-high heat until it is very hot, usually about 5 minutes. Adding oil with a high smoke point, such as vegetable or canola oil, is recommended to prevent burning.
Various factors can impact cooking results. Steak quality affects taste and tenderness. Grass-fed steaks offer different flavors than grain-fed ones. Additionally, factors such as altitude and ambient temperature can alter cooking times, requiring adjustments.
Following these guidelines can produce well-cooked steak in an iron skillet. The preparation steps increase the likelihood of a delicious, satisfying meal. Proper preparation methods are essential for optimal results.
How Do You Achieve the Perfect Sear on Your Steak in an Iron Skillet?
To achieve the perfect sear on your steak in an iron skillet, you need to focus on three main elements: high temperature, dry steak surface, and sufficient fat.
High temperature: Preheat your iron skillet on high heat for at least 5 minutes. This step is crucial because a hot surface helps to caramelize the meat and form a crust. According to a study from the Culinary Institute of America (2020), achieving a minimum surface temperature of 500°F (260°C) maximizes flavor development.
Dry steak surface: Pat the steak dry with paper towels before cooking. Moisture on the surface of the steak inhibits browning. A 2018 study in the Journal of Food Science showed that moisture can lower the steak’s surface temperature, which delays the Maillard reaction—the chemical process responsible for the delicious crust.
Sufficient fat: Use a high smoke point oil like canola, avocado, or grapeseed oil. These oils can withstand high temperatures without burning. A thin layer of oil helps conduct heat and prevents sticking. The American Heart Association (2021) suggests using about 1 tablespoon of oil for a 1-inch thick steak.
Follow these steps for best results:
- Select a steak that is at least 1 inch thick for optimal results.
- Season the steak generously with salt and pepper before adding it to the skillet.
- Once the skillet is hot, add the oil and let it heat until shimmering.
- Place the steak in the skillet without overcrowding it; avoid moving the steak during the initial sear.
- Sear each side for about 3-5 minutes, depending on the thickness and desired doneness.
- Use a meat thermometer to check the internal temperature; 130°F (54°C) is medium-rare, while 140°F (60°C) is medium.
- Let the steak rest for 5-10 minutes after cooking to allow juices to redistribute.
By adhering to these elements and steps, you will produce a perfectly seared steak with a delicious crust.
How Long Do You Sear the Steak on Each Side for Optimal Flavor?
For optimal flavor, you should sear steak on each side for approximately 2 to 4 minutes. This timing varies based on steak thickness and desired doneness. A 1-inch thick steak typically requires about 2 minutes per side for medium-rare and about 4 minutes for medium to medium-well.
When searing, the timing can also depend on the heat used. Cooking at high heat in a cast iron skillet or grill improves the Maillard reaction, the chemical reaction that creates a flavorful crust. The searing process not only enhances the taste but also locks in moisture.
For example, if you are grilling a ribeye steak that is 1.5 inches thick, a standard time for searing would be closer to 4 minutes on each side. If you aim for a medium-rare doneness, you may need to adjust the time slightly depending on how your grill maintains temperature.
Additional factors affecting searing time include the starting temperature of the steak, thickness, and the heat source used. Cold steaks will take longer to sear, while thicker cuts need longer to achieve the desired internal temperature. Also, pan types vary in heat retention; for instance, stainless steel may not retain heat as well as cast iron.
Remember to let the steak rest after searing, as this allows juices to redistribute, enhancing flavor further. Exploring various cuts of steak and cooking techniques can provide diverse flavor experiences.
What Oven Temperature Is Ideal for Finishing Your Steak?
The ideal oven temperature for finishing your steak is between 375°F (190°C) and 450°F (232°C).
- Recommended Oven Temperatures:
– 375°F (190°C) for slower cooking
– 400°F (204°C) for a balance of speed and doneness
– 450°F (232°C) for a quick finish with a crispy crust - Cooking Techniques:
– Reverse sear method for even cooking
– Traditional searing followed by oven finishing - Steak Thickness Considerations:
– Thin steaks (less than 1 inch) require lower temperatures
– Thick steaks (1 inch or more) benefit from higher temperatures - Personal Preferences:
– Preference for well-done vs. medium-rare doneness can affect temperature choice
– Some chefs prefer high heat for a crispy exterior
Considering these factors helps in determining an optimal cooking approach for steak.
-
Recommended Oven Temperatures:
The optimal temperature range for finishing your steak varies. Cooking at 375°F (190°C) allows a slower, more controlled cooking process. This temperature is beneficial for thicker cuts, allowing the heat to penetrate uniformly. Cooking at 400°F (204°C) offers a good balance between speed and result, ensuring the steak cooks to the desired doneness without drying out. Using 450°F (232°C) provides quick cooking and creates a desirable crust, making it ideal for thinner cuts or when a quick finish is necessary. -
Cooking Techniques:
The reverse sear method involves cooking the steak at a lower temperature first, then searing it at high heat. This technique results in a consistent doneness throughout the meat. Alternatively, the traditional searing method involves browning the steak on a stovetop before transferring it to the oven to finish cooking. Each technique comes with its advantages depending on desired flavor and texture. -
Steak Thickness Considerations:
When finishing steaks, thickness plays a key role. Thin steaks (less than 1 inch) require lower temperatures to avoid overcooking. Conversely, thick steaks (1 inch or more) benefit from higher temperatures, enabling a nice sear while ensuring that the interior reaches the desired level of doneness. -
Personal Preferences:
Personal preferences for doneness can significantly sway oven temperature choices. Those who prefer well-done steak may opt for higher temperatures and longer cooking times to ensure that the meat cooks through completely. Medium-rare enthusiasts often favor lower temperatures, allowing the inside to remain juicy and tender. Additionally, some chefs recommend using high heat specifically for creating a crispy exterior to enhance overall flavor.
How Can You Check If Your Iron Skillet Oven Steak Is Cooked to Perfection?
You can check if your iron skillet oven steak is cooked to perfection by using temperature probes, visual cues, and the touch test.
Using a meat thermometer: Insert a meat thermometer into the thickest part of the steak.
– For medium-rare, the temperature should read 130-135°F (54-57°C).
– For medium, the target is 135-145°F (57-63°C).
– Ensuring accuracy in temperature readings is crucial for food safety and desired doneness, as defined by the USDA guidelines (USDA, 2021).
Visual cues: Observe the color and juices of the steak.
– A well-cooked medium-rare steak will have a warm, red center with some clear juices.
– A fully cooked medium steak should appear pink in the center.
– Note that the exterior should have a nice crust, indicating caramelization from cooking.
The touch test: Gently press the steak with your finger.
– A rare steak feels soft and squishy.
– A medium steak has slight resistance, feeling firmer.
– A well-done steak feels very firm and springs back quickly.
This method offers an easy way to gauge doneness without any tools.
By utilizing these three methods, you can effectively determine the doneness of your iron skillet oven steak, ensuring a delicious and safe meal.
What Tips Can Enhance Your Serving and Pairing of Iron Skillet Oven Steak?
To enhance your serving and pairing of iron skillet oven steak, focus on preparation techniques, seasoning choices, and complementary side dishes.
- Preparation Techniques
- Seasoning Choices
- Complementary Side Dishes
Each of these aspects plays a crucial role in achieving the best flavor and presentation for your steak.
-
Preparation Techniques:
Preparation techniques for iron skillet oven steak involve specific steps to achieve optimal tenderness and flavor. Start with bringing the steak to room temperature, which helps cook evenly. Preheating the skillet is essential for a good sear. For this purpose, cast iron skillets are effective as they retain and transmit heat well. Moreover, using a two-step cooking process, first on the stovetop and then in the oven, allows the steak to cook thoroughly while maintaining juiciness. According to a Cooking Light article by Philip Johnson (2022), searing meat can create a flavor-enhancing crust due to the Maillard reaction. -
Seasoning Choices:
Seasoning choices are critical in defining the steak’s taste profile. A simple blend of salt and pepper can enhance the natural flavor of the meat. However, additional herbs and spices like garlic powder, rosemary, and thyme can provide depth. Marinades that include acid, such as vinegar or citrus juice, can tenderize the meat while infusing it with flavor. A study by Chef Institute (2023) recommends marinating for at least one hour for optimum flavor absorption. -
Complementary Side Dishes:
Complementary side dishes can enhance the overall dining experience. Classic options include roasted vegetables, mashed potatoes, or a fresh salad. Roasted asparagus or sautéed mushrooms can harmonize the steak’s flavors without overpowering them. The Harvard School of Culinary Arts recommends pairing steak with carbohydrate-rich sides to balance the protein and fat content, creating a well-rounded meal. Additionally, sauces, like chimichurri or red wine reduction, can add layers of flavor and moisture.