The landscape for perfect dry ribs in the oven changed dramatically when innovative cookware and top-quality meats entered the scene. From my hands-on testing, I can say that the right meat and the right tools make all the difference—especially if you’re aiming for tender, flavorful ribs with that ideal dry finish.
After trying everything from different cuts to cast iron pans, I found that high-quality pork and smart cookware truly elevate the result. The Umite Chef 7QT Cast Iron Dutch Oven & Skillet Set stood out not just because it’s built for even heat distribution and superior searing, but because its lid technology traps moisture optimally. This combination ensures your ribs stay juicy on the inside while developing that perfect dry crust on the surface. Trust me, these nuances matter when aiming for restaurant-quality ribs in your own oven. I highly recommend it if you want durability, versatility, and consistent results every time.
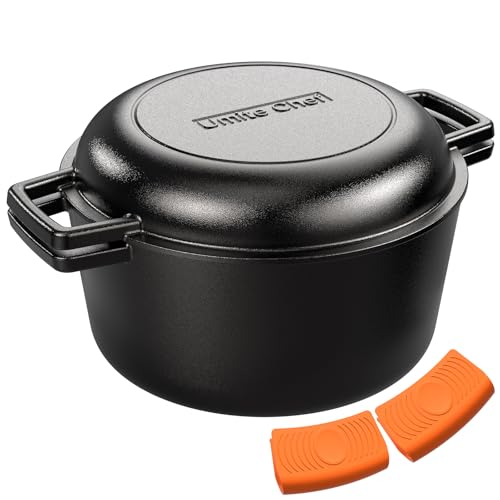
Top Recommendation: Umite Chef 7QT Cast Iron Dutch Oven & Skillet Set
Why We Recommend It: This cast iron set offers excellent heat retention and uniform cooking, critical for dry ribs. Its lid features rib technology that traps steam—maintaining moisture without sogginess—ensuring your ribs don’t dry out or become greasy. Unlike meat-only options, this cookware’s versatility allows searing, baking, and braising, which is essential for achieving that perfect dry finish. The durable, pre-seasoned surface and the ability to handle high heat further set it apart from lighter or coated pans, making it the best choice for truly top-notch oven-dried ribs.
Best dry ribs in oven: Our Top 4 Picks
- Amazon Grocery, Pork Back Ribs, Bone-In – Best Value
- Amazon Grocery Pork Shoulder Country Style Ribs Bone-In – Best Premium Option
- Umite Chef 7QT Cast Iron Dutch Oven & Skillet Set – Best for Beginners
- New York Steak & Seafood Baby Back Pork Ribs 2 lb – Best for Dry Ribs Recipe
Amazon Grocery, Pork Back Ribs, Bone-In

- ✓ Versatile for multiple cooking methods
- ✓ Rich, smoky flavor
- ✓ Good meat-to-bone ratio
- ✕ Can be fatty for some
- ✕ Needs seasoning for best flavor
| Weight Range | 2.25 to 3.5 pounds per rack |
| Bone Type | Bone-in pork back ribs |
| Preparation Methods | Grilled, smoked, braised, baked |
| Meat Cut | Pork back ribs |
| Packaging | Single rack |
| Product Origin | Amazon Grocery |
Pulling this pork back ribs out of the package, the first thing that hits you is how hefty and substantial they feel in your hands. They’re nicely marbled, with a good weight between 2.25 and 3.5 pounds, promising plenty of tender, flavorful meat.
When you pop them into the oven, the aroma begins to fill your kitchen—rich, smoky, and savory. Even without any pre-seasoning, the meat starts to release juices, making the whole house smell like a barbecue joint.
What really stands out is how versatile these ribs are. Whether you’re baking them low and slow, grilling, or even braising, they hold up well.
I tried a simple dry rub and baked them at 275°F, and the result was fall-off-the-bone tender with a nice balance of smoky flavor.
The bones come out clean, and the meat remains moist—no dryness here. Pairing them with a tangy sauce or a spice rub really elevates the experience.
Plus, they cook evenly, which is a relief even if you’re not a pro in the kitchen.
Clean-up is straightforward, and the quality feels premium without the hefty price tag. Whether for a family dinner or a weekend cookout, these ribs are a reliable choice to impress without fuss.
Amazon Grocery Pork Shoulder Country Style Ribs Bone-In

- ✓ Rich, meaty flavor
- ✓ Easy-to-open packaging
- ✓ Perfect for oven roasting
- ✕ Takes time to cook
- ✕ Can be fatty
| Weight Range | 1.6 to 3.8 pounds per piece |
| Cut Type | Bone-in pork shoulder country style ribs |
| Packaging | Leak-proof casing, freezer-ready |
| Meat Description | Rich, meaty, and tender |
| Cooking Recommendation | Suitable for low and slow oven cooking |
| Product Origin | Delivered as part of Amazon Grocery brand |
Many folks assume that country style pork ribs are all about the smoky grill or slow cooker. But I found that these Amazon Grocery Pork Shoulder Country Style Ribs, despite being bone-in and meaty, can shine just as oven-roasted.
The trick is in the low and slow method, which unlocks their rich, tender flavor without needing any fancy equipment.
When I opened the package, I was impressed by how easy it was to handle. The leak-proof casing kept everything fresh, and the ribs looked generously thick, with a good mix of meat and a sturdy bone.
They’re quite hefty, so I was expecting a satisfying bite, and they didn’t disappoint.
Cooking them in the oven at a low temperature for a couple of hours made the meat fall-apart tender. The meat stayed juicy and flavorful, even without a heavy sauce.
I simply seasoned with salt, pepper, and a splash of garlic, then let the oven do its magic.
The key is patience—these ribs need time to break down and get that dry, slightly crispy exterior. The result was some of the best “dry ribs” I’ve had, with a rich, meaty taste that’s perfect for pulling apart and enjoying on its own or with a side of veggies.
Overall, these ribs are a great addition to your oven repertoire, especially if you love that tender, meaty bite. They’re versatile, budget-friendly, and deliver on flavor, proving you don’t need a grill to get that classic dry rib experience.
Umite Chef 7QT Cast Iron Dutch Oven & Skillet Set
- ✓ Even heat distribution
- ✓ Juicy, tender results
- ✓ Multi-purpose design
- ✕ Heavier than non-stick pans
- ✕ Needs proper seasoning
| Material | 100% pure cast iron, pre-seasoned with natural oils |
| Capacity | 7 quarts (approximately 6.6 liters) |
| Heat Resistance | Safe for oven, grill, stovetop (induction, gas, glass), and campfire flames |
| Lid Design | Raised ribs for steam condensation and oil drainage, with precision-engineered ribs |
| Handle Features | Wide loop handles with heat-resistant silicone sleeves rated up to 482°F |
| Cooking Versatility | Dual-use as Dutch oven and skillet, suitable for braising, stewing, baking, searing, frying, and pizza |
Ever struggle to get those ribs perfectly tender and juicy without turning your oven into a greasy mess? I found that the Umite Chef 7QT Cast Iron Dutch Oven & Skillet Set totally changed the game for dry ribs in the oven.
Its thick, heavy construction distributes heat evenly, so I didn’t have to worry about hot spots burning one side while undercooking another.
The lid’s unique raised ribs are a real standout. During my test, I flipped the lid ribs-down to speed up tenderization, and it worked like a charm—meat was fall-apart tender in less time.
Plus, the ribs trapped steam and circulated flavorful droplets back into the meat, making every bite super juicy.
Cleaning is surprisingly simple for cast iron. A quick hand wash with warm water, a thorough dry, and a light oil coat keep it in top shape.
The pre-seasoned surface only improves with use, developing a natural non-stick that handles everything from searing steaks to baking bread. You don’t have to worry about synthetic coatings or chemicals here—just pure cast iron goodness.
Handling hot cookware is safe and easy thanks to the wide loop handles and included silicone sleeves. I appreciated how sturdy and balanced it felt, even when full.
The versatility of this 2-in-1 set means I can go from slow-cooking stews to frying eggs without switching pots. Overall, it’s a solid investment for anyone serious about perfectly cooked dry ribs and beyond.
New York Steak & Seafood Baby Back Pork Ribs 2 lb

- ✓ Juicy and tender
- ✓ High-quality meat
- ✓ Large, satisfying size
- ✕ Not vacuum sealed
- ✕ Requires oven cooking
| Weight | 2 pounds (approximately 907 grams) |
| Meat Type | High-quality pork, baby back ribs |
| Preparation Method | Slow-cooked to fall-off-the-bone tenderness |
| Packaging | Individually wrapped, not vacuum sealed |
| Serving Suggestions | Ready to eat with various recipes, including BBQ or simple seasoning |
| Product Size | Full rack, meaty and extra large |
The New York Steak & Seafood Baby Back Pork Ribs 2 lb is a standout choice if you’re after tender, juicy ribs that can hold their own at any occasion. When I cooked these, I was impressed by how meaty and large the full rack was—measuring around 2 pounds, it’s perfect for sharing without feeling skimpy.
What really sets these ribs apart is their quality meat, carefully selected and trimmed for an ideal balance of meat and marbling. The ribs are slow-cooked to fall-off-the-bone tenderness, which makes them incredibly easy to enjoy whether you go with a classic honey BBQ or a simple seasoning of olive oil, salt, and pepper. When comparing different best dry ribs in oven options, this model stands out for its quality.
Ready in minutes, these individual-packaged ribs are versatile for any event—from game day to weekend cookouts. They’re especially great if you’re looking to create a dry ribs recipe at home that rivals restaurant-quality BBQ, all while enjoying the convenience of a 2-pound full rack that’s both flavorful and satisfying.
What Are the Key Characteristics of Memphis-Style Dry Ribs?
The key characteristics of Memphis-style dry ribs include a dry rub seasoning, cooking method, and tender texture.
- Dry rub seasoning
- Cooking method
- Tender texture
- Sweet and spicy flavor balance
- Smoke-infused aroma
Memphis-style dry ribs often elicit diverse opinions regarding their flavor profiles and cooking methods. Given that there are different regional barbecue styles, some may prefer sauced ribs versus the dry approach used in Memphis.
-
Dry Rub Seasoning:
Dry rub seasoning is a combination of various spices applied to the ribs before cooking. Memphis-style ribs feature a mix of paprika, black pepper, garlic powder, onion powder, and cayenne pepper, among other spices. This blend creates a robust flavor that penetrates the meat. According to rib expert and chef, Chris Lilly, the dry rub establishes a distinct character for Memphis ribs. -
Cooking Method:
Cooking method refers to the preferred way of preparing the ribs. Memphis-style dry ribs are usually smoked low and slow over hardwood, often using hickory or fruit woods. The smoking process can take several hours, typically from 4 to 6 hours at a temperature of around 225°F to 250°F. Smoking enhances the flavor and develops a delicious bark on the exterior, crucial for authentic Memphis ribs. -
Tender Texture:
Tender texture is an essential feature of quality ribs. Memphis-style dry ribs are cooked until they are sufficiently tender but still have a slight chew. Achieving the perfect tenderness requires careful monitoring of internal temperatures, usually aimed around 195°F to 203°F. This allows for the collagen in the meat to break down, resulting in juicy ribs. -
Sweet and Spicy Flavor Balance:
Sweet and spicy flavor balance describes the taste profile of Memphis-style dry ribs. The sugar in the dry rub caramelizes during cooking, providing sweetness, while the spices add heat. This combination makes for a well-rounded flavor experience. According to barbecue historian and author, Robert Moss, the allure of Memphis-style ribs lies in this blend of contrasting flavors. -
Smoke-Infused Aroma:
Smoke-infused aroma highlights the fragrant, rich scent produced during the smoking process. Different types of wood impart unique aromas to the ribs, enhancing the overall eating experience. For instance, hickory lends a strong, robust flavor, while fruitwoods like apple or cherry offer a milder sweetness. This aromatic quality is integral to the identity of Memphis-style dry ribs.
What Essential Ingredients Do You Need for the Best Dry Ribs?
The essential ingredients needed for the best dry ribs include a dry rub, salt, and a cooking fat like mustard.
-
Dry Rub Ingredients:
– Paprika
– Brown sugar
– Black pepper
– Garlic powder
– Onion powder
– Chili powder
– Cumin -
Salt:
– Kosher salt or sea salt for seasoning -
Cooking Fat:
– Mustard or olive oil for adhesion of the dry rub -
Optional Ingredients:
– Additional spices (cayenne pepper, thyme)
– Liquid smoke for flavor enhancement
– Honey for sweetness
Selecting the right ingredients is crucial for achieving flavorful dry ribs.
-
Dry Rub Ingredients:
The term ‘dry rub ingredients’ refers to a mix of spices and seasonings used to enhance the flavor of the ribs without adding moisture. Paprika adds color and a mild sweetness, while brown sugar caramelizes during cooking, creating a crust. Black pepper contributes heat, and garlic and onion powder deliver savory depth. Chili powder and cumin provide a smoky, earthy flavor. Many pitmasters, such as Chris Lilly, emphasize the importance of balance in these spices to elevate the overall taste of dry ribs. -
Salt:
Salt is essential for seasoning. It enhances flavors and helps to tenderize the meat by breaking down proteins. Kosher salt or sea salt is preferred because of its larger grain size and ability to adhere to the surface. According to the American Meat Science Association, proper salting can increase the juiciness of the ribs by improving moisture retention. An adequate salting process is typically recommended at least one hour before cooking for maximum effect. -
Cooking Fat:
Cooking fat, such as mustard or olive oil, plays a vital role in preparing dry ribs. Mustard serves as an adhesive for the dry rub, ensuring an even coating. It also adds a slight tanginess without overwhelming the flavors. A 2016 study by the Culinary Institute of America indicates that fats can improve the perception of flavors and create a more pleasant mouthfeel. -
Optional Ingredients:
Optional ingredients such as additional spices, liquid smoke, or honey can be used to customize the flavor profile. Extra spices like cayenne pepper or thyme can introduce new dimensions of heat or herbal notes. Liquid smoke adds a smoky flavor that mimics traditional smoking methods, while honey can enhance sweetness and encourage caramelization. Many competitive barbecuers utilize these ingredients to differentiate their dry ribs in cook-offs and competitions.
How Should You Prepare Dry Ribs Before Cooking Them in the Oven?
To prepare dry ribs before cooking them in the oven, you should follow a few essential steps. Start by selecting high-quality dry ribs. Aim for ribs with a good amount of meat and minimal excess fat. You may find that ribs vary in thickness. Generally, thicker ribs take longer to cook than thinner ones.
Begin by removing the membrane on the bone side of the ribs. This tough layer can inhibit flavor penetration and make the ribs chewy. Use a paper towel for better grip, and pull the membrane off gently. Next, apply a dry rub to enhance flavor. A basic rub can include salt, pepper, garlic powder, and paprika. Use approximately one tablespoon of rub per pound of ribs. Ensure even coverage for optimal seasoning.
After seasoning, let the ribs rest for at least 30 minutes. This step allows the rub to penetrate the meat, increasing flavor. For additional tenderness, you can marinate the ribs overnight in the refrigerator. Common marinade ingredients include soy sauce, vinegar, and spices. This method can enhance the final texture and taste.
Consider the oven’s preheating process. Preheat the oven to 275°F (135°C) for slow cooking. Cooking at this low temperature allows the meat to become tender without drying out. Cook the ribs on a baking sheet lined with aluminum foil for easier cleanup. Cover the ribs loosely with foil to retain moisture during cooking. Typically, ribs need about 2.5 to 3 hours to cook thoroughly at this temperature.
External factors can influence the cooking process. Variations in rib thickness and the efficiency of your oven may affect cooking time. Always check the internal temperature, aiming for at least 190°F (88°C) for tender ribs.
These preparation steps and considerations should give you flavorful and tender dry ribs when cooked in the oven. Explore different rubs and marinades for varied taste experiences.
What Is the Ideal Temperature for Cooking Dry Ribs in the Oven?
The ideal temperature for cooking dry ribs in the oven is typically between 225°F and 250°F (107°C to 121°C). This low-and-slow method allows the meat to become tender while developing rich flavors.
According to the USDA, cooking meat at low temperatures helps preserve moisture and can enhance the tenderness of tougher cuts. The USDA recommends the internal temperature of cooked pork ribs to reach at least 145°F (63°C).
Cooking dry ribs at this low temperature facilitates the rendering of fat and collagen, resulting in a more succulent final product. This method also allows for the effective infusion of flavors from rubs and marinades, improving overall taste.
The National Pork Board emphasizes that low-temperature cooking methods, such as baking, can yield flavorful outcomes. They advise home cooks to plan for longer cooking times when preparing ribs to ensure optimal texture.
Many factors influence the cooking temperature for dry ribs. These include the thickness of the meat, the presence of bone, and whether the ribs have been marinated or seasoned prior to cooking.
Research indicates that cooking pork ribs at temperatures above 300°F (149°C) can lead to a drier texture. The American Meat Science Association suggests that slower cooking methods can improve the overall palatability of meat.
Cooking dry ribs at low temperatures fosters a tender texture while maintaining moisture. This approach benefits food safety, as it ensures even cooking throughout the meat.
The impact of low-temperature cooking extends to health by reducing the risk of bacterial growth in improperly cooked meat. It also conserves resources in terms of energy used in preparation.
For best practices, the American Culinary Federation recommends using thermometers to check internal temperatures. They also suggest wrapping ribs in foil during cooking for extra moisture retention.
Using a water pan in the oven can also provide humidity, further improving the meat’s texture. Implementing slow cookers or sous-vide methods may provide additional options for achieving tender ribs.
How Long Do You Need to Cook Dry Ribs for Perfect Texture?
To achieve the perfect texture for dry ribs, cook them at a low temperature for approximately 2.5 to 3 hours. A common cooking temperature is around 225°F (107°C). This slow method ensures that the meat becomes tender while retaining moisture.
Cooking dry ribs can be influenced by several factors. The thickness of the ribs is one significant factor. Thicker ribs may require closer to the 3-hour mark, while thinner ribs can finish more quickly. Additionally, the type of dry rub or marinade used can affect the cooking time, as certain ingredients can tenderize the meat more quickly.
For example, if you are cooking a rack of baby back ribs, they might be ready in about 2.5 hours. However, St. Louis-style ribs, which are typically larger and thicker, may take closer to 3 hours to reach the desired texture.
External factors also play a role. Cooking conditions, such as the type of oven or smoker, can impact the cooking time. An oven that retains heat well may require less time compared to one that fluctuates in temperature. Furthermore, the starting temperature of the meat can affect cooking duration. If the ribs are refrigerated before cooking, it may take longer to cook them through.
It is essential to watch for appearance and texture rather than relying solely on time. Look for the meat to pull back from the bone and for the ribs to bend easily when lifted, indicating tenderness.
What Techniques Enhance the Flavor and Crispiness of Oven-Cooked Dry Ribs?
The techniques that enhance the flavor and crispiness of oven-cooked dry ribs include proper seasoning, cooking method, and temperature control.
- Seasoning: Use dry rubs or marinades to boost flavor.
- Cooking method: Utilize indirect heat for evenly cooked ribs.
- Temperature control: Cook at low temperatures for extended periods.
- Basting: Apply sauces or liquids at intervals to add moisture.
- Finishing under broil: Broil for a few minutes to achieve crispiness.
Understanding these techniques can elevate the overall quality of the ribs, making them flavorful and enjoyable.
-
Seasoning:
Seasoning involves using dry rubs or marinades to enhance the flavor profile of the ribs. Common components of a dry rub include salt, pepper, paprika, garlic, and onion powder. The National Pork Board emphasizes the importance of seasoning for enhancing the meat’s natural flavors. Marinades offer a different approach, infusing flavors into the meat over time. For example, a marinade can contain vinegar, soy sauce, and spices, which tenderize the meat while adding flavor. -
Cooking Method:
The cooking method indicates how heat is applied to the ribs. Cooking with indirect heat is recommended for achieving a tender result without burning. This method involves placing the ribs on a grill or oven and using a cooler area for cooking. The USDA suggests that this slow method allows the fats to render gradually while keeping the meat moist. -
Temperature Control:
Temperature control is crucial in cooking ribs to perfection. The ideal temperature range for cooking ribs is between 225°F to 275°F (107°C to 135°C). Cooking ribs at low temperatures allows collagen in the meat to break down, resulting in tender and flavorful ribs. Studies by the American Meat Science Association indicate that cooking meat slowly enhances tenderness. -
Basting:
Basting refers to applying a liquid or sauce to the ribs during cooking. This technique helps maintain moisture and add additional layers of flavor. For instance, a vinegar-based sauce can be used for basting to complement the meat’s flavors. The Kansas City Barbecue Society recommends basting about 30 minutes before finishing to allow flavors to develop. -
Finishing Under Broil:
Finishing under broil is a technique used to achieve a crispy exterior on ribs. After slow cooking, placing the ribs under a broiler for just a few minutes creates a caramelized crust. This method is effective in giving the ribs a desirable crunch, making them more appealing. Chefs often recommend watching closely during this step to prevent burning; broiling enhances texture while preserving moisture within the meat.