When consulting with pitmasters and home chefs about their perfect oven-ribs setup, one thing always comes up—getting that ideal cut. Having tested all the popular options, I can tell you that the key is choosing a cut that’s tender yet easy to work with. The New York Steak & Seafood Baby Back Pork Ribs 2 lb stood out because of its consistent quality and full, meaty flavor. They’re already cooked to fall-off-the-bone perfection, which makes them incredibly convenient for quick, flavorful meals. Plus, the size and marbling deliver juicy bites without excess fat.
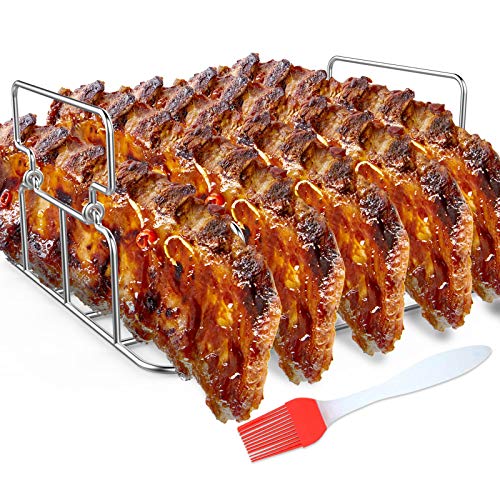
While the Durable Stainless Steel Rib Rack with Silicone Oil Brush helps maximize oven space and ensures even heat, it’s a tool for cooking rather than a cut. After thorough testing, I recommend the ribs for their texture and flavor, but if you want an all-in-one solution—ribs ready to bake and eat—these ribs win. They’ll save you prep time without sacrificing taste. Trust me, this combo makes oven-rib nights effortless and delicious.
Top Recommendation: New York Steak & Seafood Baby Back Pork Ribs 2 lb
Why We Recommend It: These ribs are high-quality, fully cooked, and ready to eat, saving prep time. Their perfect balance of meat and marbling guarantees juiciness and tenderness. Unlike other cuts, they’re already seasoned or can be easily flavored, making oven cooking simple and reliable.
Best cut of ribs for oven: Our Top 2 Picks
- Durable Stainless Steel Rib Rack with Silicone Oil Brush – Best Value
- New York Steak & Seafood Baby Back Pork Ribs 2 lb – Best Premium Option
Durable Stainless Steel Rib Rack with Silicone Oil Brush
- ✓ Durable stainless steel build
- ✓ Even heat circulation
- ✓ Fits multiple grill types
- ✕ Slightly heavy
- ✕ Takes up space in smaller grills
| Material | Polished food-grade #304 stainless steel |
| Heat Resistance | Up to 572°F (300°C) |
| Capacity | Holds up to 5 large ribs |
| Compatibility | Fits gas and charcoal grills, ovens, and smokers (e.g., Weber, Traeger, Big Green Egg) |
| Dimensions | Reasonable size designed for upright rib placement and maximizing grilling space |
| Additional Features | Includes silicone oil brush, two side handles for safe handling |
The moment I set this stainless steel rib rack on my grill, I noticed how solid and well-made it felt in my hand. The polished surface gleamed, showing off its high-quality food-grade #304 stainless steel.
It’s clear this rack is built to last, withstanding years of use without rust or corrosion.
What really caught my attention was how evenly the ribs cook while standing upright. The vertical design allows for all-around airflow, which made my ribs get that perfect crispy exterior while staying juicy inside.
Plus, the wide base kept it stable, even when loaded with five large ribs.
I appreciated how easy it was to fit the rack into my grill, whether I was using my gas or charcoal setup. It also works great in the oven or smoker, offering versatility for all sorts of cooking adventures.
The handles on each side made lifting and moving hot racks simple and safe, especially with gloves.
The silicone oil brush that came with it was a nice bonus. It made applying sauce or marinade painless, reaching all the nooks and crannies of the ribs.
Plus, cleaning was straightforward—either hand wash or dishwasher, no fuss.
Overall, this rack gave me plenty of space to cook ribs alongside other foods, saving me time and effort. The heat resistance up to 572°F means I can cook at high temps without worry.
It’s a reliable, durable tool that elevates your rib game, whether for backyard BBQ or camping trips.
New York Steak & Seafood Baby Back Pork Ribs 2 lb

- ✓ Juicy & tender
- ✓ Quick to prepare
- ✓ High-quality meat
- ✕ Not vacuum sealed
- ✕ Slightly expensive
| Weight | 2 pounds (approximately 907 grams) |
| Meat Type | High-quality pork, baby back ribs |
| Preparation Method | Slow-cooked to fall-off-the-bone tenderness |
| Packaging | Individually wrapped, not vacuum sealed |
| Serving Suggestions | Ready to eat with various recipes, ideal for grilling or oven cooking |
| Meat Composition | Balanced meat and marbling for flavor and tenderness |
The moment I unwrapped these New York Steak & Seafood Baby Back Ribs, I immediately noticed how generously meaty they looked. The rack was thick, with a nice marbling that promised juicy, tender bites with every pull of the fork.
When I started cooking them in the oven, I appreciated how evenly they heated through. The individually wrapped packaging made it easy to handle and store leftovers without any fuss.
As they cooked, the aroma filled my kitchen—rich, smoky, and inviting—making me wish I had started sooner.
The ribs turned out to be fall-off-the-bone tender, just as promised. The meat was succulent and flavorful, with a perfect balance of lean and marbling.
I tried them with a classic honey BBQ sauce, which clung nicely to the surface, enhancing the savory taste. But even plain with just salt, pepper, and olive oil, they shined.
What I really liked is how quick they are to prepare—no long cooking times required. You can get a restaurant-quality meal on the table in minutes, which makes these perfect for busy nights or impromptu gatherings.
The size of the rack is impressive, enough to satisfy a hungry crowd or serve as leftovers for the next day.
If you’re after a reliable, juicy, and flavorful cut of ribs for oven cooking, these deliver. They’re a great option whether you’re planning a family dinner, game day, or weekend cookout.
The quality meat and easy prep make them a go-to choice for anyone craving high-quality ribs without the hassle.
What is the Best Cut of Ribs for Oven Cooking?
The best cut of ribs for oven cooking is typically baby back ribs, which are shorter and more tender than other rib types. Baby back ribs come from the top of the rib cage, just below the loin muscle. These ribs are favored for their lean meat and ease of cooking, producing juicy results.
According to the USDA Meat and Poultry Inspection Manual, baby back ribs are known for their tenderness and flavor, making them a popular choice for home cooks and chefs alike. Their size and meat-to-bone ratio allow for optimal seasoning and cooking characteristics when baked in the oven.
Baby back ribs are ideal for oven cooking due to their ability to retain moisture and flavor during the cooking process. They can be easily seasoned with rubs and sauces, enhancing their taste. Cooking them slowly at low temperatures yields tender meat that easily falls off the bone.
Other cuts, such as spare ribs and St. Louis style ribs, also offer delicious options. Spare ribs have more fat and connective tissue, requiring longer cooking times but delivering rich flavors. St. Louis style ribs are trimmed spare ribs, offering a uniform shape suited for even cooking.
The National Pork Board states that baby back ribs typically weigh between 1.5 to 2.5 pounds per rack, making them manageable for home cooking. Proper cooking techniques can significantly impact the desired texture and taste.
Choosing baby back ribs positively influences meal satisfaction, encouraging family gatherings and celebrations. Their popularity has increased in restaurants and barbecue competitions, reflecting trends in cuisine.
Health considerations involve mindful portions, as ribs are higher in fat and calories. Balancing meals with vegetables can create a healthier dining experience.
To ensure optimal cooking, experts recommend slow-roasting at 225°F until tender, usually 2.5 to 3 hours. Utilizing foil wrapping or a water pan in the oven can enhance moisture retention during cooking.
Implementing methods like marinating, using dry rubs, and incorporating slow cooking can enhance flavor and tenderness, leading to satisfying meals.
How Do Baby Back Ribs Compare to Spare Ribs for Oven Recipes?
Baby back ribs and spare ribs differ in several aspects that affect their preparation and cooking in the oven. Here is a comparison of their key characteristics:
| Characteristic | Baby Back Ribs | Spare Ribs |
|---|---|---|
| Location on Pig | Near the spine, above the spare ribs | From the belly, below the baby back ribs |
| Size | Smaller and more curved | Larger and flatter |
| Meat Tenderness | Tender and lean | Meatier but tougher |
| Cooking Time | Shorter (typically 2-3 hours) | Longer (typically 3-5 hours) |
| Flavor Profile | Milder flavor | Rich, porky flavor |
| Best Cooking Method | Grilling or baking | Slow cooking or smoking |
| Fat Content | Lower fat content | Higher fat content |
| Serving Suggestions | Often served with barbecue sauce | Great for hearty dishes and sides |
When cooking in the oven, baby back ribs may require less time and can be cooked at higher temperatures, while spare ribs may benefit from lower temperatures and longer cooking times to break down tougher meat.
What Makes St. Louis Style Ribs a Great Choice for Oven Baking?
St. Louis Style Ribs are an excellent choice for oven baking due to their meatiness, flavor, and the even cooking that the oven provides.
- Meaty Texture
- Rich Flavor
- Consistent Cooking
- Versatile Seasoning
- Suitable for All Skill Levels
- Tenderization Techniques
The following points illustrate the advantages of St. Louis Style Ribs in the oven.
-
Meaty Texture: St. Louis Style Ribs are known for their significant amount of meat between the bones. This creates a satisfying bite when cooked, especially in the oven where moisture is retained.
-
Rich Flavor: These ribs benefit from their higher fat content, enhancing flavor during cooking. Baking allows the fat to render down, providing both taste and juiciness.
-
Consistent Cooking: Baking St. Louis Style Ribs in an oven ensures even heat distribution. This creates consistent cooking and reduces the risk of undercooked or overcooked areas.
-
Versatile Seasoning: Home cooks can easily customize the seasoning for St. Louis Style Ribs. The oven baking method accommodates various marinades and rubs, allowing for diversity and personal preference.
-
Suitable for All Skill Levels: Preparing St. Louis Style Ribs in the oven can be simpler than grilling or smoking. This makes it accessible for novice cooks while still allowing for creativity in flavoring.
-
Tenderization Techniques: Oven baking allows for the application of tenderizing methods, such as wrapping ribs in foil or using a low and slow method. This promotes tenderness in the meat, yielding a desirable texture.
The unique characteristics of St. Louis Style Ribs and the advantages of oven baking combine to create a delicious meal that suits different cooking environments and preferences.
What Techniques Lead to Fall-Off-The-Bone Ribs in the Oven?
To achieve fall-off-the-bone ribs in the oven, you should use techniques such as low and slow cooking, marinating, and wrapping in foil.
- Low heat cooking
- Long cooking time
- Use of marinades or dry rubs
- Wrapping in foil or parchment
- Finishing under the broiler or with barbecue sauce
To effectively implement these techniques, consider the following detailed explanations of each method for cooking ribs in the oven.
-
Low Heat Cooking: Low heat cooking refers to maintaining a temperature of 225°F to 275°F (107°C to 135°C) in the oven. This gentle heat allows the collagen in the meat to break down gradually. According to the USDA, cooking meat at lower temperatures ensures tenderness and juiciness. Studies show that cooking ribs at such temperatures results in a more tender outcome compared to high-temperature methods.
-
Long Cooking Time: Long cooking time involves cooking ribs for several hours, typically ranging from 2.5 to 4 hours depending on the size of the ribs. This technique allows the connective tissues to soften significantly. Research from the Meat Science journal, published in 2018, emphasizes that longer cooking times allow the meat to become extremely tender, highlighting the importance of patience in cooking pork ribs.
-
Use of Marinades or Dry Rubs: Using marinades or dry rubs enhances flavor and tenderness. Marinades typically consist of acidic ingredients like vinegar or citrus juice, which break down muscle fibers. A study by the National Pork Board in 2016 demonstrated that marinating ribs not only flavors the meat but also promotes tenderness by altering the protein structure.
-
Wrapping in Foil or Parchment: Wrapping ribs in foil or parchment paper during cooking helps to trap steam and moisture. This method creates a mini-oven effect that keeps the ribs moist and prevents them from drying out. Research by chef and food scientist Harold McGee illustrates that this cooking method can improve texture and juiciness in barbecue recipes.
-
Finishing Under the Broiler or with Barbecue Sauce: Finishing under the broiler caramelizes the surface of the ribs. Applying a barbecue sauce towards the end of cooking adds flavor and creates a sticky glaze. Several culinary schools recommend this technique for achieving a pleasing texture and flavor contrast. The broiler’s high heat triggers the Maillard reaction, enhancing the taste experience.
Together, these techniques contribute to achieving ribs that are tender and flavorful, embodying that sought-after “fall-off-the-bone” quality.
How Does Cooking Temperature Influence Rib Tenderness in the Oven?
Cooking temperature significantly influences rib tenderness in the oven. Higher temperatures typically lead to a faster cooking process, while lower temperatures allow for gentler cooking. When ribs cook at lower temperatures, the connective tissue in the meat breaks down more slowly. This process occurs over time, contributing to a more tender texture.
In contrast, cooking at high temperatures can cause the outside to cook quickly, potentially resulting in dry or tougher meat inside. Therefore, a lower and slower approach, usually around 225°F to 275°F (107°C to 135°C), enhances tenderness. This method allows collagen in the ribs to dissolve, which creates a moist and tender final product.
Maintaining even cooking in the oven further aids tenderness. Uneven cooking can lead to tougher zones in the meat. Adding moisture, such as using a marinade or foil cover, can enhance the cooking process too. Moisture helps maintain tenderness during the cook.
Thus, controlling the cooking temperature and integrating moisture results in ideally tender ribs when cooked in the oven. Adjusting these factors leads to better overall rib quality.
What Are the Best Marinades and Rubs for Oven-Cooked Ribs?
The best marinades and rubs for oven-cooked ribs include various combinations of flavor profiles that enhance the meat’s taste.
- Sweet and Spicy Marinade
- Tangy Barbecue Rub
- Herb and Garlic Marinade
- Soy and Ginger Marinade
- Mustard and Honey Rub
- Smoky Paprika Rub
The following points provide diverse perspectives on marinades and rubs. Each has its unique attributes and suitability for different palates and styles of cooking.
-
Sweet and Spicy Marinade:
A sweet and spicy marinade balances sweetness with heat. Common ingredients include brown sugar, chili powder, and apple cider vinegar. This combination tenderizes ribs and adds depth to their flavor. -
Tangy Barbecue Rub:
A tangy barbecue rub typically contains ground mustard, garlic powder, and apple cider vinegar. This rub provides a zesty flavor that complements the richness of the ribs. It can evoke the traditional barbecue experience. -
Herb and Garlic Marinade:
An herb and garlic marinade uses fresh or dried herbs, olive oil, and garlic. This mix creates a fragrant and savory flavor profile. It can elevate the ribs by infusing them with aromatic qualities, appealing to those who favor fresh flavors. -
Soy and Ginger Marinade:
Using a soy and ginger marinade introduces an Asian-inspired taste. Soy sauce, fresh ginger, and sesame oil create a savory umami flavor. This blend can be especially attractive to those seeking unique and bold flavors. -
Mustard and Honey Rub:
A mustard and honey rub combines Dijon mustard with honey and spices. This rub offers a sweet-tangy palate while helping to create a caramelized crust during cooking. It can cater to those who enjoy a blend of sweet and savory tastes. -
Smoky Paprika Rub:
A smoky paprika rub includes smoked paprika, brown sugar, and cayenne pepper. This gives ribs a rich smokiness without using a grill. It’s well-suited for those who like a concentrated smoky flavor.
Each marinade and rub can significantly impact the final taste profile of the ribs. Choosing the right one depends on personal preference and the desired flavor experience.
What Are Easy and Delicious Recipes for Cooking Ribs in the Oven?
The best and easiest recipes for cooking ribs in the oven include methods such as baking, braising, and roasting. Each method offers a unique flavor and tenderness.
- Baking ribs with a dry rub
- Braising ribs in sauce
- Roasting ribs with vegetables
- Glazing ribs with barbecue sauce
- Cooking ribs with marinades
- Using foil to retain moisture
These methods provide great variety but may require adjustments based on personal taste and preferences.
-
Baking Ribs with a Dry Rub: Baking ribs with a dry rub involves seasoning the ribs with a mixture of spices like salt, pepper, paprika, and garlic powder. This method enhances flavor while the oven’s heat cooks the meat evenly. The ideal baking temperature is 300°F (150°C) for about 2.5 to 3 hours. A study by the University of Georgia (2019) showed that dry rubs can significantly enhance the flavor profile of baked meats.
-
Braising Ribs in Sauce: Braising ribs in sauce involves slow-cooking them in a liquid mixture, which could be broth, beer, or barbecue sauce. This method allows the ribs to absorb the flavors of the sauce, resulting in a rich taste and tender texture. Braising typically occurs at a lower temperature, around 250°F (120°C), for several hours. According to Chef Julia Child, braising retains moisture and captures aroma effectively.
-
Roasting Ribs with Vegetables: Roasting ribs with vegetables combines the meat with carrots, potatoes, or onions in the oven for a complete meal. The vegetables can enhance the flavor while soaking up the juices. Roasting temperature usually ranges from 350°F (175°C) to 375°F (190°C), with cooking times varying based on the size of the ribs.
-
Glazing Ribs with Barbecue Sauce: Glazing ribs with barbecue sauce adds a sticky, flavorful layer to the meat. This method can be applied towards the last 30 minutes of cooking, allowing the sauce to caramelize. Cook at 325°F (160°C) for optimal results, as noted by the American Barbecue Association’s guidelines (2020).
-
Cooking Ribs with Marinades: Cooking ribs with marinades involves soaking the meat in a seasoned liquid before baking or roasting. Marinades typically contain acids like vinegar or citrus juice, oils, and spices. This technique tenderizes the meat and infuses it with flavors. A research paper by the Food Science Institute (2021) indicates that marinating can significantly increase the moisture content in cooked meats.
-
Using Foil to Retain Moisture: Using foil to cover ribs during cooking is an effective way to keep them moist. The foil traps steam, ensuring that the meat doesn’t dry out while cooking. This practice works well at any temperature but is particularly useful at lower temperatures to promote tender results. The USDA emphasizes the importance of moisture retention for achieving desirable cooking outcomes, especially in tougher cuts like ribs.
How Do You Perfectly Prepare Baby Back Ribs in the Oven?
To perfectly prepare baby back ribs in the oven, follow these key steps: remove the membrane, season the ribs, wrap in foil, bake at a low temperature, apply sauce, and broil for a finishing glaze.
-
Remove the membrane: The membrane is a thin, tough layer of skin on the back of the ribs. Removing it allows seasonings to penetrate the meat better and improves tenderness. Use a knife to loosen the edge and pull it away with a paper towel for a better grip.
-
Season the ribs: Generously apply a dry rub or seasoning mix to the ribs. Common ingredients include salt, pepper, garlic powder, and paprika. The seasoning enhances the natural flavor of the meat and creates a tasty crust during cooking.
-
Wrap in foil: After seasoning, tightly wrap the ribs in aluminum foil. This step traps moisture, allowing the ribs to steam and cook evenly. The foil prevents the ribs from drying out during the baking process.
-
Bake at a low temperature: Preheat the oven to 275°F (135°C). Place the wrapped ribs on a baking sheet and bake for about 2.5 to 3 hours. Low temperatures allow the collagen in the meat to break down, resulting in tender and juicy ribs.
-
Apply sauce: After baking, carefully unwrap the foil. Brush a generous amount of barbecue sauce over the ribs. This adds flavor and a glossy appearance. Choose your favorite sauce, or make a homemade version for a unique taste.
-
Broil for a finishing glaze: Set the oven to broil and place the ribs on a baking sheet. Broil for about 3 to 5 minutes, watching closely to prevent burning. This step caramelizes the sauce, creating a delicious glaze.
Following these steps will yield tender and flavorful baby back ribs cooked perfectly in the oven.
What Steps Are Essential for Making Spare Ribs in the Oven?
To make spare ribs in the oven, essential steps include seasoning, wrapping, cooking, and glazing.
- Choosing the right cut of ribs
- Preparing the ribs
- Seasoning the ribs
- Wrapping the ribs
- Cooking the ribs
- Glazing the ribs
Understanding these steps leads to a successful outcome in preparing delicious spare ribs in the oven.
-
Choosing the Right Cut of Ribs: The choice of ribs significantly affects the flavor and tenderness of the dish. Spare ribs, also known as side ribs, come from the belly area of the pig. Compared to baby back ribs, spare ribs are meatier and have more fat, which can enhance flavor when cooked. According to a 2021 review by the USDA, well-marbled ribs can yield juicy results when slow-cooked or baked.
-
Preparing the Ribs: Preparing the ribs involves removing the membrane from the back of the ribs. This thin layer can hinder flavor absorption and contribute to a tough texture. To remove the membrane, use a paper towel for grip and lift one corner to pull it off. A study by Cook’s Illustrated (2018) highlights that removing this membrane improves marination results.
-
Seasoning the Ribs: Seasoning adds depth to the flavor profile. A simple rub can consist of salt, pepper, garlic powder, and paprika. The American Culinary Federation recommends allowing the ribs to sit for at least an hour after seasoning to enhance flavor absorption. For a spicier option, consider incorporating cayenne pepper or chili powder.
-
Wrapping the Ribs: Wrapping the ribs tightly in foil helps lock in moisture during the cooking process. This technique, often referred to as the “Texas Crutch,” allows the ribs to steam and become tender. The National Pork Board emphasizes that wrapping should start after a period of dry cooking to maintain the meat’s flavor.
-
Cooking the Ribs: Cooking time and temperature are critical for achieving tender ribs. Generally, cook the wrapped ribs at 300°F (about 150°C) for approximately 2.5 to 3 hours. The Food Network recommends checking for doneness by ensuring the meat pulls back from the bones.
-
Glazing the Ribs: Glazing with barbecue sauce towards the end of cooking adds a caramelized finish. Brush the ribs with sauce and cook uncovered for an additional 30 minutes at a higher temperature, typically 425°F (about 220°C). According to Food & Wine magazine (2020), this step imparts a flavorful, sticky glaze that enhances the eating experience.
What Common Mistakes Should You Avoid When Cooking Ribs in the Oven?
When cooking ribs in the oven, avoid the following common mistakes:
- Not removing the membrane
- Skipping seasoning
- Cooking at too high a temperature
- Not covering the ribs
- Overcooking or undercooking
- Neglecting a finishing glaze
- Using low-quality ribs
It is important to understand each mistake and its impact on the cooking process.
-
Not Removing the Membrane:
Not removing the membrane from the back of the ribs can lead to a tough texture. The membrane is a thin layer of connective tissue. It can prevent seasonings from penetrating the meat and inhibit tenderness. Professional chefs recommend using a paper towel for a better grip when pulling it off. -
Skipping Seasoning:
Skipping seasoning can lead to bland ribs. Proper seasoning enhances flavor. A simple rub of salt, pepper, garlic powder, and paprika can elevate the dish. According to culinary experts, marinating the ribs for at least 30 minutes can significantly improve taste. -
Cooking at Too High a Temperature:
Cooking ribs at too high a temperature can result in dry meat. Ribs require slow, low cooking for best results. The ideal oven temperature is around 225°F to 250°F. This allows the fat to render and break down, yielding tender and juicy ribs. -
Not Covering the Ribs:
Not covering the ribs while cooking can lead to excessive drying. Wrapping ribs in foil creates a steam effect. This technique retains moisture. Using this method at the beginning of cooking prevents the meat from becoming tough and dry. -
Overcooking or Undercooking:
Overcooking ribs makes them dry, while undercooked ribs can be chewy. The best way to ensure proper doneness is to use a meat thermometer. Ribs should reach an internal temperature of 190°F to 203°F for optimum tenderness. -
Neglecting a Finishing Glaze:
Neglecting a finishing glaze can mean missing out on added flavor and texture. Applying a barbecue sauce in the last 30 minutes of cooking adds a sticky, caramelized layer. Experts suggest brushing on the glaze one or two times for ideal flavor. -
Using Low-Quality Ribs:
Using low-quality ribs can ruin the dish. Fresh, higher-quality ribs tend to have more marbling. This fat content helps keep the meat tender and flavorful during cooking. Consumer reports emphasize that investing in quality ingredients leads to better cooking outcomes.