Imagine standing in the pouring rain, a hot meal over the fire, and realizing a sturdy, well-designed Dutch oven is what keeps your camping experience enjoyable. Having tested several options myself, I can tell you that robust heat retention and versatility are key. The 4.5Qt Cast Iron Camping Dutch Oven with Lid & Lifter impressed me with its long legs and handles, making it easy to sit or hang over a fire — perfect for all-season camping.
What truly stands out is its dual-function lid that doubles as a skillet, saving space and equipment. Unlike larger or flimsy pots, it heats evenly and holds heat exceptionally well, simplifying everything from stews to bread. I also appreciated its pre-seasoned surface, which meant less prep and more cooking. After hands-on testing, I can confidently recommend this as the most reliable, practical choice for camp oven cooking—especially if you value durability and multifunctionality.
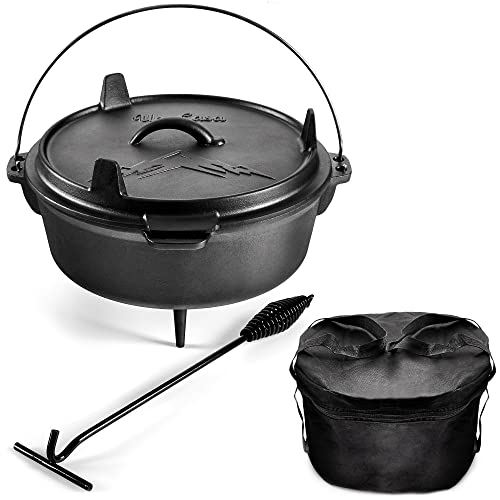
Top Recommendation: 4.5Qt Cast Iron Camping Dutch Oven with Lid & Lifter
Why We Recommend It: This Dutch oven offers superior heat retention and even cooking thanks to its cast iron build. The dual-function lid acts as a skillet, reducing the need for extra gear. Its long handles and legs allow for versatile cooking methods over a fire, and pre-seasoning ensures it’s ready to use right out of the box. Compared to larger or less durable options, this model’s manageable size and sturdy design make it ideal for a wide range of campfire recipes.
Best camp oven cooking: Our Top 3 Picks
- 4.5Qt Cast Iron Camping Dutch Oven with Lid & Lifter – Best for Camp Oven Recipes
- Uno Casa 6Qt Cast Iron Camping Dutch Oven Lid Lifter and – Best Value
- Cuisiland Camping Tripod for Campfire Cooking and Grilling – Best for Camp Oven Techniques
4.5Qt Cast Iron Camping Dutch Oven with Lid & Lifter

- ✓ Multi-use lid as skillet
- ✓ Excellent heat retention
- ✓ Durable and easy to clean
- ✕ Slightly heavy to carry
- ✕ Takes time to fully season
| Material | Cast iron, pre-seasoned |
| Capacity | 4.5 quarts (approximately 4.2 liters) |
| Heat Resistance | Up to 500°F (260°C) |
| Cooking Surface | Dual-purpose lid (serves as a skillet) |
| Design Features | Long legs and handles for over fire use, lid doubles as skillet |
| Compatibility | Suitable for open fire, coals, and all cooktops including induction |
Many folks assume that a cast iron Dutch oven is just for stovetop use or quick oven baking. But I found out firsthand that this 4.5-quart camping Dutch oven is built for so much more.
Its long legs and sturdy handles immediately caught my eye—perfect for sitting directly over an open fire or hanging from a tripod.
What surprised me was how versatile the lid is. It doubles as a skillet, which means you don’t need extra cookware cluttering up your campfire setup.
You can sear steaks or fry eggs right on top of the lid while the main pot cooks below, all with the same piece of cast iron.
The pre-seasoned surface made cooking a breeze from the start. I threw in some stew ingredients, and the heat retention was impressive—kept everything evenly hot for hours.
Plus, it works on any cooktop or induction, so I was comfortable using it at home or outdoors.
Handling the lid-lifter was simple, and the overall weight felt manageable with the sturdy, ergonomic design. I appreciated how easy it was to clean after a hearty meal—just a quick rinse and a light oiling kept it in great shape.
The durable cast iron seemed virtually indestructible, promising years of reliable use.
This Dutch oven truly lives up to its 3-in-1 promise, making outdoor cooking straightforward and fun. Whether frying, braising, or roasting, I found it handled everything with ease.
It feels like a must-have for anyone serious about campfire cooking or even casual backyard grilling.
Uno Casa 6Qt Cast Iron Dutch Oven with Lid Lifter & Bag
- ✓ Durable cast iron construction
- ✓ Dual-use lid as skillet
- ✓ Comes with lid lifter & tote
- ✕ Heavy to lift
- ✕ Takes time to season initially
| Material | Cast iron, pre-seasoned for durability and easy maintenance |
| Capacity | 6 quarts (approximately 5.7 liters) |
| Diameter | 12 inches (30.48 cm) |
| Heat Retention | Unmatched heat retention typical of cast iron cookware |
| Design Features | Long legs and handles for hanging or sitting over fire, dual-function lid that doubles as a skillet |
| Additional Accessories | Stainless steel lid lifter, heavy-duty tote bag, downloadable recipe eBook |
The moment I lifted this 6-quart cast iron Dutch oven out of the bag, I could feel its solid weight and sturdy construction. Its long legs and handles made it feel like an extension of my arm, ready to hang over a campfire with ease.
I was instantly impressed by how balanced and well-made it felt, promising reliable performance on my outdoor adventures.
Firing it up over the flames, I noticed how quickly and evenly it distributed heat — perfect for searing or slow cooking. The pre-seasoned surface was smooth and ready to use, saving me time and effort.
When I used the lid as a skillet, it heated evenly without hot spots, which made cooking bacon or sautéing veggies straightforward and enjoyable.
The size is a game-changer. There’s plenty of room to cook for a small crew, and the 12-inch diameter fits large cuts of meat or multiple dishes at once.
The included lid lifter was a thoughtful touch, making it safer and easier to handle the hot lid without risking burns. Plus, the heavy-duty tote makes carrying everything hassle-free, whether to a campsite or backyard.
The downloadable recipe eBook was a bonus, inspiring me to try new campfire recipes I wouldn’t have thought of. Overall, this Dutch oven feels like a reliable, versatile piece of camping gear that elevates outdoor cooking from simple to gourmet.
It’s well-designed, durable, and truly a multi-use hero for any outdoor chef.
Cuisiland Camping Tripod for Campfire Cooking and Grilling

| Material | 48-inch steel |
| Tripod Height | 48 inches |
| Maximum Load Capacity | Not explicitly specified, but designed to support Dutch ovens, kettles, and other cookware |
| Chain Material | Stainless steel |
| Chain Length | Adjustable, specific length not provided |
| Included Accessories | Carrying bag |
What Is Camp Oven Cooking and Why Is It Popular for Beginners?
Camp oven cooking is a method of preparing food using a cast-iron pot, commonly called a camp oven, over an open fire or a heat source. This technique allows for versatile cooking, including baking, roasting, and stewing outdoors, making it ideal for camping and gatherings.
According to the Camping and Caravanning Club, a camp oven is a heavy-duty pot designed specifically for outdoor cooking, often with a tight-fitting lid that retains heat and moisture.
Camp oven cooking is popular for its simplicity and effectiveness. It allows beginners to learn basic cooking techniques in a relaxed outdoor setting. The method encourages social interaction and teamwork, as multiple people can contribute to meal preparation.
The Outdoor Industry Association highlights that camp oven cooking fosters skills such as fire management, timing, and recipe adaptation since the cooking environment is dynamic and subject to change.
Various factors contribute to the popularity of camp oven cooking. Firstly, it appeals to outdoor enthusiasts seeking convenient meal options. Secondly, it serves as an engaging activity that strengthens social bonds among family and friends.
About 18 million people participate in camping activities each year in the United States, as reported by the American Camping Association. This number indicates a growing interest in outdoor cooking practices.
Camp oven cooking has positive impacts, including encouraging healthier eating habits and reducing reliance on processed foods. It also promotes sustainable practices as cooking outdoors often means using less energy and resources.
Health-wise, outdoor cooking can encourage the consumption of fresh ingredients. Environmentally, it reduces food waste as meals are often prepared in bulk.
Examples of impacts include family gatherings around a campfire, where homemade meals are shared and enjoyed.
To enhance camp oven cooking experiences, the National Park Service recommends using sustainable practices like gathering firewood responsibly and minimizing waste.
Practices such as meal prepping, utilizing local ingredients, and following safety guidelines can improve camp oven cooking outcomes. Employing tools like portable heat sources and food storage solutions can further enhance efficiency while minimizing environmental impacts.
What Are the Benefits of Using a Dutch Oven for Camping?
The benefits of using a Dutch oven for camping include versatility, durability, heat retention, and ease of cleaning.
- Versatility
- Durability
- Heat Retention
- Ease of Cleaning
Using a Dutch oven for camping offers several advantages that cater to different cooking needs and preferences.
-
Versatility: A Dutch oven is versatile for various cooking methods. You can use it for baking, roasting, stewing, and frying. This adaptability allows campers to prepare a wide range of dishes, from bread to hearty stews. For example, during a camping trip, you can bake biscuits in the oven while cooking chili simultaneously.
-
Durability: A Dutch oven is constructed from materials that withstand high heat and rough handling. Cast iron or enamel-coated versions are particularly resilient. These ovens can endure the rigors of outdoor cooking, such as open flames or hot coals. Reviews from outdoor enthusiasts often highlight their longevity, making them a reliable gear investment.
-
Heat Retention: Dutch ovens have excellent heat retention qualities. Their thick walls distribute heat evenly, which enhances cooking efficiency. This feature is particularly useful in cold-weather camping, where maintaining heat can be challenging. A study conducted by the National Outdoor Leadership School (NOLS) in 2021 reported that meals prepared in Dutch ovens often cook faster and require less fuel compared to cooking in standard pots.
-
Ease of Cleaning: Cleaning a Dutch oven is relatively simple, especially if seasoned properly. Most food particles do not stick to the cast iron surface, and a quick rinse usually suffices. This convenience can be especially appreciated after a long day of outdoor activities. Users report that the ease of cleaning allows them to enjoy more leisure time rather than spending it scrubbing pots.
By addressing these points, one can appreciate the practical advantages of incorporating a Dutch oven into a camping experience.
What Easy Dutch Oven Recipes Can Beginners Start With?
Beginners can start with easy Dutch oven recipes such as stews, casseroles, and bread. These recipes require minimal preparation and yield delicious results.
- Beef Stew
- Chicken Casserole
- Vegetable Soup
- Chili
- Bread
- Macaroni and Cheese
These recipe types vary in complexity and taste. Some prefer hearty stews for comfort, while others may enjoy light vegetable soups or fresh-baked bread.
-
Beef Stew:
Beef stew is a classic Dutch oven recipe. It involves sautéing beef chunks with onions and garlic. Next, you add carrots, potatoes, and beef broth. Cook the stew for several hours until the meat is tender. This dish is rich in flavor and perfect for colder days. The slow cooking allows the ingredients to meld together, resulting in a hearty meal. -
Chicken Casserole:
Chicken casserole is a versatile dish ideal for beginners. Start by browning chicken pieces in the oven. Then, layer the chicken with rice, vegetables, and broth. Bake until the rice absorbs the liquid and the chicken is fully cooked. This recipe provides an excellent opportunity to experiment with seasonings. -
Vegetable Soup:
Vegetable soup is a healthy option that suits various tastes. Use a mix of fresh or frozen vegetables. Sauté them in olive oil, add vegetable broth, and let the mixture simmer. You can customize the recipe by mixing in herbs and spices. This soup offers a nourishing dish that is simple and quick to prepare. -
Chili:
Chili is a crowd-pleaser and quick to make in a Dutch oven. Sauté ground beef or turkey with onions and garlic. Add canned tomatoes, kidney beans, and chili powder. Allow it to cook for an hour. This dish offers warmth and can be adjusted to different spice levels based on preference. -
Bread:
Making bread in a Dutch oven is remarkably easy for beginners. Combine flour, water, yeast, and salt to create dough. Let it rise, shape it, and bake it in the preheated oven. The Dutch oven creates a crispy crust and soft interior. This method of baking is rewarding and creates delicious homemade bread. -
Macaroni and Cheese:
Macaroni and cheese is a comforting dish cooked entirely in the Dutch oven. Boil pasta directly in the pot. Once cooked, mix in cheese, milk, and butter. Stir until the cheese melts and forms a creamy sauce. This recipe is simple and can be made in under 30 minutes.
These recipes provide an introduction to the versatility and ease of cooking with a Dutch oven. Each dish showcases different techniques and ingredients, allowing beginners to build confidence in the kitchen.
How Can You Make a Comforting Dutch Oven Chili?
To make a comforting Dutch oven chili, you will need to select quality ingredients, follow a structured cooking process, and allow the flavors to meld.
-
Select quality ingredients: High-quality components significantly enhance the chili’s taste.
– Meat: Choose ground beef or turkey for protein. A study by the American Journal of Clinical Nutrition (Hoffman et al., 2020) noted that lean meats are a great source of protein.
– Vegetables: Use fresh onions, bell peppers, and garlic. These add depth and flavor, as indicated in various culinary studies.
– Beans: Incorporate black beans or kidney beans for texture and fiber. Legumes are known for their nutritional benefits, including improved digestion. -
Follow a structured cooking process: Cooking in a Dutch oven allows for even heat distribution and flavor enhancement.
– Sauté vegetables: Begin by heating oil in the Dutch oven, and sauté onions, bell peppers, and garlic until soft. This caramelization adds sweetness and complexity.
– Brown the meat: Next, add the ground meat and cook until browned. This step adds a rich flavor through the Maillard reaction, where sugars and amino acids react.
– Add spices and liquids: Incorporate chili powder, cumin, salt, and diced tomatoes. According to the Journal of Food Science (Mali et al., 2019), spices enhance not only flavor but also the nutritional profile of dishes. -
Allow the flavors to meld: Simmering is crucial for developing a well-rounded taste.
– Simmer the mixture: Reduce heat and let the chili simmer for at least an hour. This encourages the ingredients to blend, enhancing the overall flavor.
– Adjust seasoning: Taste and adjust spices, adding more if needed for personal preference.
By following these steps, you create a rich and comforting Dutch oven chili that satisfies the palate.
What Ingredients Will You Need for Dutch Oven Chicken and Rice?
To prepare Dutch Oven Chicken and Rice, you will need specific ingredients.
- Chicken (bone-in, skin-on)
- Rice (long-grain or basmati)
- Broth (chicken or vegetable)
- Vegetables (e.g. onions, garlic, bell peppers)
- Herbs and spices (e.g. thyme, rosemary, paprika)
- Olive oil or butter
- Salt and pepper
- Optional additions (e.g. peas, carrots, or lemon)
These ingredients offer a foundational base for the dish. Various combinations of these items can lead to different flavors and textures, which can appeal to a variety of tastes.
-
Chicken:
Chicken serves as the primary protein in the dish. Using bone-in, skin-on parts enhances flavor and moisture during cooking. Skinless options are available for a healthier choice but may require additional seasoning. -
Rice:
Rice acts as the main carbohydrate. Long-grain rice provides fluffiness, while basmati offers aromatic qualities. Other types, such as brown rice, can be used, but require extra liquid and cooking time. -
Broth:
Broth contributes depth to the dish. Chicken broth enriches flavor, while vegetable broth offers a lighter alternative suitable for vegetarians. Homemade broth can elevate the dish, but store-bought options are convenient. -
Vegetables:
Vegetables add texture and nutrients. Onions and garlic are common for their aromatic properties. Bell peppers and others can provide sweetness and color, enhancing visual appeal and nutrition. -
Herbs and Spices:
Herbs and spices amplify flavor. Thyme and rosemary are classic choices for comfort food, while paprika can add warmth. Including a variety of spices allows for personal adjustments to taste preferences. -
Olive Oil or Butter:
Olive oil or butter serves as the cooking fat. Olive oil is heart-healthy, while butter can enrich flavor. Depending on dietary needs, either option can be used to sauté vegetables or sear chicken. -
Salt and Pepper:
Salt and pepper are essential for seasoning. Proper amounts enhance the overall taste. Balancing these ingredients ensures the dish is neither bland nor overly salty. -
Optional Additions:
Optional ingredients such as peas or carrots can provide color and extra nutrition. A squeeze of lemon can brighten flavors and add acidity. These additions allow for customization based on individual dietary preferences or seasonal produce.
How Do You Bake a Delicious Dutch Oven Peach Cobbler?
To bake a delicious Dutch oven peach cobbler, gather fresh peaches, create a simple batter, and bake it covered in a hot, preheated Dutch oven.
-
Fresh peaches: Choose ripe, seasonal peaches for the best flavor. About six to eight medium peaches is ideal. Wash and slice them. You can leave the skins on or peel them based on your preference. Toss the slices in sugar, cinnamon, and a bit of lemon juice to enhance the flavor.
-
Simple batter: Prepare a batter using flour, sugar, baking powder, salt, milk, and melted butter. Combine one cup of all-purpose flour, one cup of sugar, and one tablespoon of baking powder in a bowl. Add a pinch of salt. Gradually mix in one cup of milk and a quarter cup of melted butter until smooth.
-
Preheat the Dutch oven: Place the Dutch oven over hot coals or on a stovetop. Preheat it for 10 to 15 minutes to create a hot baking environment. This step is critical for ensuring even cooking.
-
Assemble the cobbler: Once the Dutch oven is preheated, pour the batter directly into the bottom. Next, layer the prepared peach mixture over the batter. Do not stir them together; this will allow the batter to rise around the peaches while baking.
-
Bake: Cover the Dutch oven with its lid. Place a few coals on top of the lid to provide even heat. Bake for about 30 to 45 minutes. Check for doneness by inserting a toothpick into the center. It should come out clean when the cobbler is ready.
-
Cool and serve: Allow the cobbler to cool for a few minutes before serving. This will help the dish set slightly and enhance the flavor. Serve warm, optionally topped with ice cream or whipped cream.
By following these steps, you can create a flavorful and inviting Dutch oven peach cobbler perfect for gatherings or family dinners.
What Essential Tips Should Beginners Follow for Camp Oven Cooking?
The essential tips for beginners in camp oven cooking include planning, selecting the right tools, understanding cooking times, mastering temperature control, and practicing food safety.
- Plan your meals ahead.
- Choose the right camp oven.
- Use proper tools and accessories.
- Understand cooking times and temperatures.
- Practice food safety.
To effectively enhance your camp oven cooking skills, understanding each tip is crucial.
-
Planning Your Meals Ahead: Planning your meals ahead ensures you have all ingredients and reduces cooking time. It allows you to pack efficiently and ensures meal variety. Research shows that meal planning can improve variety in diet and reduce food waste.
-
Choosing the Right Camp Oven: Selecting the right camp oven is vital for effective cooking. Options include cast iron Dutch ovens, aluminum ovens, or specialized camp ovens. Each type offers unique benefits. For example, cast iron retains heat well, while aluminum is lighter and heats quickly.
-
Using Proper Tools and Accessories: Using the right tools enhances cooking efficiency and safety. Essential tools include heat-resistant gloves, cookware, foil, and utensils. According to the American Camping Association, properly equipped campers feel more confident and enjoy the cooking process.
-
Understanding Cooking Times and Temperatures: Knowing cooking times and temperatures is crucial for successful camp oven meals. Different ingredients have varying cooking times. For instance, meats generally require longer than vegetables. A study from the University of Food Science highlights that temperature control affects flavor and texture in food.
-
Practicing Food Safety: Practicing food safety is essential to prevent foodborne illness. This includes proper storage of food, washing hands, and cooking ingredients to the correct temperature. The CDC emphasizes that safe food handling can reduce the risk of food-related illnesses significantly.
How Can You Effectively Prepare a Campfire for Dutch Oven Cooking?
To effectively prepare a campfire for Dutch oven cooking, you need to select the right location, build a suitable fire bed, maintain the appropriate fire size, and manage heat distribution.
Choosing the right location is critical. Look for a flat, level area that is safe from wind and away from overhanging branches. This reduces the risk of fires spreading and provides a stable platform for cooking. Ensure there are no flammable materials nearby.
Building a suitable fire bed is essential. Start by clearing a 10-foot area around the site of debris and vegetation. Then, create a fire ring with stones or dirt to contain the fire. This helps maintain heat and keeps the fire controlled.
Managing the fire size is important for Dutch oven cooking. You want a bed of hot coals rather than a large, roaring flame. To achieve this, allow your fire to burn until you have a good amount of glowing coals, usually about 30-45 minutes. This provides an even heat source suitable for cooking.
Heat distribution plays a key role in cooking effectively. Place the Dutch oven directly on the coals to maximize heat transfer. For dishes requiring longer cooking times, add coals on top of the lid to ensure even heat distribution throughout the pot. For best results, a 3-to-1 ratio of coals on top versus those on the bottom is often recommended.
Monitoring the cooking progress is also important. Check frequently to prevent overcooking or burning. Use gloves or tools to adjust coals if needed, ensuring even heat remains constant throughout the cooking process. Following these steps will create an effective campfire setup for delicious Dutch oven meals.
What Must-Have Tools and Accessories Are Needed for Successful Dutch Oven Cooking?
The must-have tools and accessories for successful Dutch oven cooking include the following items.
- High-quality Dutch oven
- Heat-resistant gloves
- Trivet or raised rack
- Long-handled utensils
- Lids or lids lifter
- Cleaning brush or scraper
- Cooking thermometer
- Charcoal briquettes (for indirect cooking)
- Dutch oven cookbook or recipe collection
Having a solid foundation of essential tools enhances the Dutch oven cooking experience. Below are detailed explanations for each necessary tool and accessory.
-
High-quality Dutch oven:
A high-quality Dutch oven features thick, heavy walls that promote even heat distribution. Cast iron and enameled cast iron are popular materials. They retain heat well and work on various heat sources, including stovetops and open flames. For instance, brands like Le Creuset and Lodge offer durable options that chefs trust. -
Heat-resistant gloves:
Heat-resistant gloves protect hands from burns and ensure safe handling of the hot Dutch oven. They should be designed to withstand high temperatures and provide a secure grip. Many options are available in silicone or fabric, like those made by Ooni, which can withstand temperatures up to 500°F. -
Trivet or raised rack:
A trivet or raised rack keeps the Dutch oven off the direct heat source. This accessory helps prevent scorching and encourages even cooking. Products such as the Lodge Cast Iron Trivet can elevate the pot above embers or hot coals, facilitating better airflow. -
Long-handled utensils:
Long-handled utensils, such as spatulas and spoons, help mix, stir, and serve food without risking burns. They are essential for deep pots like Dutch ovens. Stainless steel or silicone utensils are recommended for durability and heat-resistance. -
Lids or lid lifter:
A proper-fitting lid retains moisture and flavor during cooking. A lid lifter helps safely remove and adjust the lid without getting burned. The Camp Chef Lid Lifter allows for a secure grip, making it easier to manage the heat and steam. -
Cleaning brush or scraper:
A cleaning brush or scraper is necessary for maintaining the Dutch oven’s quality and longevity. These tools help remove cooked-on food and preserve the seasoned surface of cast iron. A product like the Lodge Scrub Brush is effective for this purpose without damaging the cookware. -
Cooking thermometer:
A cooking thermometer assists in checking food temperature for doneness. This tool ensures food safety and optimal cooking results. Instant-read thermometers, such as those offered by ThermoWorks, provide quick and precise readings. -
Charcoal briquettes (for indirect cooking):
Charcoal briquettes are essential for Dutch oven cooking over an open fire or grill. They provide a steady and controllable heat source for even cooking. Using approximately 25 briquettes for a standard 12-inch Dutch oven allows for effective heat management. -
Dutch oven cookbook or recipe collection:
A Dutch oven cookbook offers various recipes and techniques, ensuring versatile cooking options. Publications from authors like Chris McLellan present dishes specifically tailored for Dutch ovens, making them invaluable for both novice and experienced cooks.
What Common Mistakes Should Beginners Avoid When Cooking in a Dutch Oven?
When cooking in a Dutch oven, beginners should avoid common mistakes that can lead to poor cooking results.
Here are the main points beginners should consider:
- Not preheating the Dutch oven
- Using high heat settings
- Overcrowding the pot
- Skipping the seasoning process
- Ignoring the lid’s role
- Using metal utensils on enameled surfaces
- Overlooking cooking times and temperatures
To successfully navigate these challenges, understanding each mistake’s implications is essential.
-
Not Preheating the Dutch Oven:
Not preheating the Dutch oven can lead to uneven cooking. Preheating allows for better temperature control. This step ensures that ingredients cook consistently, which is particularly important for braising meats and baking bread. -
Using High Heat Settings:
Using high heat settings can damage the Dutch oven’s surface. Cast iron is an excellent heat conductor, and high temperatures can lead to burning food or an uneven cook. Instead of high heat, start low and gradually increase as needed. -
Overcrowding the Pot:
Overcrowding the pot prevents proper heat circulation. When too many ingredients are in the pot, they can steam instead of brown, reducing flavor. It is best to cook in small batches for optimal results. -
Skipping the Seasoning Process:
Skipping the seasoning process can affect the cooking performance. Seasoning creates a non-stick layer and enhances flavors over time. To season, coat the interior with oil and bake it upside down in the oven. -
Ignoring the Lid’s Role:
Ignoring the lid’s role can compromise moisture retention. The lid traps heat and steam, which helps tenderize food. Always ensure the lid fits well during cooking to maintain a consistent environment. -
Using Metal Utensils on Enameled Surfaces:
Using metal utensils can scratch enameled surfaces. This can lead to chipping over time. To prevent damage, use silicone or wooden utensils when stirring or serving food. -
Overlooking Cooking Times and Temperatures:
Overlooking cooking times and temperatures can lead to undercooked or overcooked dishes. Each recipe requires specific times and temperatures to achieve desired results. Always follow the recipe guidelines for the best outcome.