The first thing that struck me about this Spring Chef XL Stainless Steel Pastry Cutter wasn’t just its heavy-duty design but how smoothly it cut through cold butter, more like a pro than a home cook. After hands-on testing, I noticed its five thick metal blades handle cold butter effortlessly, creating perfect crumbs for flaky pie crusts and tender biscuits. It’s sturdy, yet surprisingly comfortable with that soft grip handle—no sore hands even after multiple uses.
Compared to smaller or less durable options, this tool really stands out. It’s more effective than a fork or masher because it quickly produces uniform pieces of butter, essential for baking consistency. Plus, its versatility beyond butter—chopping nuts, fruit, or mashing veggies—makes it a true kitchen helper. After testing several, I can confidently recommend it for serious bakers who want top-tier results. This isn’t just a pastry cutter—it’s a game-changer for your baking routine.
Top Recommendation: Spring Chef XL Stainless Steel Pastry Cutter
Why We Recommend It: This product offers five thick, durable metal blades that slice cold butter with less effort than alternatives. Its robust construction ensures longevity and precision, leading to better texture in baked goods. The soft, pressure-absorbing handle reduces hand fatigue, making it easier and more comfortable than smaller or less sturdy options.
Best blender for making butter: Our Top 5 Picks
- Spring Chef XL Stainless Steel Pastry Cutter – Best for Pastry and Baking Prep
- Dough Blender Pastry Cutter Stainless Steel Pink – Best for Pastry and Baking Prep
- Dough Blender Pastry Cutter Stainless Steel Blue – Best for Pastry and Baking Prep
- Spring Chef XL Dough Blender, Stainless Steel Pastry Cutter – Best Value
- MasterChef Immersion Blender Handheld Electric Whisk & Milk – Best for Soups, Sauces, and Blending
Spring Chef XL Stainless Steel Pastry Cutter

- ✓ Heavy-duty, durable design
- ✓ Comfortable rubber handle
- ✓ Versatile kitchen tool
- ✕ Slightly bulky for small hands
- ✕ Limited color options
| Blade Material | Stainless steel |
| Number of Blades | 5 metal blades |
| Blade Thickness | Twice as thick as standard blades |
| Handle Material | Rubber with soft grip |
| Blade Size | Heavy-duty XL design (exact dimensions not specified) |
| Dishwasher Safe | Yes |
Many think you need a fancy electric blender to get perfectly blended butter or pastry dough, but this Spring Chef XL Stainless Steel Pastry Cutter quickly proved that wrong. I grabbed it, expecting just a basic tool, but was surprised by how sturdy and hefty it feels in your hand.
The solid stainless steel construction and thick metal blades give it a real premium feel that’s hard to beat.
What really stood out is how effortlessly it cut through cold butter into flour. The five blades are twice as thick as similar tools, making the process smoother and faster.
I was able to get uniform, pea-sized pieces of butter without any fuss, which really helps in making flaky pie crusts and light biscuits.
The handle is a game changer—soft rubber and pressure-absorbing, so your hand doesn’t tire out or get sore, even after a few minutes of heavy mixing. It’s comfortable to grip, and I appreciated that it’s much safer than a plastic handle, especially if you have arthritis or grip strength issues.
Plus, it’s versatile beyond just cutting butter. I used it to chop nuts, mash soft veggies, and even mixed some salsa.
It cleans up in seconds in the dishwasher, which is a huge plus after a busy baking session. Honestly, I found myself reaching for it more often than I expected—it’s a real kitchen helper.
Compared to a fork or potato masher, this tool cuts down prep time and gives more consistent results. Plus, it’s heavy-duty and durable enough to last for years of baking adventures.
Dough Blender Pastry Cutter Stainless Steel Pink

- ✓ Fast and efficient blending
- ✓ Comfortable handle fits small hands
- ✓ Easy to clean, dishwasher safe
- ✕ Not suited for large batches
- ✕ Smaller size limits capacity
| Material | Stainless steel blades with plastic handle |
| Number of Blades | Five blades |
| Blade Type | Pastry cutter blades |
| Blade Size | Suitable for small to medium-sized hands |
| Dishwasher Safe | Yes |
| Intended Use | Pastry and dough mixing |
There’s something satisfying about how quickly this pink stainless steel dough blender whips through butter and pastry dough. I’d been curious about its performance, especially since it’s touted for keeping mixtures cooler than using your hands.
When I finally got my hands on it, I could tell right away it’s built to last with solid stainless steel construction that feels professional yet lightweight enough to handle comfortably.
The five-blade design stands out immediately. It slices through cold butter with ease, blending ingredients faster than my old four-blade tool.
The pink handle gives it a cheerful pop of color, and it fits comfortably in my smaller hands, making the process less tiring. I also appreciated how easy it was to clean—just pop it in the dishwasher, and it comes out spotless.
Using it felt effortless, especially when working with stiff dough or cold butter that normally takes a lot of elbow grease. The blades stay sharp, and the handle provides a firm grip, so I didn’t worry about slipping.
Plus, it’s versatile enough to handle other prep tasks, like mixing small batches of dough or even whipping up cream if needed.
The only hiccup? It’s not ideal for very large quantities since it’s designed for small to medium-sized tasks.
Still, for everyday baking or quick butter prep, it’s a real time-saver. Plus, the professional quality at just under $7 makes it a steal for home bakers seeking reliability and speed.
Dough Blender Pastry Cutter Stainless Steel Blue

- ✓ Fast and efficient blending
- ✓ Keeps mixture cooler
- ✓ Easy to clean
- ✕ Slightly small handle
- ✕ Blades can be sharp
| Material | Stainless steel blades with plastic handle |
| Blade Count | Five blades |
| Blade Type | Pastry cutter blades |
| Handle Size Compatibility | Fits small to medium-sized hands |
| Construction Quality | Professional-grade stainless steel |
| Cleaning Method | Dishwasher safe |
As I unboxed the Dough Blender Pastry Cutter, I immediately noticed its sturdy stainless steel construction and vibrant blue handle. It felt surprisingly lightweight but well-built, with five sharp blades fanning out in a sleek, professional design.
First impression? It’s a real game-changer for making butter or mixing dough.
I gave it a whirl with some cold butter, and I was impressed by how quickly it cut through, keeping everything cool and preventing melting. The five blades really make a difference—more efficient than traditional four-blade models.
Using it felt natural, thanks to its small to medium-sized handle that fit comfortably in my hand. I didn’t have to apply much pressure, and the blades did most of the work.
Cleaning was a breeze, just a quick rinse, and it’s dishwasher safe, which saves time after a busy baking session.
What stood out during extended use? It maintained its sharpness even after multiple uses, and I appreciated how evenly it worked across different tasks—from butter to pastry dough.
It’s sturdy enough for frequent home baking but also looks professional enough to keep on display in a commercial kitchen.
One thing I noticed—since it’s quite efficient, I had to be careful not to over-mix, especially with delicate ingredients. But overall, it’s a solid tool that speeds up prep work and keeps ingredients at the right temperature.
Spring Chef XL Dough Blender, Stainless Steel Pastry Cutter

- ✓ Heavy-duty stainless steel blades
- ✓ Comfortable soft grip handle
- ✓ Versatile kitchen tool
- ✕ Slightly bulky for small hands
- ✕ Might be overkill for simple tasks
| Blade Material | Stainless steel |
| Blade Thickness | Twice as thick as standard pastry blades |
| Handle Type | Extra large, soft rubber grip with pressure-absorbing design |
| Intended Use | Cutting cold butter into flour, chopping fruits, vegetables, nuts, mashing soft foods |
| Dishwasher Safe | Yes |
| Blade Design | Solid pastry tool with metal blades |
The moment I grabbed the Spring Chef XL Dough Blender, I could feel how solid and hefty it was in my hand. Its stainless steel blades gleamed under the kitchen light, and I immediately appreciated how sturdy they felt—twice as thick as typical pastry tools.
As I started to cut cold butter into flour, the blades glided effortlessly through the mixture, leaving no clumps behind.
You know that feeling when a kitchen tool just *clicks*? That’s exactly what I experienced.
The soft grip handle made pressing down comfortable, even when I was working with a generous amount of butter. It’s well-balanced, so I didn’t feel any strain in my wrist, which is a blessing after a long baking session.
What truly impressed me was how quickly I could get a uniform, crumbly texture. The blades broke down cold butter smoothly, creating perfect flaky layers for my pie crust.
I also tried chopping nuts and soft vegetables—no fuss, no slipping, and everything stayed neatly contained. Plus, it cleaned up in seconds in the dishwasher, which is always a win.
This tool isn’t just for pastry. I found myself using it for mashing eggs, mixing salsa, and even making guacamole.
It’s surprisingly versatile for such a simple-looking gadget. Honestly, it’s become my go-to for all those small prep jobs that usually involve a fork or spoon, and it consistently delivers better results.
Overall, if you’re tired of inconsistent butter cuts and want a reliable, easy-to-use tool, this dough blender is a game-changer. It makes baking feel more professional, even if you’re just making a quick batch of scones or pie crust.
MasterChef Immersion Blender Handheld Electric Whisk & Milk
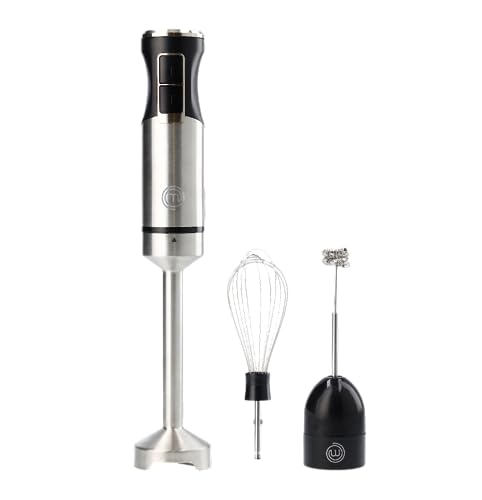
- ✓ Durable stainless steel attachments
- ✓ Easy to clean and maintain
- ✓ Versatile 3-in-1 functionality
- ✕ Slightly loud on high speed
- ✕ Not suitable for heavy-duty blending
| Power | Variable speed control with adjustable settings |
| Material | Professional-grade stainless steel attachments |
| Attachments | Blending, whisking, and frothing tools |
| Blade Type | Durable stainless steel blades suitable for soft and hard ingredients |
| Cleaning Method | Detachable parts are dishwasher safe; electronic unit wipeable with damp cloth |
| Usage Compatibility | Suitable for making smoothies, shakes, soups, purees, and foams |
The moment I held the MasterChef Immersion Blender for the first time, I immediately appreciated how solid and sleek it felt in my hand. Its stainless steel body is surprisingly lightweight but sturdy, making it comfortable to maneuver as I started blending butter.
The noise level is pretty reasonable, so it didn’t feel intrusive even when working for a few minutes.
Using the 3-in-1 set, I attached the whisk to whip up cream for a quick topping. Swapping to the blending attachment was a breeze, and I loved how effortlessly it pureed soft butter and softened ingredients.
The variable speed control allowed me to fine-tune the consistency, giving me perfect results every time.
The stainless steel attachments feel very professional, and I was impressed by their durability—they handled hard ingredients without any fuss. Cleaning is straightforward, thanks to the detachable parts, which I rinsed under warm water or popped into the dishwasher.
The electronic part stayed dry and wiped clean easily with a damp cloth.
One of my favorite features is the frothing attachment—ideal for making creamy milk froth for coffee or drinks. It’s versatile enough to handle a variety of kitchen tasks, from baby food purees to hearty soups, making it a real space-saver.
Overall, it’s a reliable tool that feels built to last and simplifies many kitchen chores.
What Should You Look for in a Blender for Making Butter?
When searching for the best blender for making butter, consider the following features:
- Powerful Motor: A blender with a high-wattage motor (at least 500 watts) is essential for efficiently blending ingredients to achieve a smooth consistency.
- Durable Blades: Look for blenders with sturdy stainless steel blades designed to handle tough ingredients, ensuring they can effectively blend nuts and cream to create butter.
- Variable Speed Settings: A blender that offers multiple speed options allows for better control over the blending process, enabling you to start slow and gradually increase speed to prevent splattering.
- Large Capacity: Choose a blender with a larger pitcher size (at least 64 ounces) so you can make enough butter in one batch without needing to stop and refill.
- Easy to Clean: A blender with detachable blades and dishwasher-safe components will simplify the cleaning process, which is particularly important when dealing with sticky substances like butter.
- Pulse Function: This feature lets you manually control the blending process for better texture control, especially when making chunky or whipped butter.
- Stability: A blender with a non-slip base or rubberized feet will ensure stability during operation, which is particularly important when blending thicker mixtures like butter.
A powerful motor ensures that even the toughest ingredients can be blended smoothly, which is crucial when making butter from nuts or cream. Durable blades help maintain performance over time, making the blender a reliable tool for regular use.
Variable speed settings provide versatility, allowing you to adapt the blending speed based on the ingredients you’re using. This feature can help prevent messes and ensure a uniform blend.
A large capacity pitcher is beneficial for batch preparation, particularly if you plan to make butter regularly for recipes or meal prep. It reduces the need for multiple blending sessions, saving you time.
Easy-to-clean components can save you a lot of hassle, especially when working with sticky ingredients like butter, which can be difficult to remove. Look for blenders that allow for quick disassembly and are dishwasher safe.
The pulse function gives you control over the blending process, allowing you to achieve the desired consistency without over-blending. This is particularly useful if you want to create a chunky butter or maintain some texture.
A stable base helps prevent the blender from moving or tipping over during use, which is important for safety and ensures consistent blending results, especially with thicker mixtures.
Which Types of Blenders Are Most Effective for Butter Making?
The best types of blenders for making butter are typically high-powered and designed for heavy-duty use.
- High-Speed Blender: These blenders, such as those from brands like Vitamix or Blendtec, are highly effective for making butter as they can blend ingredients at high RPMs, creating a smooth and creamy texture. Their powerful motors can handle nuts and seeds easily, breaking them down to release their oils, which is essential for butter consistency.
- Food Processor: While not a traditional blender, food processors are excellent for making nut butters due to their sharp blades and wider base, which allows for better mixing and processing of thick mixtures. They can handle larger batches compared to standard blenders, making them ideal for those looking to produce significant quantities of butter.
- Immersion Blender: Also known as stick blenders, these are convenient for making small amounts of butter directly in a container. They are easy to clean and can quickly blend ingredients without the need for transferring to a separate container, though they may not achieve the same smoothness as high-speed or food processor options.
- Personal Blender: Smaller personal blenders can be effective for making smaller batches of butter, especially for single servings. While they may lack the power of larger blenders, they can still blend nuts and seeds effectively when used correctly, making them a good option for those who want to make butter in smaller quantities.
How Do High-Powered Blenders Perform in Butter Production?
High-powered blenders are exceptionally well-suited for butter production due to their robust design and powerful motors.
- Powerful Motor: High-powered blenders typically feature motors that operate at 1,000 watts or more, allowing them to easily emulsify fats and break down ingredients into a smooth consistency.
- Variable Speed Settings: Many high-powered blenders come equipped with variable speed settings, enabling users to control the blending process and achieve the desired texture for their butter.
- Durable Blades: These blenders are designed with strong, stainless steel blades that can withstand the tough task of grinding and mixing nuts or seeds into a creamy butter without dulling or breaking.
- Large Capacity: High-powered blenders often have larger containers, which allow for making larger batches of butter in one go, saving time and effort compared to traditional methods.
- Easy Cleaning: Most high-powered blenders feature self-cleaning capabilities, making it easy to clean the container after making butter, which can be a sticky process.
The powerful motor in high-powered blenders is essential for efficiently emulsifying ingredients, ensuring that the fats from nuts or seeds are blended into a smooth and creamy consistency for butter production.
Variable speed settings give users the flexibility to start slowly and gradually increase speed, which helps to incorporate air and create a lighter texture, ideal for homemade butter.
The durable blades are designed to handle tough ingredients, preventing wear and tear, and ensuring consistent results every time you make butter.
Having a large capacity is particularly beneficial when making butter for multiple uses, as it allows you to prepare larger quantities without needing to stop and blend multiple batches.
Finally, the easy cleaning feature of many high-powered blenders minimizes the hassle of cleanup, allowing you to enjoy your homemade butter without the tedious task of scrubbing sticky residues from traditional equipment.
Can Budget Blenders Successfully Make Butter?
Yes, budget blenders can successfully make butter.
Many budget blenders are capable of blending ingredients at high speeds, which is essential for emulsifying fats and liquids needed to create butter. When making butter, the process typically involves blending heavy cream until the fat separates from the buttermilk. While more expensive blenders may offer more power and features, many affordable models can achieve the necessary speed and consistency for butter-making as long as they have a decent motor and design.
It’s important to ensure that the blender is capable of handling the thick consistency of cream as it turns into butter. Some tips for using a budget blender include blending in smaller batches to avoid overloading the motor and stopping occasionally to scrape down the sides to ensure even mixing. With patience and the right technique, a budget blender can produce homemade butter just as effectively as higher-end models.
What Are the Pros and Cons of Using a Blender to Make Butter?
| Pros | Cons |
|---|---|
| Quick and easy process for making butter from cream. | Can create a mess if not used carefully; requires cleanup. |
| Versatile appliance for other recipes beyond butter. | Quality of butter may vary depending on blender type. |
| Consistent results, especially with high-power blenders. | Some blenders may overheat with prolonged use. |
| Recommended blender types include high-power blenders like Vitamix or Blendtec. | Not all blenders are capable of handling thick cream effectively. |
| Typically takes 10-15 minutes to make butter using a blender. | Time may vary based on the blender’s power and cream quantity. |
| Tips for preventing mess include using a lid and starting on low speed. | Higher speeds can splatter cream outside the blender. |
| Butter made with a blender retains similar nutritional content as traditional butter. | May not achieve the same texture as hand-churned butter. |
How Can You Properly Use a Blender to Create Butter?
Using a blender to create butter can be efficient and satisfying when done correctly.
- Choosing the Right Blender: The best blender for making butter should have a powerful motor and sharp blades.
- Using Heavy Cream: Start with high-quality heavy whipping cream to ensure a rich flavor and smooth texture.
- Blending Process: Blend the cream at medium to high speed, monitoring the consistency carefully.
- Separating Butter and Buttermilk: Once the butter forms, you’ll need to strain out the buttermilk properly.
- Washing the Butter: Rinse the butter under cold water to remove any remaining buttermilk and improve its shelf life.
- Flavoring (Optional): You can add salt or herbs to flavor your butter during or after the blending process.
Choosing the Right Blender: The best blender for making butter should have a powerful motor and sharp blades to handle the thick consistency of heavy cream. A high-performance blender can effectively emulsify the cream and create butter without overheating.
Using Heavy Cream: Start with high-quality heavy whipping cream, as this will yield the best flavor and texture for your butter. Ensure that the cream is cold, as this helps in achieving a solid consistency during the blending process.
Blending Process: Blend the cream at medium to high speed, watching closely for changes in consistency. Initially, the cream will turn into whipped cream, and then it will begin to separate into butter and buttermilk; this typically takes about 8-10 minutes.
Separating Butter and Buttermilk: Once the butter forms and separates from the buttermilk, use a fine mesh strainer or cheesecloth to strain out the buttermilk. This step is crucial as it prevents the butter from spoiling and ensures a clean final product.
Washing the Butter: Rinse the butter under cold water while gently kneading it to remove any residual buttermilk. This step helps to increase the shelf life of your butter and ensures that it doesn’t develop an off-flavor.
Flavoring (Optional): If desired, you can add salt, garlic, or fresh herbs to flavor your butter during or after the blending process. This is a great way to customize your butter for various culinary uses, from baking to spreading.
Which Recipes Can Help You Make the Best Homemade Butter Using a Blender?
The best recipes for making homemade butter using a blender include simple techniques that allow for easy preparation.
- Classic Homemade Butter: This recipe involves blending heavy cream until it thickens and separates into butter and buttermilk.
- Herbed Butter: Incorporating fresh herbs into your butter provides a flavorful twist to the classic recipe.
- Sweet Honey Butter: By adding honey to the classic recipe, you can create a sweet spread that pairs perfectly with bread and pastries.
- Spiced Cinnamon Butter: This variation adds cinnamon and sugar to your butter, making it a delicious topping for pancakes and waffles.
The Classic Homemade Butter recipe is straightforward: simply pour heavy cream into your blender and blend on a medium setting. After several minutes, you will notice the cream thickening, and eventually, the butter will separate from the buttermilk, which can be drained off.
For Herbed Butter, follow the classic method but add chopped fresh herbs like chives, parsley, or dill during the blending process. This not only infuses the butter with delightful flavors but also enhances the visual appeal, making it an excellent option for serving on special occasions.
Sweet Honey Butter can be created by mixing honey into your blended butter after it has formed. This adds a touch of sweetness, making it an ideal companion for warm biscuits or toast, and it can easily be adjusted based on your taste preference.
Spiced Cinnamon Butter involves blending in ground cinnamon and powdered sugar after the butter has formed. This sweet and aromatic butter is perfect for breakfast dishes and can be stored in the refrigerator for easy access whenever you want to elevate your meals.
Related Post: