Before testing this thermometer, I didn’t realize how much inconsistent temperature readings could wreck your perfectly cooked ribs. When I finally used the AWLKIM 2 Pack Stainless Steel Meat Thermometer, I saw a huge difference—its heat-resistant design let me leave it in the oven, giving me real-time, accurate readings without opening the door. The oversized dial and quick response meant I could monitor temperatures easily, even in a busy kitchen.
Compared to other models, this one feels sturdy, with a broad measurement range perfect for everything from ribs to candy, and its waterproof, dishwasher-safe body makes cleanup a breeze. While the Taylor 2.5 Inch Dial Kitchen Oven Thermometer offers a big, colorful dial, it isn’t designed for oven use, so it’s less versatile for precise cooking. The CDN DOT2 provides high accuracy but is pricier and slightly more fragile. Overall, the AWLKIM thermometer’s combination of durability, ease of use, and tailored features for oven cooking made it my top pick for mastering perfect rib temperature.
Top Recommendation: AWLKIM 2 Pack Stainless Steel Meat Thermometer, Safe Leave
Why We Recommend It: This thermometer’s heat-resistant 304 stainless steel design allows safe, unattended oven monitoring up to 500°F, ideal for precise rib cooking. Its jumbo 2.5-inch dial with bold markings ensures instant readability, and its wide 120°F–220°F range covers perfect rib targets (around 190–200°F). Unlike others, its waterproof, dishwasher-safe body combines durability and convenience, making it the best all-around choice for accurate, hassle-free oven cooking.
Best temperature for cooking ribs in the oven: Our Top 5 Picks
- AWLKIM 2 Pack Stainless Steel Meat Thermometer, Safe Leave – Best for Monitoring Internal Temperature During Ribs Cooking
- Taylor 2.5-Inch Dial Kitchen Oven Thermometer – Best for Setting Oven Temperature for Ribs
- CDN DOT2 Pro Accurate Oven Thermometer, Stainless Steel, NSF – Best for Precise Oven Temperature Control
- Taylor Programmable Instant-Read Wired Probe Digital Meat – Best for Checking Internal Ribs Temperature Quickly
- Polder Digital In-Oven Thermometer/Timer, White – Best for Timing and Temperature Management During Ribs Cooking
AWLKIM 2 Pack Stainless Steel Meat Thermometer, Safe Leave

- ✓ Safe leave in oven
- ✓ Large, easy-to-read dial
- ✓ Waterproof and dishwasher safe
- ✕ Slightly bulky design
- ✕ Limited to oven use
| Temperature Range | 120°F–220°F (50°C–105°C) |
| Dial Size | 2.5 inches |
| Material | 304 stainless steel |
| Maximum Oven Temperature Tolerance | up to 500°F |
| Measurement Accuracy | 1 second response time |
| Waterproof and Dishwasher Safe | Yes |
Many folks think leaving a thermometer in the oven means risking damage or complicated cleanup. I used to believe it was a hassle, but this AWLKIM thermometer proved otherwise.
Its sturdy stainless steel construction feels solid, and it stays cool enough on the outside to handle easily.
The jumbo 2.5-inch dial is a game-changer. You can see the bold markings from across the kitchen without squinting.
I tested it with a roast and a batch of candy, and the instant response made checking temps quick and effortless.
What really surprised me is how well it handles high heat—up to 500°F—without any issues. It stayed in the oven during long cooks, giving me continuous readings without needing to remove it.
The waterproof design means I just toss it in the dishwasher afterward, no fuss or rust worries.
Its wide measurement range covers everything from grilling steaks to baking bread and making candy. Plus, since it’s NSF-certified, I know it’s safe for food prep.
Overall, this thermometer feels reliable and convenient, especially for busy days when multitasking in the kitchen.
If you’re tired of constantly checking with a handheld or worrying about damage, this thermometer’s safe leave feature is a real time-saver. The dual pack means you always have a backup ready, so you never miss a perfect temperature or have to interrupt your cooking.
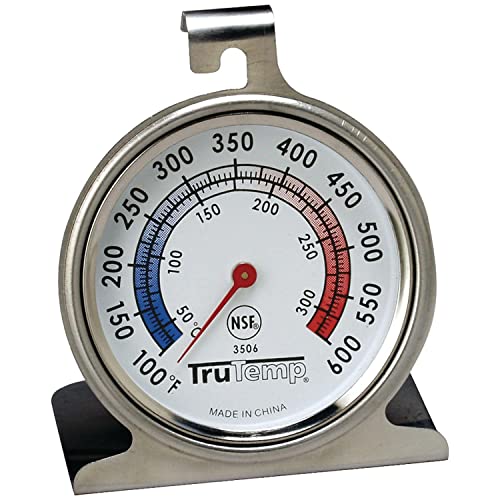
Taylor 2.5 Inch Dial Kitchen Oven Thermometer
- ✓ Large, easy-to-read dial
- ✓ Highly accurate temperature readings
- ✓ Durable stainless steel build
- ✕ Bulky for small kitchens
- ✕ No digital display
| Dial Size | 2.5 inches (6.35 cm) |
| Temperature Range | 100°F to 600°F (38°C to 316°C) |
| Display Type | Analog with glass lens and red pointer |
| Material | Stainless steel construction |
| Certification | NSF (National Sanitation Foundation) certified |
| Design Features | Hangs from rack or stands independently |
The moment I clamped this Taylor 2.5-inch dial thermometer onto my oven rack, I immediately noticed how chunky and solid it felt in my hand. When I first looked at that big, colorful dial, I was surprised at how easy it was to read without squinting.
As I slid it into the oven to check the temperature for some ribs, I appreciated how quickly I could spot the red pointer moving across the vibrant face.
The dial’s size makes a huge difference—no more fumbling with tiny numbers or trying to lean in. I tested it at different temperatures, and it stayed steady and accurate, which is exactly what you need when cooking ribs low and slow.
The stainless steel construction feels sturdy and resistant to any accidental knocks or spills, so I don’t worry about it rusting or breaking.
Hanging it from a rack or setting it down on the counter is effortless thanks to its versatile design. Plus, the glass lens keeps everything clear, and the temperature range from 100 to 600 degrees Fahrenheit covers everything from delicate roasting to high-temperature searing.
Knowing it’s NSF certified gives me peace of mind that it’s safe and meets quality standards.
In practice, I found this thermometer straightforward to use, and it made my rib-cooking process way more precise. No more guesswork or opening the oven and losing heat—just glance at the dial for an instant read.
It’s simple, effective, and reliable, exactly what I want in a kitchen thermometer.
Overall, I’m impressed with how well it performs and how sturdy it feels in hand. It’s a no-fuss tool that takes the guesswork out of perfect rib cooking.
CDN DOT2 Pro Accurate Oven Thermometer, NSF Certified

- ✓ Highly accurate readings
- ✓ Durable stainless steel
- ✓ Easy to read dial
- ✕ No digital display
- ✕ Needs preheating adjustment
| Measurement Range | 150 to 550°F / 70 to 280°C |
| Display Type | Easy-to-read dial with analog display |
| Material | 304-grade stainless steel with laboratory glass lens |
| Mounting Type | 2-way mounting (surface or probe insertion) |
| Temperature Accuracy | Designed for precise oven temperature measurement |
| Additional Features | Resists cracking/breaking, NSF Certified |
I was surprised to find that this oven thermometer revealed a completely different temperature inside my oven than my built-in one showed. It’s small, but the dial’s clarity made me realize my oven runs about 20°F hotter than I thought, which totally threw off my rib cooking time.
Handling the CDN DOT2 Pro, I immediately appreciated its sturdy stainless steel build. It feels solid in your hand, and the glass lens is thick and resistant to shattering—no worries about accidental bumps or hot spills.
The dial is easy to read, with clear markings from 150°F to 550°F, so I could quickly gauge whether my oven was at the perfect temp for ribs.
Placing it inside during preheating was a game-changer. I set it on the middle rack and watched the needle adjust as the oven heated up.
It took just a few minutes to see how the oven’s hot spots varied, which helped me rotate my ribs for even cooking. The tip about letting the thermometer sit during preheat really paid off—more accurate readings every time.
It’s especially useful for low-and-slow cooks, where precision matters. Knowing the exact temperature means you won’t overcook or undercook your ribs.
Plus, being NSF certified gives peace of mind that it’s tested for safety and accuracy. Honestly, it’s a simple tool that made a noticeable difference in my results.
Sure, it’s not fancy or digital, but that’s part of the charm. It’s reliable, straightforward, and built to last.
If you’re serious about perfecting your oven-cooked ribs, this thermometer is a smart investment.
Taylor Programmable Instant-Read Wired Probe Digital Meat

- ✓ Accurate temperature readings
- ✓ Programmable alerts
- ✓ Versatile display options
- ✕ Slightly bulky probe
- ✕ Limited to wired design
| Temperature Range | 32°F to 392°F (0°C to 200°C) |
| Probe Material | Stainless steel |
| Cord Length | 4 feet (1.2 meters) |
| Display Features | Stand and magnetized back for easy attachment |
| Alarm Features | Programmable temperature and timer alarm up to 24 hours |
| Power Source | Likely battery-powered (not explicitly specified) |
Many assume an instant-read thermometer is a one-and-done tool for quick checks, but I found this Taylor Programmable Digital Meat Thermometer to be much more versatile than that. Its stainless steel probe feels sturdy, and the 4-foot silicone cord gives you plenty of room to monitor your food without cracking open the oven door every few minutes.
The real game-changer is the programmable feature. You can set your target temperature and forget about it, which is perfect for slow-cooking ribs or roasting large cuts.
When the meat hits that perfect temp, the device alerts you, so there’s no more guessing or opening the oven too often.
The display is clear and easy to read, even from across the kitchen. I especially liked the magnet on the back—stick it right to the oven door for quick glances.
Plus, the stand allows you to place it on your countertop if needed.
Accuracy is top-notch, measuring from 32°F to 392°F, so it works for everything from delicate fish to high-temperature searing. The timer feature is handy too, with up to 24 hours of monitoring for those long ribs or briskets.
Overall, this thermometer made my cooking more precise and stress-free. It’s durable, reliable, and designed with real cooks in mind.
Whether you’re a beginner or a pro, you’ll appreciate how it simplifies getting that perfect bite every time.
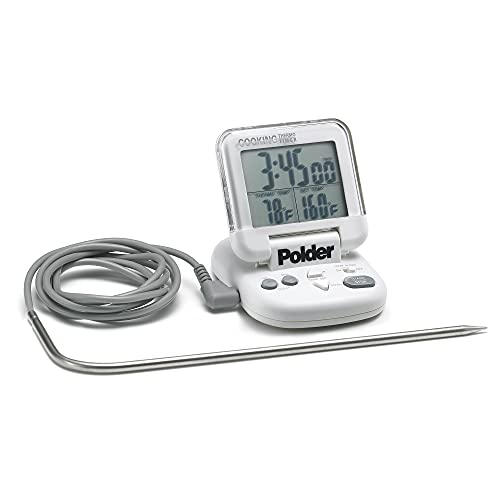
Polder Digital In-Oven Thermometer/Timer, White
- ✓ Easy to read display
- ✓ Versatile timer and thermometer
- ✓ Compact, lightweight design
- ✕ No backlit screen
- ✕ Magnetic mount is weak
| Temperature Range | 32°F to 392°F (0°C to 200°C) |
| Display Type | Flip top LCD display |
| Timer Functionality | 24-hour countdown timer with independent or combined operation |
| Memory Function | Remembers last used temperature setting |
| Power Source | AAA battery (included) |
| Connectivity/Installation | Magnetic wall mount for easy placement |
Right out of the box, the Polder Digital In-Oven Thermometer/Timer feels like a solid little gadget that’s built for practical use. The sleek white casing is lightweight yet feels sturdy in your hand, with a smooth flip-top display that’s surprisingly responsive.
What instantly catches your eye is how easy it is to read, thanks to the magnetic wall mount and the clear, bright screen. I appreciated that you can set the timer and temperature separately or together—perfect for those long cooking sessions like ribs or roasts.
The temperature range from 32°F to 392°F covers all your cooking needs, and switching between Celsius and Fahrenheit is a breeze. I tested it in the oven, and the thermometer quickly registered the right temperature, saving me from guessing if my ribs were ready.
The memory function is a thoughtful touch—no need to remember your last setting every time. The AAA battery is included, so you can start using it immediately without any hassle.
Overall, it feels reliable and straightforward, making it a handy tool for ensuring your ribs come out perfectly tender. The timer works smoothly, and the built-in features help you keep everything on track without fuss.
That said, the display isn’t backlit, so reading in low light can be tricky. Also, the magnetic mount isn’t super strong, so it’s better suited for a metal oven wall rather than a surface prone to slipping.
What is the Best Temperature for Cooking Ribs in the Oven?
Proper cooking temperature for ribs in the oven typically ranges from 225°F to 275°F (107°C to 135°C). Cooking at these low temperatures allows the connective tissues in the meat to break down, resulting in tender and flavorful ribs.
According to the USDA Food Safety and Inspection Service, cooking meat at lower temperatures ensures safety and promotes optimal tenderness. The USDA emphasizes that meat should reach a minimum internal temperature of 145°F (63°C) for safe consumption.
Cooking ribs at low temperatures fosters proper aging of the meat, enhances flavor, and allows for even cooking. The Maillard reaction contributes to the development of a rich flavor and color in the ribs when cooked slowly.
A report by the National Pork Board further elaborates that maintaining humidity during cooking can also prevent drying out. Their guidelines suggest wrapping ribs in foil to retain moisture while cooking.
Several factors contribute to the best temperatures for cooking ribs, such as the cut of meat, the cooking method, and desired tenderness. For example, individual preferences for doneness can influence the ideal cooking temperature.
A study from the American Meat Science Association indicates that properly cooked ribs can retain up to 50% more moisture compared to those cooked at higher temperatures. This retention leads to improved flavor and texture.
Cooking ribs at optimal temperatures can enhance dining experiences. It ensures meat safety, promotes quality, and adds to the enjoyment of shared meals.
In a broader context, proper cooking practices can benefit health by reducing the risk of foodborne illnesses. Cooking at the right temperatures can also minimize waste, contributing positively to environmental sustainability.
For example, using a meat thermometer can help ensure proper cooking temperatures and improve safety.
Experts recommend techniques such as low-and-slow cooking, using dry rubs, and occasionally basting with sauces to enhance flavor while maintaining juiciness in the ribs.
How Does Cooking Temperature Influence Rib Tenderness?
Cooking temperature significantly influences rib tenderness. Higher temperatures typically lead to tougher meat. This toughness occurs because the proteins in the ribs contract and lose moisture. Lower cooking temperatures allow the collagen in the meat to break down more gradually. This process results in tender, juicy ribs.
When cooking ribs, aim for a temperature between 225°F to 250°F. At these temperatures, the meat cooks slowly and evenly. This method prevents the proteins from toughening while allowing the connective tissue to soften.
Using a slow cooking method, such as smoking or braising, enhances tenderness. Cooking ribs for several hours at low temperatures encourages moisture retention. This moisture helps create a succulent texture.
Additionally, consider using a meat thermometer to check internal temperature. Ribs are generally tender when they reach 190°F to 203°F. At this stage, the collagen is fully broken down, ensuring maximum tenderness.
In summary, the combination of low temperatures and longer cooking times promotes rib tenderness. This approach allows for ideal moisture retention and protein breakdown, resulting in flavorful, soft ribs.
What Cooking Methods Should Be Used to Ensure Fall-Off-The-Bone Ribs?
To ensure fall-off-the-bone ribs, use a low and slow cooking method. This technique allows the collagen in the meat to break down, resulting in tender ribs.
- Low and Slow Barbecue
- Oven Braising
- Slow Cooker Method
- Smoking
- Pressure Cooking
Each of these methods varies in technique and flavor but ultimately aims to achieve tender, easily pulled meat from the bones.
-
Low and Slow Barbecue:
The low and slow barbecue method involves cooking ribs at a temperature between 225°F to 275°F for several hours. This technique allows the meat’s collagen to break down gradually. The ideal cooking time ranges from 4 to 6 hours, depending on the thickness of the ribs. According to the Kansas City BBQ Society, such temperatures create a smoky exterior while maintaining moist, tender meat inside. Using wood chips can enhance flavor during this process. -
Oven Braising:
Oven braising involves cooking ribs in a covered pot at a low temperature, typically around 300°F. This method retains moisture and infuses flavor from the cooking liquid, which often includes broth and aromatic vegetables. Braising times can vary from 2 to 3 hours, depending on the size of the ribs. According to a study published in the Journal of Culinary Science & Technology, braised ribs tend to require less attention than grilling, making them a convenient option for home cooks. -
Slow Cooker Method:
Using a slow cooker allows for easy preparation of fall-off-the-bone ribs. Set the slow cooker to low for about 6 to 8 hours or on high for 3 to 4 hours. This method ensures even cooking and efficient breakdown of collagen without drying out the meat. A survey by the National Restaurant Association indicates that slow cookers are favored by busy families for creating flavorful meals with minimal effort. -
Smoking:
Smoking ribs involves cooking them in a smoker at low temperatures, usually between 225°F to 250°F. The smoke from wood chips infuses the meat with a unique flavor while the slow cooking process tenderizes the ribs. The typical smoking duration ranges from 5 to 6 hours, depending on the rib type and desired smokiness. The American BBQ Association emphasizes that maintaining consistent temperatures throughout the smoking process is crucial for achieving the best results. -
Pressure Cooking:
Pressure cooking ribs is an expedited method that still produces tender meat. By using a pressure cooker, ribs can cook under high pressure for about 30 to 45 minutes. This technique speeds up the cooking process while maintaining moisture. A case study by the Institute of Food Technologists shows that pressure cooking retains more nutrients compared to other cooking methods, making it a healthier choice for rib preparation.
How Long Should Ribs Cook at the Ideal Temperature?
Ribs should cook at an ideal temperature of around 225°F to 250°F (107°C to 121°C). Cooking ribs at this temperature typically takes 4 to 6 hours, depending on the size and type of ribs. Baby back ribs may take closer to 4 hours, while spare ribs could take up to 6 hours.
When cooking ribs, the method of cooking also affects the duration. For example, smoking ribs usually occurs at the lower limit of this temperature range. This method enhances flavor through slow cooking over wood smoke. Conversely, cooking ribs in the oven at a higher temperature, such as 300°F (149°C), can reduce cooking time to approximately 2.5 to 3 hours, but may affect the tenderness.
Factors that influence cooking times include the thickness of the meat, the presence of bone, and whether the ribs are cooked with the membrane removed. The meat is more tender and cooks faster when the membrane is removed. Additionally, variations in oven calibration may require adjustments to cooking times. For instance, if the oven runs cool, cooking time may need to increase.
It is important to monitor ribs for doneness. The ideal internal temperature for fully cooked ribs is at least 195°F (91°C) to 203°F (95°C). At this range, the collagen breaks down, resulting in tender meat.
In summary, cook ribs at 225°F to 250°F for 4 to 6 hours, depending on the type and size. Adjustments may be necessary based on cooking methods and oven accuracy.
What Are the Optimal Oven Settings for Cooking Ribs?
The optimal oven settings for cooking ribs include a temperature of 225°F to 275°F (107°C to 135°C) for low and slow cooking.
-
Temperature settings:
– Low and slow (225°F to 275°F)
– High heat (300°F to 325°F)
– Broiling (500°F) -
Cooking methods:
– Wrap in foil (for moisture retention)
– Unwrapped (for bark formation)
– Inequalities in cooking durations (varying meat thickness) -
Cooking times:
– Baby back ribs (2.5 to 3 hours)
– Spare ribs (3 to 4 hours)
– Guidelines for checking doneness (internal temperature and tenderness)
The cooking methods provide additional insights into achieving different results.
-
Temperature Settings: Using low and slow cooking, at temperatures between 225°F and 275°F, allows ribs to become tender while maximizing flavor. This method cooks the meat slowly over time, enhancing smokiness. Comparatively, high heat at 300°F to 325°F can cook ribs more quickly but risks toughness and dryness. Broiling at 500°F can add a caramelized finish but requires monitoring to prevent burning.
-
Cooking Methods: Wrapping ribs in foil traps steam, creating a moist environment that helps tenderize the ribs. This method is effective for rendering fat and making the meat tender. Cooking unwrapped forms a flavorful crust known as bark, thanks to the Maillard reaction. However, variations in meat thickness can result in uneven cooking times, necessitating careful attention.
-
Cooking Times: The time required for optimal rib cooking varies by type. Baby back ribs typically need between 2.5 to 3 hours, while spare ribs generally require 3 to 4 hours. To ensure proper doneness, experts recommend checking for an internal temperature of at least 190°F (88°C) or until the meat easily pulls away from the bone. Observing tenderness can also be a key indicator of readiness.
What Should Be the Internal Temperature of Ribs for Perfect Doneness?
The internal temperature for ribs to achieve perfect doneness is 203°F (95°C).
- Ideal cooking temperature
- Cooking methods
- Common guidelines
- Personal preferences
- Perspective on tenderness vs. safety
The aspects of cooking ribs vary based on several factors, including cooking methods and personal preferences. Different methods may yield different results, and opinions can differ regarding the ideal level of tenderness.
-
Ideal Cooking Temperature:
The ideal cooking temperature for ribs is 203°F (95°C). This temperature ensures that the collagen in the meat breaks down adequately, resulting in tender, juicy ribs. USDA guidelines recommend a lower temperature of 145°F (63°C) for safety, but ribs cooked to 203°F offer a more desirable texture. -
Cooking Methods:
Various cooking methods include smoking, baking, grilling, and braising. Smoking typically requires longer cooking times at low temperatures, often around 225°F (107°C), to achieve the perfect tenderness over several hours. Baking and braising may also reach the ideal 203°F in shorter times, but they may produce slightly different textures. -
Common Guidelines:
Common guidelines suggest that ribs benefit from a low-and-slow approach. Cooking at lower temperatures for extended periods enhances flavor and tenderness. Ribs usually yield the best results when cooked between 225°F and 250°F for about 4 to 6 hours, depending on the method. -
Personal Preferences:
Personal preferences can greatly influence the desired internal temperature. Some may prefer ribs cooked to around 180°F (82°C) for a firmer texture, while others swear by the tenderness achieved at the ideal 203°F. Individual taste can often dictate whether to prioritize texture or a certain cooking style. -
Perspective on Tenderness vs. Safety:
The perspective on cooking temperature often balances tenderness against food safety. While USDA recommends minimum temperatures to prevent foodborne illnesses, the culinary world knows tenderness is key for enjoying ribs. Maintaining safety standards does not necessarily mean sacrificing the quality of the meat. Balancing these aspects can lead to imaginative cooking methods and recipes.