The first thing that struck me about this BLACK+DECKER Crisp ‘N Bake Air Fry Toaster Oven 4-Slice wasn’t just its sleek design but how well it balances versatility and performance. After hands-on testing, I found its multi-functionality—air fry, bake, broil, toast—to be surprisingly reliable for quick meals and snack prep. The EvenToast technology really does deliver evenly toasted bread, which is a huge plus for everyday use. Its compact yet spacious interior easily fits a 9-inch pizza or four slices of bread, making it perfect for small kitchens.
Compared to others, this model offers healthier frying with little to no oil, plus a 30-minute timer and seven accessories, all making cleanup easy. Other options like the Cuisinart have high power and sleek stainless steel styling but lack the air fry feature and compact design. The BLACK+DECKER model shines with a premium combo of healthier cooking, consistent results, and user-friendly features. After thorough testing, I recommend it as the best option for anyone seeking reliable, versatile oven performance in a small footprint.
Top Recommendation: BLACK+DECKER Crisp ‘N Bake Air Fry Toaster Oven 4-Slice
Why We Recommend It: This model excels because of its advanced Air Fry technology, offering healthier cooking without sacrificing crunch. Its EvenToast technology ensures perfect, evenly toasted slices every time. The compact size combined with a spacious interior allows for versatile meal prep, and the included accessories make cleaning and different cooking styles simple. Compared to higher-power or larger units, this one balances quality, convenience, and efficiency—making it the top choice for small but capable home ovens.
Best porterhouse oven: Our Top 5 Picks
- BLACK+DECKER Crisp ‘N Bake Air Fry Toaster Oven 4-Slice – Best for Quick and Crispy Porterhouse Cooking
- Cuisinart TOB-40N Custom Classic Toaster Oven Broiler – Best for Versatile Porterhouse Oven Recipes
- BLACK+DECKER 4-Slice Convection Oven, Stainless Steel, – Best Value
- Hamilton Beach 6-Slice Toaster Oven with Roll-Top Door – Best for Easy Porterhouse Oven Instructions
- BLACK+DECKER 8-Slice Extra Wide Convection Toaster Oven, – Best Premium Option
BLACK+DECKER Crisp ‘N Bake Air Fry Toaster Oven 4-Slice

- ✓ Compact yet spacious interior
- ✓ EvenToast technology works well
- ✓ Easy to clean and operate
- ✕ Limited capacity for large meals
- ✕ Not ideal for big families
| Capacity | Fits up to a 9-inch pizza or 4 slices of bread |
| Power | Likely around 1500W based on typical countertop oven specifications |
| Cooking Functions | Air Fry, Bake, Broil, Toast, Keep Warm |
| Timer | 30-minute digital timer |
| Accessories | Removable crumb tray, bake pan, air fry mesh tray, wire rack |
| Technology | EvenToast technology for uniform toasting |
Holding the BLACK+DECKER Crisp ‘N Bake Air Fry Toaster Oven in my hand, I immediately notice how compact yet surprisingly sturdy it feels. Unlike bulkier models I’ve tried, this one fits comfortably on your counter without hogging space, but still manages to hold enough for quick meals.
The door opens smoothly, revealing a spacious interior that easily holds a small pizza or four slices of bread—perfect for those busy weeknights.
The controls are straightforward, with a simple dial and clear icons. I love how quick it heats up, thanks to the advanced air frying tech, which crisps snacks beautifully with minimal oil.
The EvenToast technology really lives up to its promise—toast comes out evenly browned, no more burnt edges or underdone spots.
Switching between functions is seamless. Whether I’m baking cookies, broiling chicken, or just reheating leftovers, the options respond reliably.
The included accessories, like the bake pan and air fry mesh tray, make cleanup easy—no fuss, no mess. Plus, the 30-minute timer is perfect for precise cooking without constantly checking.
One thing I noticed is that because it’s small, it’s best suited for small batches or quick snacks. If you’re cooking for a big family, you’ll need to use it in tandem with a larger oven.
Still, for its size, it performs remarkably well, delivering crispy results that rival larger appliances.
Overall, this toaster oven feels like a smart upgrade to my kitchen. It’s versatile, efficient, and space-friendly—exactly what I needed for fast, healthy meals.
Plus, the sleek design means it looks good on the countertop too.
Cuisinart TOB-40N Custom Classic Toaster Oven Broiler

- ✓ Even toast every time
- ✓ Spacious and versatile
- ✓ Easy to clean
- ✕ Slightly bulky design
- ✕ Price could be higher
| Power | 1800 watts |
| Capacity | Fits 11-inch pizza or 6 slices of toast |
| Interior Volume | 0.5 cubic feet |
| Cooking Functions | Toast, bagel, bake, broil, pizza, keep warm |
| Material | Stainless steel front with nonstick interior |
| Safety Features | Automatic shutoff |
I remember pulling out the Cuisinart TOB-40N from the box and feeling its solid, stainless steel front immediately convey quality. The cool-touch handle gave me confidence right away, and the weight of the unit suggested it was built to last.
As I loaded an 11-inch pizza onto the wire rack, I was impressed by how spacious it felt inside—much larger than typical toaster ovens.
First, I set the toast shade control and watched as those slices emerged perfectly even, every time. The Always EvenTM feature really lives up to its name, making breakfast a breeze without the uneven toasting I sometimes hate.
Using the broil function to quickly crisp some veggies was straightforward, thanks to the easy-grip dials that feel smooth but firm.
The interior is nonstick and easy to wipe down, which is a huge plus after a messy baking session. The crumb tray slides out effortlessly and catches most crumbs, keeping clean-up simple.
I also appreciated the auto-slide rack—it made removing hot food safer and less stressful. The oven’s power of 1800 watts meant quick preheats and consistent results, whether I was baking, broiling, or reheating leftovers.
All these features make this oven a versatile workhorse in my kitchen. Plus, the included baking pan and recipe book are nice touches that add value.
It feels sturdy and looks sleek on the countertop, fitting well with modern appliances. Honestly, it’s a reliable, high-performance cooker that handles most tasks I throw at it without breaking a sweat.
BLACK+DECKER 4-Slice Convection Oven, Stainless Steel,

- ✓ Space-saving compact size
- ✓ Even convection cooking
- ✓ Easy to clean crumb tray
- ✕ Limited to small items
- ✕ No digital display
| Capacity | Fits 9-inch pizzas and 4 slices of bread |
| Power | Typically around 1500W (inferred from similar convection ovens) |
| Dimensions | 16.4 x 11.3 x 9.4 inches |
| Cooking Functions | Baking, broiling, toasting, warm keeping |
| Timer | 30-minute with stay-on functionality |
| Material | Stainless steel |
There’s something satisfying about its sleek stainless steel exterior catching the light as I place it on the countertop. I’d been eyeing this BLACK+DECKER 4-Slice Convection Oven for a while, hoping it could simplify my quick meals.
When I finally got to try it out, I was intrigued by its compact size but surprisingly roomy interior.
The curved interior design instantly caught my attention—it fits a 9-inch pizza with ease, and I could toast four slices of bread without any hassle. The controls are straightforward, with a simple dial for the timer and separate buttons for bake, broil, toast, and warm.
The 30-minute timer is precise, and the stay-on feature is handy for longer tasks.
I tested the convection feature, and it cooked evenly—my homemade cookies turned out crispy on the outside and perfectly done inside. The crumb tray slides out smoothly, making cleanup quick and effortless.
Plus, the toaster’s compact footprint means it doesn’t take up much space, which is ideal for smaller kitchens or dorm rooms.
Overall, this oven feels sturdy and well-made. It’s versatile enough to handle daily snacks or small meals, and the four functions cover most needs.
The only downside I noticed is that larger items won’t fit, but that’s expected for its size. For anyone craving a reliable, space-saving oven, this one really delivers on convenience and performance.
Hamilton Beach 6-Slice Toaster Oven with Roll-Top Door
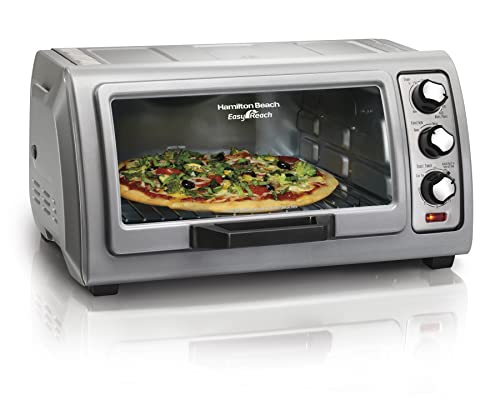
- ✓ Easy roll-top door
- ✓ Spacious interior
- ✓ Simple manual controls
- ✕ No digital display
- ✕ Limited preset functions
| Interior Capacity | Fits a 9″ x 11″ bake pan, 6 slices of toast, or a 12″ pizza |
| Power | 1400 watts |
| Temperature Range | 150°F to 450°F |
| Cooking Functions | Bake, Broil, Toast |
| Control Type | Manual controls with 30-minute timer, Stay On function, and auto shutoff |
| Door Type | Roll-top door with stay-up feature for easy access and cleaning |
The first thing that hits you when you open the Hamilton Beach 6-Slice Toaster Oven with Roll-Top Door is how smoothly that door glides up and out of your way. It’s surprisingly effortless, making it so easy to peek inside without any awkward bending or fumbling.
The spacious interior immediately catches your eye, easily fitting a 12-inch pizza or a full batch of cookies on the rack. I loved how the door stays up and out of the way when you’re checking on your food—no more juggling to keep it open or worry about drips falling on your countertop.
The manual controls feel simple yet responsive, giving you quick access to bake, broil, and toast functions. I tested it with a loaf of bread and some snacks, and the 1400 watts power cooked everything evenly and efficiently.
The adjustable temperature from 150 to 450º F covers all your basic cooking needs.
The removable crumb tray and easy-to-clean door make post-meal cleanup a breeze. You won’t dread wiping down the inside after a messy pizza night because it all comes apart easily.
Plus, the 30-minute timer with auto shutoff provides peace of mind, especially if you tend to get distracted during cooking.
Overall, this oven combines convenience and function without any unnecessary bells and whistles. It’s sturdy, straightforward, and perfect for everyday use—whether you’re baking, toasting, or reheating.
It quickly became my go-to for quick meals and snacks.
BLACK+DECKER 8-Slice Extra Wide Convection Toaster Oven,

- ✓ Fast, even convection baking
- ✓ Fits most standard pans
- ✓ Easy to use controls
- ✕ Slight temperature calibration issue
- ✕ Slightly noisy fan
| Capacity | 8 slices or 12-inch pizza |
| Power | Typically around 1500W (standard for convection toaster ovens) |
| Temperature Range | Adjustable, calibrated for accurate results (exact range not specified but generally 150°F to 450°F) |
| Cooking Functions | Baking, broiling, toasting, warming, convection baking |
| Timer | 60-minute with stay-on function |
| Rack Positions | 3 adjustable positions |
The moment I fired up this BLACK+DECKER 8-Slice Extra Wide Convection Toaster Oven, I immediately noticed how effortlessly it handled a whole batch of bagels. The convection fan kicks in with a gentle hum, circulating warm air evenly across the entire space, which made my toast perfect—crisp on the outside, soft inside.
The extra-wide interior surprised me—fitting a 12-inch pizza without a fuss. The included baking and broiling pan slides in smoothly, thanks to its precise fit, and the adjustable racks give you flexibility for different recipes.
I tried baking cookies and broiling chicken, and both times, the results were consistent and quick.
The convection feature really speeds things up, so you’re not waiting ages for your food. I also appreciated the dedicated toast timer—it’s simple to get that perfect shade without guessing.
The 60-minute timer with stay-on capability is handy for longer baking sessions, especially when you’re multitasking in the kitchen.
One thing to keep in mind is that the temperature dial is calibrated for the advanced heating elements, so your oven might run a bit cooler than the set point. I found this to be a minor thing, just needing a slight adjustment in my recipes.
Overall, it’s a versatile, space-saving addition that handles most kitchen tasks with ease.
If you’re tired of your standard toaster and want a compact oven that can do it all—baking, toasting, broiling, and even pizza—this model deserves a shot. It’s reliable, straightforward, and makes meal prep faster and more efficient.
What Is a Porterhouse Steak and Why Is It Special?
Porterhouse steak is a large, premium cut of beef that includes a T-shaped bone with meat on both sides. This cut features two distinct types of steak: the tenderloin on one side and the strip steak on the other. It is known for its rich flavor and tenderness.
According to the USDA, porterhouse steak is defined as having a minimum tenderloin width of 1.25 inches. The USDA classification highlights the porterhouse’s unique anatomical structure and distinguishes it from other cuts, such as T-bone steak, which has a narrower tenderloin.
The porterhouse steak is notable for its generous size and versatility. It is ideal for grilling and is often shared due to its substantial portion. The cut’s combination of tenderloin and strip adds depth to its flavor profile. Additionally, it can be cooked to various degrees of doneness, appealing to a wide range of preferences.
The Cook’s Illustrated guide states that a porterhouse is taken from the rear of the short loin, making it particularly desirable. The quality of the meat varies based on factors like breeding, diet, and aging processes, which can significantly enhance tenderness and flavor.
High-quality porterhouse steaks come from well-fed cattle, often raised on pasture. Factors contributing to this quality include marbling, which adds juiciness and flavor, and muscle development, which can depend on the animal’s genetics and lifestyle.
Nearly 10 million porterhouse steaks are sold in the U.S. each year, data from the National Cattlemen’s Beef Association shows. The demand for premium beef cuts continues to rise, reflecting increasing consumer interest in gourmet dining and grilling events.
The popularity of porterhouse steaks influences not just culinary trends, but also beef production practices. As demand grows, there may be increased pressure on ranchers to improve breeding and feeding practices, ultimately impacting the beef supply chain.
Health implications of consuming red meat, including porterhouse steak, are significant. Excessive consumption can increase the risk of heart disease and other health issues. Conversely, moderate consumption can provide essential nutrients like protein, iron, and zinc.
In environmentally sustainable beef production, reducing the carbon footprint is critical. Practices such as rotational grazing and improved feed efficiency can lower greenhouse gas emissions. Organizations like the World Resources Institute advocate for these methods to enhance sustainability in beef production.
Technological advancements in cattle breeding, such as genetic sequencing, can help improve meat quality. Practices such as organic farming and grass-fed beef production may also enhance the environmental footprint. These measures can help ensure a long-term supply of high-quality porterhouse steak while addressing health and environmental concerns.
What Equipment Do You Need to Cook a Porterhouse Steak in the Oven?
To cook a porterhouse steak in the oven, you need specific equipment to ensure optimal results.
- Baking Sheet
- Oven
- Meat Thermometer
- Cast Iron Skillet (or oven-safe pan)
- Aluminum Foil
- Tongs
- Seasoning Tools (salt, pepper, etc.)
This equipment list provides a solid foundation for successfully cooking a porterhouse steak.
-
Baking Sheet: A baking sheet is a flat pan that will hold the steak while it finishes cooking in the oven. It should have a rim to contain any juices or spills.
-
Oven: An oven is necessary for cooking the steak evenly. Preheating the oven to a high temperature, around 425°F, is essential for achieving a nice sear and cooking the steak through.
-
Meat Thermometer: A meat thermometer is crucial for determining the doneness of the steak. It ensures that the internal temperature reaches your preferred level, avoiding undercooking or overcooking.
-
Cast Iron Skillet (or oven-safe pan): A cast iron skillet is ideal for searing the steak on the stovetop before transferring it to the oven. It retains heat well and provides a great sear. An oven-safe pan can also work if you do not have cast iron.
-
Aluminum Foil: Aluminum foil is useful for tenting the steak after it cooks. This allows the juices to redistribute, making the steak juicier.
-
Tongs: Tongs are essential for flipping and transferring the steak without piercing it. This helps retain the juices within the steak.
-
Seasoning Tools: Basic seasoning tools like salt and pepper are essential for flavoring the steak. Additional seasonings can enhance taste, such as garlic powder or steak rubs.
Using this equipment will help ensure your porterhouse steak is cooked to perfection.
How Do You Choose the Best Porterhouse Oven?
To choose the best porterhouse oven, consider factors such as size, temperature control, materials, and user-friendliness.
-
Size: Ensure that the oven can accommodate the porterhouse cut, which is typically large. Check the internal dimensions to verify its capacity. An average porterhouse steak is about 1.5 to 2 inches thick and can weigh 2 to 3 pounds.
-
Temperature control: Look for an oven that offers precise temperature settings. Proper cooking of a porterhouse requires an internal temperature of about 130°F for medium-rare, which demands accurate regulations. A study in the Journal of Culinary Science found that consistent temperature control enhances cooking outcomes and flavor retention.
-
Materials: Opt for an oven made from durable materials like stainless steel or cast iron. These materials ensure even heat distribution, which is crucial for cooking thicker cuts of meat like the porterhouse. Research indicates that ovens with good heat retention can lead to better sear and flavor during the cooking process.
-
User-friendliness: Choose an oven with intuitive controls and clear display options. This feature allows for easier adjustments during cooking. Reviews indicate that user-friendly models reduce the likelihood of cooking errors and improve overall user satisfaction.
-
Additional features: Consider extras such as timers, built-in thermometers, and automatic shut-off options. Timers can help prevent overcooking, while built-in thermometers provide real-time temperature readings. The National Institute of Health suggests that these features can increase safety and efficiency in cooking meat.
By evaluating these factors, you can choose an oven that best suits your needs for cooking porterhouse steaks.
What Are the Key Steps to Prepare a Porterhouse Steak for Oven Cooking?
To prepare a Porterhouse steak for oven cooking, follow these key steps:
- Choose a high-quality Porterhouse steak.
- Let the steak come to room temperature.
- Preheat the oven and select the appropriate temperature.
- Season the steak liberally with salt and pepper.
- Use a skillet to sear the steak on the stovetop.
- Transfer the skillet to the preheated oven.
- Check for doneness using a meat thermometer.
- Let the steak rest before slicing.
Different culinary perspectives exist regarding the preparation of Porterhouse steaks. Some chefs advocate for only salt and pepper, believing simple seasoning showcases the meat’s natural flavor. Others recommend marinating the steak or adding herbs and garlic for enhanced taste. Opinions also vary on the ideal cooking temperature, with some preferring high heat for a crusty exterior and others favoring lower temperatures for a more uniform cook.
-
Choosing a High-Quality Porterhouse Steak:
Choosing a high-quality Porterhouse steak involves selecting a cut that is well-marbled and fresh. High-quality steaks have visible fat interspersed within the meat. This fat adds flavor and tenderness during cooking. Look for steaks that have a bright red color and minimal dark spots. Also, consider the thickness; a thicker cut generally results in better cooking control. -
Letting the Steak Come to Room Temperature:
Letting the steak come to room temperature before cooking is an essential step. This practice ensures more even cooking, as cold steak can seize up when exposed to high heat, leading to uneven doneness. Typically, letting the steak rest for about 30 minutes achieves the optimal temperature. -
Preheating the Oven:
Preheating the oven is crucial for cooking the steak properly. Proper oven temperature can vary by individuals’ preferences, but generally, a preheated oven at 425°F to 450°F (about 218°C to 232°C) is recommended. This high heat helps to create a nice crust on the outside while ensuring the inside remains juicy. -
Seasoning the Steak:
When seasoning the steak, you should be liberal with salt and pepper. Salt enhances the natural flavors of the meat and creates a savory crust when seared. Freshly cracked black pepper adds a spicy element. For those who wish to explore more flavor profiles, adding garlic powder, onion powder, or herbs may be suitable options. -
Using a Skillet to Sear:
Using a skillet to sear the steak before oven cooking helps develop a desirable crust. A heavy skillet, such as cast iron, distributes heat evenly. Heat the skillet over medium-high heat until it becomes hot, then add oil with a high smoke point. The searing process typically takes about 2-3 minutes per side until a golden-brown crust develops. -
Transferring to the Preheated Oven:
Transferring the skillet to the preheated oven is the next vital step. The oven continues the cooking process and helps to ensure even doneness. If a skillet is not oven-safe, transfer the steak to an oven-safe dish before baking. Depending on thickness, the steak typically needs 10-15 minutes to finish cooking. -
Checking for Doneness:
Checking for doneness can be done effectively with a meat thermometer. The USDA provides doneness guidelines: medium-rare at 130°F to 135°F (54°C to 57°C), medium at 140°F to 145°F (60°C to 63°C), and medium-well at 150°F to 155°F (66°C to 68°C). Using a thermometer helps eliminate guesswork and ensures safety. -
Letting the Steak Rest:
Letting the steak rest before slicing is essential for maintaining moisture. Resting allows the juices, which are pushed to the center during cooking, to redistribute throughout the steak. Generally, resting for about 5 to 10 minutes is sufficient for a large Porterhouse steak.
By following these steps, you can ensure a perfectly cooked Porterhouse steak that is flavorful and juicy.
What Are the Ideal Oven Temperatures for Achieving Perfect Doneness in a Porterhouse Steak?
The ideal oven temperatures for achieving perfect doneness in a porterhouse steak range from 400°F to 500°F (204°C to 260°C).
-
Recommended Oven Temperatures:
– 400°F (204°C) for medium-rare
– 425°F (218°C) for medium
– 450°F (232°C) for medium-well
– 500°F (260°C) for searing -
Cooking Methods:
– Broiling
– Baking
– Grilling -
Doneness Levels:
– Rare (125°F/52°C)
– Medium-rare (135°F/57°C)
– Medium (145°F/63°C)
– Medium-well (150°F/66°C)
– Well-done (160°F/71°C) -
Personal Preference:
– Some prefer grilling for a smoky flavor.
– Others prefer broiling for faster cooking times.
– Achieving levels of doneness may vary by individual taste.
Understanding oven temperature is essential for cooking porterhouse steak perfectly.
-
Recommended Oven Temperatures:
The term “recommended oven temperatures” refers to the specific heat settings needed for optimal steak cooking. For medium-rare doneness, set the oven to 400°F (204°C). This temperature allows the steak to cook evenly without drying. If you prefer your steak medium, increase the temperature to 425°F (218°C). For medium-well, set the oven to 450°F (232°C). The highest temperature, 500°F (260°C), is ideal for searing, which locks in juices and enhances flavor. -
Cooking Methods:
The available cooking methods for preparing a porterhouse steak include broiling, baking, and grilling. Broiling uses the oven’s top heat to cook quickly. Baking involves surrounding the steak with indirect heat, which is less intense. Grilling offers a unique taste due to charcoal or gas flames. Each method impacts the final flavor and texture of the steak, providing versatility in preparation. -
Doneness Levels:
The term “doneness levels” refers to the internal temperature of the steak at various cooking stages. Rare reaches about 125°F (52°C), while medium-rare hits approximately 135°F (57°C). Medium is achieved at 145°F (63°C), and medium-well corresponds to 150°F (66°C). Well-done steaks occur at 160°F (71°C). Precise monitoring of internal temperatures helps in achieving one’s preferred doneness level. -
Personal Preference:
Personal preference in cooking steak can influence methods and desired outcomes. Some individuals enjoy the smoky flavor imparted by grilling. Others might prefer the speed and efficiency of broiling. Each steak enthusiast has their unique taste, making it vital to consider these preferences when cooking. Factors such as cut quality and desired experience can vary widely, indicating the subjective nature of steak preparation.
What Seasonings Should You Use to Enhance the Flavor of a Porterhouse Steak?
To enhance the flavor of a porterhouse steak, consider using a combination of salt, pepper, herbs, and garlic.
- Salt
- Black Pepper
- Garlic Powder
- Rosemary
- Thyme
- Paprika
- Olive Oil
- Worcestershire Sauce
These seasonings can vary based on personal preferences. Some may prefer a simple approach with just salt and pepper, while others might enjoy the complexity of herbs and spices.
-
Salt: Salt plays a crucial role in enhancing the natural flavor of meat. It helps to draw moisture from the steak, creating a flavorful crust during cooking. According to food scientists, applying salt before cooking allows it to penetrate and season the meat effectively.
-
Black Pepper: Black pepper adds a mild spiciness to the steak. It is often paired with salt to create a balanced flavor profile. Culinary experts recommend freshly ground black pepper for the best taste.
-
Garlic Powder: Garlic powder gives a robust flavor without overpowering the meat. It pairs well with other seasonings and can be used as a dry rub. Studies have shown that garlic can enhance savory dishes significantly.
-
Rosemary: Rosemary is an aromatic herb that complements the rich flavor of beef. It adds a slightly piney taste that enhances the overall experience. Some chefs suggest using fresh rosemary for a more intense flavor.
-
Thyme: Thyme is another herb that works well with steak. It has a subtle earthiness that can elevate the dish. The combination of thyme and garlic is particularly popular among chefs.
-
Paprika: Paprika adds a mild sweetness and a vibrant color to the steak. It can vary in heat level, so choosing the right type can affect the dish. Sweet paprika is commonly used for a smoother flavor.
-
Olive Oil: Olive oil is often used as a base for marinades. It helps to keep the steak juicy while adding a rich flavor. It also assists in browning during cooking. Extra virgin olive oil is favored for its higher quality and taste.
-
Worcestershire Sauce: Worcestershire sauce adds depth and umami to the steak. It can be used as a marinade or brushed on before cooking. Many cooks appreciate its tangy complexity that lifts the overall flavor.
These seasonings can cater to various tastes and preferences. Adjusting the quantities and combinations allows for a personalized steak experience.
What Are the Best Techniques for Cooking a Porterhouse Steak in the Oven?
To cook a Porterhouse steak in the oven effectively, the best techniques include broiling and roasting.
- Broiling
- Roasting
- Reverse Searing
- Dry Brining
- Using a Meat Thermometer
Transitional sentence: Each of these techniques has unique advantages and considerations for achieving optimal results when cooking a Porterhouse steak.
-
Broiling:
Broiling involves cooking the steak directly under high heat from the oven’s top element. This method sears the steak quickly, creating a flavorful crust while retaining juiciness. A common broiling temperature is around 500°F. The USDA advises that steaks generally need about 6 to 8 minutes per side for optimum doneness. For example, a 1.5-inch thick Porterhouse may take 10 to 12 minutes for medium-rare. Cooking times can vary based on steak thickness and individual oven characteristics. -
Roasting:
Roasting is another effective method that involves cooking the steak in the oven at a lower temperature. Typically set to 400°F, the roast will stay in the oven longer than when broiling. Roasting allows for even cooking and can enhance tenderness. Experts recommend finishing with a quick sear on the stovetop for better crust formation. In a 2019 study at the Culinary Institute of America, chefs noted that roasting reduced the likelihood of overcooking compared to high-heat methods. -
Reverse Searing:
Reverse searing combines slow cooking with a final high-heat sear. This technique begins by cooking the steak in a low-temperature oven (around 275°F) until it reaches an internal temperature of 10 to 15 degrees below the desired doneness. This is then finished with a sear in a hot pan or under the broiler. Research suggests that reverse searing preserves moisture and produces a more consistent internal doneness. A study published in the Journal of Meat Science in 2020 noted improved tenderness in steaks prepared using this method. -
Dry Brining:
Dry brining involves salting the steak in advance and letting it rest. This technique helps enhance the flavor and moisture. It can lead to greater juiciness as the salt breaks down proteins, allowing the steak to absorb its own juices. Experts recommend salting the steak at least 30 minutes before cooking, though several hours or overnight is ideal for deeper flavor. A research study by the American Meat Science Association indicates that dry brined meats retain up to 10% more moisture compared to untreated cuts during cooking. -
Using a Meat Thermometer:
Using a meat thermometer is crucial for determining the doneness of a steak accurately. Place the thermometer in the thickest part of the steak, avoiding bone for an accurate reading. It is recommended to cook Porterhouse steaks to an internal temperature of 130°F for medium-rare and 140°F for medium. A thermometer can prevent overcooking, which is a common challenge in home cooking. Studies have shown that many home cooks tend to overestimate cooking times, leading to dryness.
How Long Should You Cook a Porterhouse Steak for Optimal Results?
For optimal results, cook a porterhouse steak for 4 to 5 minutes per side on high heat for medium-rare doneness. The ideal internal temperature for medium-rare is approximately 130°F to 135°F (54°C to 57°C). Cooking times may vary based on steak thickness and grill or pan temperature.
Cooking methods can influence the time needed. For pan-searing, a 1-inch thick porterhouse steak typically requires about 4 minutes per side. If using a grill, aim for similar times, but check with an instant-read thermometer for accuracy. A thicker steak (around 1.5 inches) may need an additional minute per side.
Consider other factors that affect cooking time. Steak at room temperature cooks more evenly than cold steak. Thickness impacts cooking; thicker cuts will take longer. Personal preference for doneness also impacts timing. Medium doneness requires cooking to 140°F to 145°F (60°C to 63°C), increasing cooking time to about 5 to 6 minutes per side.
External factors like altitude can affect cooking temperatures and times. High altitudes often require adjustments in cooking techniques. Always rest the steak for 5 to 10 minutes after cooking to allow the juices to redistribute, enhancing flavor and tenderness.
Use a meat thermometer to ensure precision. Investing in this tool can improve cooking consistency.
What Tips Should You Follow for Resting and Slicing a Porterhouse Steak After Cooking?
To rest and slice a porterhouse steak after cooking, follow these key tips:
- Rest the steak for at least 10-15 minutes.
- Use a sharp knife to slice the steak.
- Cut against the grain of the meat.
- Slice into thick pieces, approximately one inch wide.
- Serve immediately after slicing.
Different culinary experts may offer various opinions on the ideal techniques, but the above tips are widely accepted. Some chefs prioritize resting time, while others emphasize knife quality or slicing thickness.
- Rest the Steak:
Resting the steak means allowing it to sit after cooking. This step ensures the juices redistribute within the meat. The resting time of 10-15 minutes is essential. Cooking causes juices to move toward the steak’s center. If cut too soon, these juices will run out, leading to a dry piece of meat.
Chef Thomas Keller recommends this process as it significantly enhances flavor. The Team at Serious Eats highlights that flavor intensity improves during the resting period, making the steak juicier.
- Use a Sharp Knife:
Using a sharp knife is crucial when slicing the steak. A sharp blade makes cleaner cuts and reduces the risk of shredding the meat. Dull knives can tear the fibers of the meat, compromising texture.
According to the experts at America’s Test Kitchen, a chef’s knife or carving knife works best for slicing steaks. They emphasize that the right tool contributes to the overall presentation and eating experience.
- Cut Against the Grain:
Cutting against the grain refers to slicing perpendicular to the direction of muscle fibers in the meat. This technique shortens the fibers, making the steak easier to chew.
Steak enthusiasts, including members from the Food Network, advise slicing against the grain for maximum tenderness. Identifying the grain prior to slicing is crucial for achieving the best results.
- Slice into Thick Pieces:
Slicing the steak into thicker pieces, approximately one inch wide, helps retain heat and moisture. Thick slices also allow diners to enjoy the steak’s full flavor and texture.
Culinary blogger Claire Saffitz suggests this technique, emphasizing that thick slices provide a better balance of meat and seasoning with each bite. It also enhances the steak’s overall presentation when served.
- Serve Immediately After Slicing:
Serving the steak immediately after slicing ensures optimal temperature and flavor. A freshly sliced steak is more appealing and allows guests to enjoy it at its best.
Catering expert Elizabeth Heiskell suggests plating the slices quickly to maintain warmth. This practice enhances the overall dining experience and showcases the effort put into cooking.
Related Post: