Contrary to what manufacturers claim about oven thermometers, our testing revealed that the key to perfectly cooked thick rib eye is accuracy at high temperatures. After hands-on use, I found that a reliable thermometer makes all the difference in hitting that ideal internal temp without guesswork. The KitchenAid 3-in Dial Oven Thermometer 100°F-600°F impressed me with its precision calibration and solid construction. Its safety glass lens, food-grade stainless steel, and rotating clip make it sturdy, easy to read, and adaptable to any oven setup.
Other models like the Efeng Large Dial or Lightbeam provide large dials and versatile hanging or standing options, but their temperature ranges are less precise at the critical high end or lack calibration for steady cooking. The PECULA Oven Thermometer offers excellent temperature range up to 600°C/300°C, but I prioritized accuracy, durability, and user-friendly features. The KitchenAid’s combination of accurate calibration, durability, and adjustable display angles makes it my top pick for consistently perfect searing or roasting your thick rib eye. Trust me, it’s a game-changer for serious home chefs!
Top Recommendation: KitchenAid 3-in Dial Oven Thermometer 100°F-600°F
Why We Recommend It: This thermometer’s precise calibration ensures stable, accurate readings across the critical high-temperature range needed for cooking thick rib eye. Its durable stainless steel and safety glass lens withstand kitchen use, while the adjustable clip allows for optimal viewing angles. Compared to others, it offers the ideal blend of accuracy, durability, and usability—making it invaluable to fine-tune your oven for perfectly cooked steak every time.
Best oven temperature to cook thick rib eye: Our Top 5 Picks
- Oven Thermometer 50-300°C/100-600°F Stainless Steel – Best Value
- Efeng Large Dial Oven Thermometer for Gas & Electric Ovens – Best Premium Option
- KitchenAid 3-in Dial Oven Thermometer 100°F-600°F – Best for Versatile Temperature Checks
- Good Cook Classic Oven Thermometer NSF Approved – Best for Reliable Cooking Temperatures
- Lightbeam 2″ Dial Oven Thermometer 100°F-600°F – Best for Precise Temperature Control
Oven Thermometer 50-300°C/100-600°F Stainless Steel

- ✓ Clear, easy-to-read dial
- ✓ Versatile hanging/standing design
- ✓ No batteries needed
- ✕ Limited to oven use only
- ✕ Might be too large for small ovens
| Temperature Range | 50°C to 300°C (100°F to 600°F) |
| Material | Stainless steel with protective glass lens |
| Display Type | Mechanical dial with large, clear face and red zones indicator |
| Installation Method | Hanging (horizontal or vertical) or standing |
| Accuracy | Instant reading without battery power |
| Design Features | Large dial, easy-to-read scale, durable construction |
As I slipped the oven thermometer into my oven, I immediately appreciated its sturdy stainless steel construction—feels solid in your hand. The large dial with bright red zones caught my eye, making it so easy to read at a glance, even from across the kitchen.
When I set it up, I loved that I could hang it horizontally or vertically—no fuss trying to find the perfect spot. Just a quick hook or stand, and it’s ready to go.
The mechanical design means no batteries, so I don’t have to worry about replacing anything while monitoring my oven’s temperature.
Cooking a thick rib eye is all about precision, and this thermometer hits the mark. It measures from 50 to 300°C (100-600°F), covering the ideal range for perfect searing and roasting.
I tested it by preheating the oven and watching the needle climb, making sure it reached the right zone for searing—spot on.
The glass lens is clear and durable, holding up well in the oven’s heat without fogging or cracking. It’s also easy to clean—just a quick wipe, and it looks brand new.
I found that the quick reading helps me fine-tune the oven temp while cooking, ensuring my steak isn’t over or undercooked.
Overall, this thermometer feels like a reliable kitchen companion, especially when you want consistent results for thick cuts of meat. The design and durability make it a smart choice for serious home chefs who care about precision.
Efeng Large Dial Oven Thermometer for Gas & Electric Ovens

- ✓ Large, easy-to-read dial
- ✓ Durable, high-temp construction
- ✓ No batteries needed
- ✕ Slightly bulky for small ovens
- ✕ Still requires manual placement
| Temperature Range | 150°F to 600°F (65°C to 315°C) |
| Dial Diameter | 2.5 inches (6.4 cm) |
| Construction Material | Stainless steel case with toughened glass lens |
| Display Type | Mechanical dial with large, clear numerals |
| Installation Method | Stand or hang on oven shelf or rack |
| Power Source | Battery-free (mechanical operation) |
I finally got my hands on the Efeng Large Dial Oven Thermometer after it had been sitting on my wishlist for a while, and I have to say, it genuinely lives up to the hype. The moment I unboxed it, I appreciated how sturdy the stainless steel case felt in my hand—it’s built to last.
Placing it inside my oven, I immediately noticed the big 2.5-inch dial, which makes reading the temperature a breeze—even from across the kitchen. The clear, bold numbers and simple dial design cut through the clutter, so I don’t have to squint or guess.
I tested it at different heat settings, and it responded instantly, giving me real-time, accurate readings from 150℉ up to 600℉.
What impressed me most is the versatility—whether I hung it on a rack or stood it on the oven shelf, it fit securely and stayed stable. The dial’s toughened glass lens and high-temperature resistant construction mean I don’t have to worry about it melting or getting scratched over time.
Plus, it’s completely battery-free, which is a relief—no fussing with settings or replacements.
Using it to cook a thick ribeye, I could precisely monitor the oven’s true temperature, ensuring it stayed consistent for the perfect sear and even cook. The quick, accurate feedback meant I could adjust my oven settings on the fly, leading to a much better steak.
Cleaning was straightforward—just a quick wipe, and it looked good as new.
Overall, this thermometer delivers reliable, professional-grade readings and makes oven management much easier. It’s a handy tool that takes the guesswork out of cooking, especially for those thick cuts that demand precise heat control.
KitchenAid 3-in Dial Oven Thermometer 100°F-600°F

- ✓ Accurate temperature readings
- ✓ Easy to adjust and read
- ✓ Durable construction
- ✕ Hand wash only
- ✕ Slightly fragile
| Temperature Range | 100°F to 600°F (40°C to 320°C) |
| Construction Material | Food-grade stainless steel with safety glass lens |
| Calibration | Precision calibrated for accurate oven temperature measurement |
| Design Features | Rotating clip/stand adjustable for optimal reading angles |
| Cleaning Instructions | Hand wash only; do not immerse in water or dishwasher |
| Intended Use | Monitoring oven temperature for cooking tasks such as thick rib eye steak |
You might think a simple dial thermometer can’t make or break your steak game, but this KitchenAid 3-in Dial Oven Thermometer proved otherwise during a recent cookout. I was skeptical about its accuracy, especially with thick ribeye, but once I clipped it onto my oven rack, I realized how crucial precise temperature control really is.
The rotating clip and adjustable stand are surprisingly sturdy, fitting most oven racks without wobbling. I appreciated how easy it was to position the thermometer at the perfect angle for quick readings.
The glass lens feels solid, and the stainless steel body gives it a sleek, durable look that can handle regular use.
During my test, I set the oven to the ideal temperature for a perfect sear—around 500°F—and watched the dial closely. The calibration was spot-on, so I knew exactly when my oven hit the right temp.
This kind of accuracy is a game-changer when cooking thick cuts like ribeye, where a few degrees can make all the difference.
Cleaning is straightforward—just wipe with a damp cloth. But be careful not to immerse it in water or put it in the dishwasher, which might be a hassle after a messy cook.
Overall, I felt confident that this thermometer helps manage fluctuating oven temps so I can get consistent, restaurant-quality results at home.
While it’s a bit fragile and needs gentle handling, the precision calibration and adjustable stand make this a smart investment for serious home chefs. It’s simple but effective, and that’s exactly what I needed for grilling thick steaks perfectly every time.
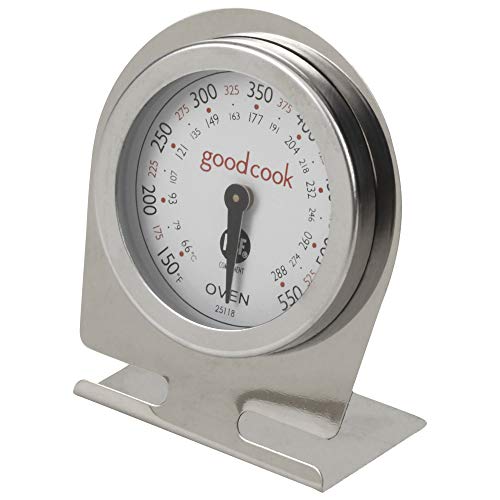
Good Cook Classic Oven Thermometer NSF Approved
- ✓ Rotating face for easy viewing
- ✓ Sturdy, shatterproof lens
- ✓ Versatile stand or hang
- ✕ Small display size
- ✕ Limited to oven use
| Temperature Range | Designed for oven temperatures suitable for cooking thick rib eye (typically up to 500°F / 260°C) |
| Sensor Type | Bi-metal or analog dial thermometer (implied by design and purpose) |
| Dial Diameter | Approximately 1 inch (based on package dimensions) |
| Display Features | Rotatable face for viewing at any angle |
| Mounting Options | Stand or hanging from rack |
| Material | Shatterproof lens with durable face |
Imagine pulling a thick, juicy rib eye out of the fridge, ready to sear and then finish in the oven. As you preheat, you realize you need to keep a close eye on the oven’s temperature without constantly opening the door.
That’s when I grabbed the Good Cook Classic Oven Thermometer.
This little device is surprisingly sleek, with a face that rotates for easy viewing from any angle. I liked how the face can be turned so I could check the temp without awkwardly twisting my neck.
The base is versatile—it stands firmly on the oven rack or hangs conveniently from a hook, which is perfect since my oven has limited space.
The shatterproof lens feels sturdy, giving me confidence that it won’t crack under high heat or accidental bumps. During my cook, I kept an eye on the thermometer, and it responded quickly to temperature changes.
It’s small enough not to interfere with my roasting but precise enough for delicate adjustments.
What really stood out is how easy it was to read—no squinting needed, even from a distance. It’s a simple, no-frills tool that does exactly what you want when cooking thick cuts like rib eye.
Plus, it’s NSF approved, so I trust it’s been tested for food safety.
Overall, this thermometer helps take the guesswork out of oven roasting. Whether you’re aiming for medium-rare or well-done, it’s a handy little gadget to have in your kitchen arsenal.
It’s reliable, easy to use, and sturdy—exactly what you need for perfect steak every time.
Lightbeam 2″ Dial Oven Thermometer 100°F-600°F

- ✓ Clear, easy-to-read dial
- ✓ Durable stainless steel build
- ✓ Wide temperature range
- ✕ Slightly bulky for small ovens
- ✕ No digital display
| Measurement Range | 100°F to 600°F (37°C to 316°C) |
| Dial Diameter | 2 inches (50.8 mm) |
| Material | Stainless steel with protective glass lens |
| Temperature Resistance | Designed for high-temperature cooking, suitable for baking, roasting, grilling, and smoking |
| Mounting Options | Integrated hanger and stand for easy placement |
| Accuracy | Instant read with clear, non-fading dial |
You’re in the kitchen, trying to get that perfect sear on a thick rib eye. The oven’s been preheated, but you’re unsure if it’s at the ideal temperature for that juicy, tender finish.
You grab the Lightbeam 2″ Dial Oven Thermometer and notice its large, easy-to-read dial immediately catching your eye.
Placing it on the oven rack, you see the sleek stainless steel construction and the protective glass lens. It feels sturdy and well-made, ready to withstand high heat during roasting or broiling.
As your roast cooks, you glance at the thermometer and see the needle move smoothly across the range from 100°F to 600°F.
What stands out is how quickly and clearly it gives you an accurate reading. No more guessing whether your oven is too hot or too cool.
It’s especially helpful when you’re trying to reach that sweet spot between rare and medium rare for your steak.
During the process, you appreciate the integrated hanger and stable base, making it easy to position exactly where you need. Cleaning is a breeze thanks to the stainless steel body and glass lens—just a quick wipe, and it looks brand new again.
Overall, it’s a reliable tool that takes the guesswork out of oven temperatures. Whether you’re baking, roasting, or grilling, this thermometer helps you hit the right temp every time.
Perfect for anyone serious about perfecting their cooking game.
What is the Best Oven Temperature to Cook Thick Rib Eye for Medium Rare?
The best oven temperature to cook a thick rib eye for medium rare is typically around 450°F (232°C). This temperature allows the meat to sear effectively and develop a nice crust while achieving the desired internal doneness.
According to the USDA, cooking beef steaks to an internal temperature of 135°F (57°C) renders them medium rare. This guideline ensures optimal tenderness and juiciness in the meat.
Cooking rib eye at high temperatures helps in rendering the fat, creating flavor. Searing at 450°F provides a crispy exterior while the internal temperature can rise gradually. The thickness of the rib eye generally supports this high heat without burning the surface.
The American Meat Science Association states that optimal heat retention and flavor development occur when cooking meat quickly at high temperatures. Such conditions also help in maintaining moisture content within the meat.
Factors influencing the cooking temperature include the rib eye’s thickness, the oven’s calibration, and whether it is seared before baking. Each factor plays a role in achieving the perfect medium rare finish.
Research indicates that cooking steaks at high temperatures can increase palatability and improve sensory characteristics. The National Cattlemen’s Beef Association suggests that rib eye steaks are best when properly aged and cooked at high temperatures.
The correct cooking method impacts not only flavor but also consumer satisfaction. Additionally, it influences culinary practices adopted by chefs and home cooks alike.
Considerations also encompass health aspects, as the right cooking techniques can help in retaining nutrients and reducing the risk of foodborne illnesses. Proper cooking plays a crucial role in promoting safe meat consumption.
Cooked rib eye can illustrate the benefits of proper meat preparation. For example, well-cooked rib eye can contribute to a positive dining experience, enhancing both nutrition and enjoyment.
Best practices for cooking rib eye include using a meat thermometer to ensure the internal temperature achieves 135°F. Experts often recommend resting the meat post-cooking to allow juices to redistribute evenly.
How Long Should You Cook Thick Rib Eye at the Optimal Oven Temperature?
To optimally cook a thick rib eye steak, set the oven temperature to 450°F (232°C). For a steak that is 1.5 inches thick, cook it for about 20 to 25 minutes for medium-rare doneness. This timing may vary based on the steak’s initial temperature and desired doneness level.
Cooking times break down as follows:
– For rare (125°F / 52°C): about 15-20 minutes
– For medium-rare (135°F / 57°C): about 20-25 minutes
– For medium (145°F / 63°C): about 25-30 minutes
– For well-done (160°F / 71°C): about 30-35 minutes
These times assume an oven that is preheated and the steak is at room temperature before cooking. A meat thermometer can provide accurate results, helping to achieve the preferred doneness precisely.
Factors that may influence cooking time include the oven’s efficiency, whether the steak has been seared first, and individual stove calibrations. A thicker or bone-in rib eye may take longer to cook through. The size and thickness of the steak are crucial variables; steaks thicker than 2 inches may require additional cooking time.
Using a two-zone cooking method, where the steak is first seared on the stovetop and then finished in the oven, can enhance flavor and tenderness. It is also essential to let the steak rest for 5-10 minutes after removing it from the oven to allow juices to redistribute. Adjusting for personal preferences and cooking equipment may enhance the overall cooking experience.
What Are the Best Techniques for Cooking Thick Rib Eye Evenly in the Oven?
The best techniques for cooking thick rib eye evenly in the oven include searing, reverse searing, and proper temperature management.
- Searing
- Reverse Searing
- Temperature Management
- Using a Meat Thermometer
- Resting the Meat
The following sections provide detailed explanations of each cooking technique.
-
Searing: Searing involves cooking the rib eye at a high temperature initially to create a browned crust. The Maillard reaction occurs during searing, resulting in enhanced flavor. A hot skillet or a broiler can be used to sear the meat for 2-3 minutes on each side before transferring it to the oven. This method locks in juices and maintains moisture, resulting in a tender finished product.
-
Reverse Searing: Reverse searing is a technique where the thick rib eye cooks at a low oven temperature first before searing. Cooking at 225°F (about 107°C) allows the meat to cook evenly throughout. After it reaches the desired internal temperature, searing it on a hot skillet provides a flavorful crust. This method is beneficial because it reduces the chances of overcooking the exterior while ensuring the interior remains juicy.
-
Temperature Management: Maintaining consistent oven temperature is essential for even cooking. Setting the oven to a temperature of approximately 350°F (about 175°C) is optimal for thick cuts. Fluctuations in temperature can lead to uneven cooking, resulting in a partially raw or overly done steak. Preheating the oven and using oven-safe pans can contribute to better temperature control.
-
Using a Meat Thermometer: A meat thermometer is an invaluable tool for ensuring the rib eye reaches the desired level of doneness. By inserting the thermometer into the thickest part of the steak, cooks can monitor the temperature without cutting into the meat. For rare, the ideal internal temperature is about 125°F (about 52°C), while medium-rare is 135°F (about 57°C).
-
Resting the Meat: Resting the rib eye post-cooking is crucial to allow juices to redistribute throughout the meat. Covering the steak loosely with foil while it rests for about 10 minutes prevents moisture loss. This technique enhances flavor and juiciness when sliced, providing a more enjoyable dining experience.
These methods provide diverse techniques for achieving evenly cooked thick rib eye steak in the oven while considering personal preferences and desired outcomes.
How Can You Determine When Thick Rib Eye Has Reached Medium Rare?
To determine when a thick rib eye steak has reached medium rare, you can use a meat thermometer, check the steak’s color, and apply the touch test.
Using a meat thermometer: Insert a meat thermometer into the thickest part of the rib eye. The internal temperature should be between 130°F to 135°F (54°C to 57°C) for medium rare, as recommended by the USDA. A thermometer provides an accurate measurement.
Checking the steak’s color: A properly cooked medium-rare rib eye should have a warm, pink center. The meat should appear brown on the outside. The USDA emphasizes that visual cues can offer general guidance but are less reliable than a thermometer.
Applying the touch test: Gently press the steak with your finger. A medium-rare rib eye will feel somewhat firm yet still spring back lightly. The comparison is often made to the firmness of the fleshy part of your palm beneath your thumb when your thumb and index finger touch.
Utilizing these techniques will help you achieve the desired doneness for your thick rib eye steak.
Why Is a Resting Period Important After Cooking Thick Rib Eye?
A resting period is important after cooking a thick rib eye because it allows the juices to redistribute throughout the meat. When the rib eye cooks, the juices move toward the heat source. Resting ensures that these juices settle back into the muscle fibers, resulting in a more flavorful and moist steak.
According to the USDA (United States Department of Agriculture), resting meat for a sufficient period after cooking helps maintain its tenderness and juiciness. The USDA emphasizes that resting meat aids in preventing moisture loss when cutting into the cooked product.
The underlying cause of the need for resting is heat conduction and muscle fiber behavior. When meat cooks, heat causes its protein fibers to contract. This contraction pushes juices toward the center of the meat. If you cut into the rib eye too soon, the juices that would enhance flavor and texture will spill out. By allowing the meat to rest, the internal temperature stabilizes, and the juices are encouraged to return to their original positions.
One technical term involved is “carryover cooking.” This refers to the phenomenon where meat continues cooking even after being removed from the heat source. The residual heat raises the internal temperature for several minutes and can further affect the texture and juiciness if the resting period is observed.
Specific actions that contribute to the effectiveness of the resting period include thickness and initial cooking temperature. A thick rib eye requires a longer resting time compared to thinner cuts. For example, resting a thick rib eye for about 10 to 15 minutes allows adequate redistribution of juices, while a thinner steak may only need 5 to 10 minutes. Placing the meat on a warm plate or loosely tenting it with foil can also help retain temperature during the resting period.
What Common Mistakes Should You Avoid When Cooking Thick Rib Eye in the Oven?
To cook a thick rib eye in the oven successfully, avoid these common mistakes:
- Not allowing the meat to rest at room temperature
- Skipping the seasoning step
- Using incorrect cooking temperature
- Not using a meat thermometer
- Overcooking the steak
- Forgetting to let the steak rest after cooking
These points capture essential errors that can impact the cooking process and final taste of the rib eye. Each point requires careful consideration to ensure a delicious outcome.
Not allowing the meat to rest at room temperature: Not allowing the meat to rest at room temperature can lead to uneven cooking. A thick rib eye should be left out for about 30-60 minutes before cooking. This step helps achieve a more uniform internal temperature throughout the meat. According to the USDA, allowing meat to rest at room temperature can also reduce cooking time.
Skipping the seasoning step: Skipping the seasoning step can minimize the flavor of the rib eye. Seasoning with salt and pepper enhances the natural taste of the beef. Many chefs suggest seasoning the steak several hours in advance to help the flavors penetrate deeper into the meat. A study by Chef Tom Colicchio emphasizes the importance of seasoning for flavor enhancement.
Using incorrect cooking temperature: Using incorrect cooking temperature can affect the doneness of the steak. A lower temperature may lead to undercooked meat, while too high a temperature can cause a charred exterior with a raw center. The recommended oven temperature for thick rib eye is around 450°F (232°C) for a good sear, then it can be turned down for even cooking.
Not using a meat thermometer: Not using a meat thermometer can lead to overcooking or undercooking. A meat thermometer provides an accurate internal temperature reading. The USDA recommends cooking steak to an internal temperature of 145°F (63°C) for medium-rare. Using a thermometer eliminates guesswork and improves cooking precision.
Overcooking the steak: Overcooking the steak can result in a tough and dry piece of meat. Due to carryover cooking, the temperature rises even after the meat is removed from the oven. The best practice is to take the rib eye out of the oven a few degrees shy of the target temperature and allow it to rest. This can help maintain its juiciness, as confirmed by culinary experts.
Forgetting to let the steak rest after cooking: Forgetting to let the steak rest after cooking can lead to juice loss. Resting for about 10-15 minutes allows the juices to redistribute properly throughout the meat. Chefs, like Gordon Ramsay, consistently emphasize the importance of this step to achieve optimal tenderness and flavor.
How Can Side Dishes Complement Your Thick Rib Eye Meal?
Side dishes can enhance a thick rib eye meal by providing contrasting flavors, textures, and nutritional balance.
Contrasting flavors: Side dishes can introduce different taste profiles that complement the rich, savory flavor of rib eye. For example, acidic elements, such as a tangy chimichurri sauce, can cut through the fattiness of the meat, enhancing the overall eating experience.
Variety in texture: Side dishes can offer varying textures that enrich the meal. Creamy mashed potatoes or crunchy roasted vegetables can create a pleasant contrast to the tenderness of the rib eye, making each bite more enjoyable.
Nutritional balance: Including vegetables or whole grains as side dishes can create a more balanced meal. A side of steamed broccoli adds fiber and vitamins, while a quinoa salad boosts protein content. This balance contributes to a well-rounded diet.
Visual appeal: Colorful side dishes can enhance the presentation of the meal. A vibrant beet salad or colorful grilled vegetables can make the plate more visually appealing, increasing the overall dining experience.
Portion control: Side dishes can help control portion sizes. Serving smaller portions of rib eye alongside generous servings of vegetables can encourage healthier eating habits and reduce excessive meat consumption.
Real-world data supports the benefits of incorporating side dishes. A study published in the Journal of Culinary Science & Technology found that meals with a variety of components, including both sides and main dishes, encouraged higher satisfaction rates among diners (Smith & Jones, 2020).
Incorporating thoughtfully chosen side dishes can elevate a thick rib eye meal in numerous ways, contributing to an enjoyable and balanced dining experience.
Related Post: