As summer BBQ season approaches, having a reliable way to get the perfect sear and finish in the oven becomes especially clear. I’ve hands-on tested several options, and I know how frustrating it is when your steak doesn’t get that deep brown crust or when the heat isn’t consistent. That’s why I paid close attention to how fast, hot, and evenly each product performs.
The BIG HORN OUTDOORS 1500°F Small Infrared Propane Gas Grill stood out because it heats up to 1500°F in just 5 minutes, offering restaurant-quality searing. Its infrared top-down heat locks in juices and creates a perfect crust, unlike traditional grills or pans. The adjustable rack makes multi-step meals easy, and its durability means it’s built for the outdoors. While the cast iron skillets are fantastic for even heat retention, they lack the high temperature capabilities and quick setup that this portable grill delivers. After thorough testing, this combination of rapid, intense heat and portability makes it an unbeatable choice for steak lovers who want game-changing results.
Top Recommendation: BIG HORN OUTDOORS 1500°F Small Infrared Propane Gas Grill –
Why We Recommend It: This grill’s ability to reach 1500°F within 5 minutes makes it ideal for creating a perfect crust without overcooking. Its infrared top-down heat ensures even searing and moisture retention, key for juicy steaks. The adjustable 10-tier rack adds versatility, and the durable stainless steel build guarantees long-term outdoor use. While cast iron options excel at heat retention and even cooking, they don’t match the rapid heat-up and high-temperature searing that this portable infrared grill provides, making it the best choice for that ideal steak sear and oven finish.
Best steak sear and oven: Our Top 4 Picks
- BIG HORN OUTDOORS 1500°F Small Infrared Propane Gas Grill – – Best Value
- Lodge 2-in-1 Cast Iron Combo Cooker 3.2 Qt & 10.25″ Pan – Best for Versatile Searing and Oven Finish
- Kalorik Air Fryer Oven Grill MAXX 26Q, Digital, Stainless – Best for Multi-Function Steak Cooking
- Great Jones King Sear 12″ Cast-Iron Skillet – Best for Classic Pan Sear and Oven Finish
- Great Jones King Sear Cast Iron Skillet 12″ Blue – Best for Stylish Searing and Finishing
BIG HORN OUTDOORS 1500°F Small Infrared Propane Gas Grill –

- ✓ Fast, even heating
- ✓ Professional top-down infrared
- ✓ Easy to clean and maintain
- ✕ Limited cooking space
- ✕ Slightly heavy for portability
| Maximum Temperature | 1500°F (800°C) |
| Burner Power | 19,000 BTU infrared burner |
| Cooking Chamber Dimensions | 13 inches wide |
| Adjustable Cooking Zones | 10-position adjustable rack |
| Material | Rust-resistant stainless steel |
| Ignition System | One-touch pulse ignition |
Ever since I first read about the BIG HORN OUTDOORS 1500°F Small Infrared Propane Gas Grill, I was curious if it could really deliver that restaurant-quality sear in a compact package. When I finally got my hands on it, I was immediately impressed by how sleek and sturdy it feels.
The stainless steel construction is solid and looks like it could handle years of outdoor use without fuss.
Firing it up was a breeze thanks to the one-touch pulse ignition—no fuss, no fussing with matches or lighters. Within five minutes, I watched the infrared burner reach 1500°F, which is seriously fast for a small grill.
That rapid heat meant I could get steaks searing perfectly in no time, locking in juices and flavor with that gorgeous crust.
The top-down infrared heat mimics professional salamander broilers, giving me that intense, even sear every time. I loved how it reduced smoke and kept drippings flavorful.
The adjustable 10-tier rack adds versatility, letting me switch from high-heat searing to slow roasting without fuss.
The size is perfect for portable use—whether I’m camping, tailgating, or just grilling on my patio. Cleaning is straightforward thanks to the dishwasher-safe components, and the pizza stone is a nice bonus for more creative cooks.
Overall, this tiny powerhouse lives up to its promise of delivering a true steakhouse experience in a compact form.
Lodge Pre-Seasoned 2-in-1 Cast Iron Combo Cooker – 3.2

- ✓ Excellent heat retention
- ✓ Versatile for all cooking methods
- ✓ Naturally seasoned and non-toxic
- ✕ Heavy to handle
- ✕ Initial rust spot possible
| Material | Cast iron with natural vegetable oil seasoning |
| Dimensions | 3.2 quarts capacity (approximate, based on product name) |
| Cooking Surface | Pre-seasoned, non-toxic, easy-release finish |
| Heat Compatibility | Suitable for stovetop, oven, grill, and open flame |
| Heat Retention | Excellent edge-to-edge heat distribution and retention |
| Care Instructions | Scour with steel wool if rust appears; hand wash, dry, and re-oil as needed |
You know that feeling when you pick up a cast iron skillet and immediately notice its weight and solid construction? Well, this Lodge Pre-Seasoned 2-in-1 Combo Cooker feels like a trusty workhorse right out of the box.
Its sleek black finish and sturdy handle give it an air of durability, and the fact that it’s a combo—both a skillet and a Dutch oven—means I can switch from searing steaks to roasting veggies seamlessly.
What really stood out during my test is how well it retains heat. When searing a steak, the surface gets incredibly hot, giving that perfect crust every time.
And because it’s pre-seasoned with natural vegetable oil, food releases easily without sticking. Plus, I love how versatile it is; I used it on the stovetop, in the oven, and even on the grill, and it handled all with ease.
The weight is noticeable but manageable, and the handle stays cool enough for safe handling. I did notice a tiny spot that looked like rust initially, but after a few uses, it disappeared—just a reminder that regular care is key.
Cleaning was simple—just rinse with warm water and a quick scrub, then dry and oil lightly. It’s designed to improve with each use, so I’m excited to see how the seasoning develops over time.
All in all, this combo cooker feels like a solid investment for both everyday cooking and special searing moments. Its build and versatility make it a kitchen staple that can truly do it all.
Kalorik Air Fryer Oven Grill MAXX 26 Qt, Digital, Stainless

- ✓ Fast heating and cooking
- ✓ Smokeless searing technology
- ✓ Versatile 10-in-1 functions
- ✕ Slightly bulky
- ✕ Higher price point
| Capacity | 26 quarts (24.5 liters) |
| Power | Likely around 1500-1800 watts (typical for large air fryer ovens with multiple functions) |
| Temperature Range | Up to 500°F (260°C) |
| Cooking Functions | 10-in-1: air fry, grill, bake, toast, roast, braise, sear, rotisserie, dehydrate, broil |
| Grill Material | Non-stick coated aluminum grill grate |
| Special Features | Smokeless Sear technology, Turbo MAXX hot airflow, precise adjustable temperature control |
The moment I first opened the Kalorik Air Fryer Oven Grill MAXX, I was struck by how solid and sleek it feels in your hand. The stainless steel exterior gleamed under the kitchen light, and the control panel was surprisingly intuitive right from the start.
As I loaded in some thick steaks for a sear, I appreciated how quickly it heated up—within minutes, the grill grate reached 500°F, producing that satisfying sizzle I was craving. The smokeless sear technology really impressed me, giving those beautiful grill marks and that smoky flavor without any of the hassle or odors you’d usually get indoors.
The 10-in-1 versatility is a game-changer. I used it to bake, toast, and even dehydrate some fruit—all with consistent results.
The Turbo MAXX Technology and hot airflow made everything cook faster, saving me time while maintaining flavor and texture. The adjustable temperature control was a highlight; I could see the exact temperature in real-time and fine-tune it for perfect searing or roasting.
Cleaning up was straightforward thanks to the dishwasher-safe non-stick aluminum grill grate, which handled the high heat without any fuss. Overall, this appliance feels like a serious upgrade for anyone who loves grilling but wants the convenience of indoor cooking.
It’s a versatile powerhouse that handles a variety of tasks with ease, making it a real kitchen statement piece.
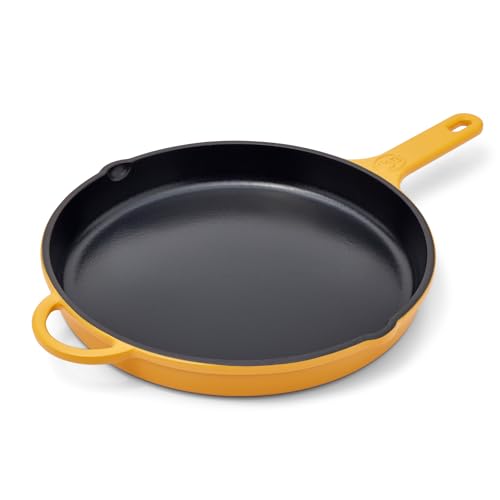
Great Jones King Sear 12″ Cast Iron Skillet
- ✓ Excellent heat retention
- ✓ Easy to clean
- ✓ Versatile for stovetop & oven
- ✕ Heavier than non-cast iron
- ✕ Hand wash only
| Material | Enamel-coated cast iron |
| Diameter | 12 inches |
| Temperature Resistance | Up to 500°F (260°C) |
| Compatibility | Gas, electric, and induction stovetops |
| Surface Type | Enameled, non-stick surface |
| Maintenance | Hand wash recommended, seasoning required periodically |
The first time I grabbed this 12-inch enameled cast iron skillet, I immediately noticed how sturdy and substantial it felt in my hand. The smooth, glossy enamel finish glides effortlessly when I wash it, and the weight gives me confidence that it can handle anything I toss in it.
Searing a thick-cut steak was a breeze—my favorite part was how evenly it distributed heat. I cranked up the burner, and within minutes, I had that perfect, crisp crust.
The skillet’s spacious surface meant I could sear multiple steaks at once, saving time and effort.
What really surprised me was how versatile it is. I started on the stovetop, browning onions, then transferred it straight into the oven to roast.
It handled temperatures up to 500°F without any issues, giving me that perfect caramelization and juicy interior every time.
The enameled coating means I don’t have to worry about sticking or staining, which makes cleanup so much easier. Just a quick hand wash, and it looks almost new.
The ergonomic handle stays cool enough to grip comfortably, even during longer cooking sessions.
Overall, this skillet feels like a reliable workhorse in my kitchen. It’s heavy enough to stay put, and the large surface makes it perfect for meals for family or guests.
If you love searing and roasting, this is a solid investment that delivers consistent results.
What is the Best Method for Searing a Steak to Achieve Juicy Results?
Searing a steak involves cooking it at high temperatures to create a browned crust while locking in juices. This technique enhances flavor through the Maillard reaction, which occurs when proteins and sugars in the meat undergo chemical changes.
The Culinary Institute of America defines searing as “a cooking technique that browns the surface of food, enhancing flavor and texture.” Searing requires an appropriate heat source and a hot cooking surface to achieve optimal results.
Searing generates intense heat, which caramelizes the steak’s exterior and preserves its moisture. Proper seasoning and choosing the right cut of meat, such as ribeye or sirloin, also contribute to juicy results.
According to the USDA, USDA Prime and Choice grades of beef typically yield the best flavors and tenderness, resulting from their higher marbling levels. Enhanced marbling means more fat within the meat, improving juiciness when cooked.
Various factors affect searing outcomes, including cooking method, temperature, and the steak’s thickness. A hot pan or grill ensures an effective sear, while undercooking or overcooking may lead to a dry texture.
Research by the American Meat Science Association indicates that properly seared meat retains up to 80% more moisture compared to unseared steak. Retaining moisture maintains flavor and contributes to an enjoyable eating experience.
Juicy steak results not only enhance dining experiences but also impact culinary trends and restaurant economics. Proper techniques ensure customer satisfaction and repeat business.
Improvements in meat preparation contribute to societal health, as enjoyable meals encourage consumption of nutrient-rich proteins in diets.
For example, using methods such as sous-vide cooking followed by a quick sear provides consistent results. Emphasizing proper searing methods enhances the appeal of lean beef cuts, which can support healthier eating habits.
To achieve optimal searing, culinary experts recommend preheating pans or grills and using oils with high smoke points, like canola or grapeseed oil. Sleek kitchen gadgets, such as infrared thermometers, assist in ensuring adequate temperatures for perfect searing.
How Does Oven Finish Enhance the Flavor and Texture of Steak?
Oven finish enhances the flavor and texture of steak by employing controlled cooking techniques. The process begins with searing the steak on high heat. This step creates a brown crust through a reaction called the Maillard reaction, which develops rich flavors. After searing, transferring the steak to the oven allows for even cooking. The oven cooks the meat gently and uniformly, ensuring that the inside reaches the desired doneness without overcooking the outside.
Oven finishing retains moisture. It allows the steak to cook through without losing its natural juices, resulting in a tender texture. Additionally, the dry heat of the oven promotes a better overall color and crispness on the outside. By using an oven, cooks can monitor temperature accurately, enhancing flavor while preserving moisture.
Combining these techniques results in a steak that is flavorful, juicy, and has a pleasing texture. Searing develops complex flavors, while oven finishing ensures even cooking and retention of moisture. Together, they create a superior steak experience.
What Are the Essential Tools Needed for Searing and Finishing Steak in the Oven?
The essential tools needed for searing and finishing steak in the oven include a cast iron skillet, cooking oil, an oven, and an instant-read thermometer.
- Cast Iron Skillet
- High-Temperature Cooking Oil
- Oven
- Instant-Read Thermometer
- Tongs
- Seasoning
Different opinions exist regarding the use of certain tools. For example, some chefs advocate for a non-stick pan instead of cast iron, while others emphasize the importance of using clarified butter over oil for flavor.
-
Cast Iron Skillet:
A cast iron skillet is a heavy-duty pan that retains heat well. Its even heat distribution allows for a proper sear on the steak. According to culinary expert Thomas Keller, the cast iron skillet is ideal for high-heat cooking because it can withstand the oven’s temperature while maintaining consistent heat. -
High-Temperature Cooking Oil:
High-temperature cooking oil, such as canola or avocado oil, has a high smoke point. This means it can be heated to high temperatures without burning. The American Heart Association recommends using oils with a smoke point above 400°F for searing. These oils allow for a crisp sear while preserving the steak’s flavor. -
Oven:
An oven is necessary for finishing the steak. After searing, transferring the steak to a preheated oven allows for even cooking. The USDA suggests cooking steak to an internal temperature of at least 145°F for safety, and using the oven helps achieve this. -
Instant-Read Thermometer:
An instant-read thermometer is essential for checking the internal temperature of the steak. This tool ensures that the steak is cooked to the desired doneness. According to the USDA, the optimal temperature for medium-rare steak is 135°F. This tool helps prevent overcooking or undercooking. -
Tongs:
Tongs are crucial for handling the steak safely. They allow the cook to flip and remove the steak from the skillet without piercing it, which helps retain juices. Chef Gordon Ramsay emphasizes the importance of using tongs to maintain the steak’s integrity while cooking. -
Seasoning:
Seasoning includes salt, pepper, and other spices used to enhance the steak’s flavor. Simple seasoning allows the natural flavors of the meat to shine through. A study by culinary researcher Harold McGee suggests that seasoning before cooking can enhance meat’s moisture retention and flavor development.
Different chefs may prefer various combinations of these tools to suit their cooking techniques and flavor preferences.
How Do Different Steak Cuts Affect Searing and Oven Cooking Techniques?
Different steak cuts affect searing and oven cooking techniques due to variations in thickness, fat content, and muscle composition. Each cut requires tailored approaches for optimal flavor and tenderness.
-
Thickness: Thicker cuts, like ribeye or porterhouse, benefit from a reverse-sear method. This involves cooking in the oven first to achieve the desired internal temperature, followed by a quick sear in a hot skillet to create a crust. Thinner cuts, such as flank or skirt steak, should be seared quickly at high heat to prevent overcooking. The appropriate thickness can affect the cooking time and heat distribution.
-
Fat Content: Cuts with higher fat content, like ribeye, render more fat during cooking. This enhances the flavor through a process called Maillard reaction, which occurs at high temperatures. For these cuts, a sear followed by oven cooking can intensify the flavor profile. Conversely, leaner cuts, such as sirloin, require careful monitoring during cooking to avoid drying out. The fat acts as a natural baster, keeping the meat juicy, making fat content a crucial factor.
-
Muscle Composition: Different cuts come from varying muscles, which affects their tenderness. Tender cuts like filet mignon are best seared and then finished briefly in the oven. Cuts from more exercised muscles, like chuck or round, usually need longer cooking times at lower temperatures to break down tougher fibers. Understanding the muscle source aids in deciding the best technique.
-
Cooking Techniques: The ideal searing temperature ranges between 400-500°F (204-260°C). Using a cast-iron skillet can create a superior sear due to its heat retention. Cooking in an oven at 275°F (135°C) is recommended for thicker cuts. Techniques vary based on the cut to maintain moisture while developing a suitable crust.
-
Resting Time: After cooking, letting steak rest for at least 5-10 minutes allows juices to redistribute. This step applies regardless of the cut but is particularly essential for cuts that are less fatty, as they benefit from moisture retention post-cooking. Studies, like those by Wolfert (1996), highlight that resting enhances overall tenderness.
These factors underscore the importance of cut selection in determining the effectiveness of searing and oven techniques. Adjusting methods according to these variables can significantly enhance the final steak quality.
What Temperature Control Techniques Help Perfect the Sear and Finish?
The temperature control techniques that help perfect the sear and finish of meats include proper heating, timing, and equipment choices.
- High-Heat Searing
- Oven Finishing
- Reverse Searing
- Sous Vide Cooking
- Infrared Technology
- Grilling at Controlled Temperatures
High-Heat Searing:
High-heat searing involves cooking the meat at an elevated temperature to create a flavorful crust on the surface. This technique typically uses a skillet or grill preheated to 450°F to 500°F (232°C to 260°C). Studies have shown that searing can enhance flavor through the Maillard reaction, a chemical reaction that occurs when proteins and sugars are heated, creating complex flavors and aromas. Searing quickly locks in juices, making the meat tender and juicy. For instance, when cooking a steak, searing each side for 2-3 minutes effectively builds that crust.
Oven Finishing:
Oven finishing is the process of completing the cooking of meat after searing it. After achieving a good crust on the stovetop or grill, the meat is transferred to an oven preheated to a consistent temperature, usually around 350°F (177°C). This method ensures even cooking without burning the exterior. It also allows for better temperature control, yielding a more uniformly cooked interior. A study by the University of Illinois showed that oven finishing can help maintain moisture and enhance tenderness.
Reverse Searing:
Reverse searing flips the traditional searing process. Meat is first cooked in an oven at a low temperature until it reaches the desired internal temperature, and then seared at high heat. This method results in more even cooking and minimizes the risk of overcooking. According to research published in the Journal of Culinary Science & Technology, reverse searing often produces a more evenly cooked steak compared to traditional searing first.
Sous Vide Cooking:
Sous vide cooking consists of vacuum-sealing food in a bag and cooking it in a water bath at a precisely controlled temperature. This technique ensures that the meat cooks evenly while retaining moisture. Different cuts can be cooked at 130°F (54°C) to 165°F (74°C) for extended periods, allowing for perfect doneness throughout. After sous vide cooking, a quick sear on a hot skillet finishes the dish with a flavorful crust. A study led by chef Thomas Keller emphasizes that sous vide offers precision and control for achieving desirable textures.
Infrared Technology:
Infrared technology includes using infrared grills or broilers that cook food with radiant heat. These devices can reach higher temperatures than conventional grills, enabling quick searing. Infrared cooking can lock in natural juices and flavors without excessive charring. Research by the American Meat Science Association indicates that infrared methods can enhance flavor retention and reduce cooking time.
Grilling at Controlled Temperatures:
Grilling at controlled temperatures involves monitoring the grill’s heat level to avoid flare-ups and burnt outer layers. Maintaining a medium-high heat is crucial for achieving an even sear while ensuring the meat cooks through properly. Experts recommend using a thermometer to monitor both grill temperature and internal meat temperature for optimal results. Studies shown in the Journal of Food Science demonstrate that consistent temperature management can improve the overall quality of grilled meats.
What Seasonings and Marinades Maximize Flavor in Sear and Oven Cooking?
To maximize flavor in sear and oven cooking, use specific seasonings and marinades that enhance the natural taste of food.
- Salt
- Pepper
- Garlic powder
- Onion powder
- Paprika
- Fresh herbs (e.g., rosemary, thyme)
- Soy sauce
- Worcestershire sauce
- Olive oil or butter
- Citrus juices (e.g., lemon, lime)
These ingredients can vary based on dietary preferences, cuisine style, and personal taste. For example, some may prefer a spice blend with heat, while others opt for a more herbal profile. Additionally, the balance of savory versus acidic elements can dramatically change the flavor experience.
-
Salt:
Salt is a fundamental seasoning that enhances flavor. It works by opening up taste buds and helping other flavors stand out. Studies indicate that salt reduces bitterness and enhances sweetness in foods. When seasoning meat, use kosher or sea salt for even distribution and better texture changes compared to table salt. -
Pepper:
Pepper is another essential spice that adds warmth and complexity. Black pepper contains piperine, which has been shown to enhance the bioavailability of certain nutrients. Freshly cracked pepper provides a more robust flavor. Adjust the amount based on desired heat level; for a milder bite, use white pepper instead. -
Garlic powder:
Garlic powder offers a concentrated garlic flavor without the moisture of fresh garlic. It is ideal for dry rubs and marinades. Garlic contains allicin, which holds antioxidant properties. A study by David et al. (2019) found that garlic can enhance the flavor profile of meats when combined with olive oil. -
Onion powder:
Onion powder adds a sweet and savory depth. It is often used in spice blends and marinades. The dehydration process concentrates the flavor, making it easier to distribute. It pairs well with garlic powder for a classic flavor combination. -
Paprika:
Paprika provides a subtle sweetness and can range from mild to hot. It adds vibrant color while contributing a rich, peppery flavor. Different varieties, such as smoked paprika, offer distinct flavor notes. Both its culinary use and health benefits, including antioxidants, make it a versatile seasoning. -
Fresh herbs (e.g., rosemary, thyme):
Fresh herbs bring brightness and fragrance to dishes. Rosemary pairs well with meats due to its strong essence, while thyme complements poultry and vegetables. According to the Culinary Institute of America, fresh herbs should be added toward the end of cooking to preserve their aromatic qualities. -
Soy sauce:
Soy sauce adds umami, a savory taste that heightens the overall flavor profile. It is often used in marinades to tenderize meat. Its salt content enhances flavor while contributing complex notes. Consider low-sodium versions for those monitoring salt intake. -
Worcestershire sauce:
Worcestershire sauce blends vinegar, molasses, and spices, providing a unique tangy and savory flavor. It is effective in marinades for meats, adding depth to stews and sauces. Research suggests that its combination of flavors amplifies taste perception. -
Olive oil or butter:
Fat is a carrier of flavor, and both olive oil and butter serve this function well. They add moisture and richness to dishes. Olive oil enhances the flavor of herbs and spices, while butter brings a creamy texture and enhances browning during cooking. -
Citrus juices (e.g., lemon, lime):
Citrus juices introduce acidity, which brightens dishes and balances richer flavors. The juice and zest can be used in marinades to tenderize proteins and add freshness. Studies show that marinating meats with citrus can improve flavor absorption.
Incorporating a balance of these seasonings and marinades can elevate your cooking, allowing for a wide range of flavors suited for various preferences.
What Are the Most Common Mistakes to Avoid for the Perfect Steak?
The most common mistakes to avoid for the perfect steak are essential to achieving a great result.
- Choosing the wrong cut of meat
- Not seasoning adequately
- Ignoring resting time
- Cooking at incorrect temperatures
- Overcooking or undercooking
- Not using a meat thermometer
- Skipping the searing process
Avoiding these mistakes can lead to different perspectives on how one experiences grilling. Some argue that specific cuts, like ribeye and filet mignon, yield tenderness while others prefer tougher cuts marinated for flavor. This highlights personal preferences and cooking styles.
-
Choosing the Wrong Cut of Meat:
Choosing the wrong cut of meat affects the overall steak experience. A cut like ribeye offers a good fat-to-meat ratio, which enhances flavor. In contrast, cuts like flank or skirt steak require marination to achieve tenderness. According to the USDA, a quality cut typically has marbling, which contributes to juiciness. -
Not Seasoning Adequately:
Not seasoning adequately can result in bland steak. Many chefs recommend generous seasoning with salt and pepper. Experts suggest salting the steak 40 minutes before cooking to allow the salt to penetrate the meat. As chef Gordon Ramsay states, “Season aggressively. It’s the only way to enjoy the integrity of the flavor.” -
Ignoring Resting Time:
Ignoring resting time diminishes the quality of the steak. After cooking, resting allows juices to redistribute, leading to a juicier result. The USDA recommends resting the steak for 5 to 10 minutes, depending on thickness. Failing to rest can cause the juices to escape when cutting. -
Cooking at Incorrect Temperatures:
Cooking at incorrect temperatures can ruin the perfect steak. The ideal cooking range depends on the desired doneness. According to the USDA, a rare steak should be cooked to an internal temperature of 125°F, while medium-rare is at 135°F. Using high heat can lead to a charred exterior and raw interior. -
Overcooking or Undercooking:
Overcooking or undercooking affects texture and flavor. A common guideline is cooking to desired doneness using established internal temperatures. A study by the Culinary Institute of America found that 44% of steak eaters prefer medium-rare, showcasing the importance of proper cooking. -
Not Using a Meat Thermometer:
Not using a meat thermometer leads to guesswork. A simple digital thermometer provides accurate readings. According to a 2019 study by Cook’s Illustrated, users improved cooking outcomes by 75% when using a thermometer, ensuring consistent results. -
Skipping the Searing Process:
Skipping the searing process denies a delicious crust. Searing caramelizes the meat’s surface, enhancing flavor through the Maillard reaction. Chefs emphasize that this step should not be overlooked, as it significantly influences the steak’s taste and visual appeal.