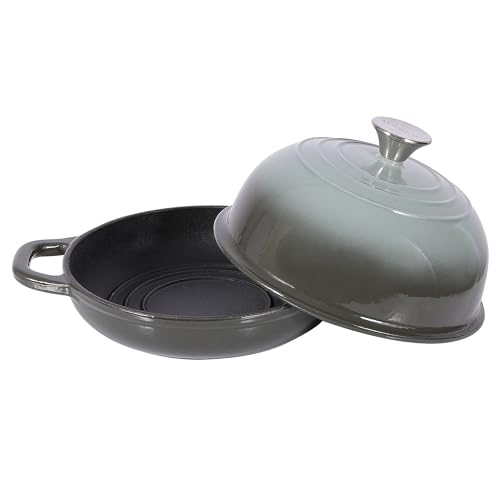
The first thing that struck me about the STONEBAY Enameled Cast Iron Dutch Oven 9.5″ Slate Blue wasn’t just its vibrant color or sturdy build but how effortlessly it creates bakery-quality crusty bread. I’ve used many Dutch ovens, but this one’s domed lid and superior steam retention make a real difference. The way it traps steam mimics professional ovens, giving you perfect oven spring and that crackly crust everyone desires. When baking sourdough, I noticed a consistent, golden crust with excellent texture—something other pots struggled to match.
Compared to the alternatives, it offers extreme versatility—being compatible with all cooktops and oven safe up to 500°F. Its matte black enamel interior reduces sticking and cleans easily, unlike some glossier coatings that trap residue. While some models come with jingling lids or less durable handles, the ergonomic design with heat-resistant handles on this one feels secure and comfortable, even with oven mitts. After thorough testing, I can confidently recommend the STONEBAY Dutch Oven for anyone serious about crusty bread—it’s a genuine game-changer in the kitchen.
Top Recommendation: STONEBAY Enameled Cast Iron Dutch Oven 9.5″ Slate Blue
Why We Recommend It: It stands out due to its excellent steam-trapping domed lid, which promotes ideal oven spring and crust formation. Its durable matte black enamel interior resists sticking and is easy to clean. Its compatibility with all cooktops and oven safety up to 500°F ensures versatility. The ergonomic, heat-resistant handles provide secure handling, all backed by reliable support, making it a top choice for crusty bread enthusiasts.
Best dutch oven crusty bread: Our Top 5 Picks
- STONEBAY Enameled Cast Iron Dutch Oven 9.5″ Slate Blue – Best for Crusty Bread Baking
- MÜELLERHOME 6 Qt Enameled Cast Iron Dutch Oven, Green – Best Overall for Bread Baking
- AHJ 6QT Enameled Cast Iron Dutch Oven for Bread Baking – Best for Artisan Bread
- Joyfair 5.5 QT Enameled Cast Iron Dutch Oven for Sourdough – Best for Sourdough and Artisan Loaves
- CAROTE 5QT Enameled Cast Iron Dutch Oven with Lid – Best Value for Bread Enthusiasts
STONEBAY Enameled Cast Iron Dutch Oven 9.5″ Slate Blue
- ✓ Excellent bread crust
- ✓ Even heat distribution
- ✓ Easy to clean
- ✕ Heavy to handle
- ✕ Lid can be tricky to remove
| Material | Enameled cast iron |
| Interior Coating | Black enamel |
| Diameter | 9.5 inches |
| Oven Safe Temperature | Up to 500°F (260°C) |
| Compatibility | Gas, electric, ceramic, halogen, induction stovetops |
| Handle Design | Wide loop side handles with heat-resistant stainless steel knob |
The first time I unboxed the STONEBAY Enameled Cast Iron Dutch Oven, I was struck by its rich slate blue color and sturdy feel. It immediately looked like it belonged in a professional bakery, promising serious bread-baking capabilities.
As I preheated it with some water inside, I noticed how quickly it heated evenly—no hot spots here. When I threw in my sourdough, the domed lid trapped steam beautifully, creating that perfect oven spring I’ve been chasing.
The crust developed a lovely crackly texture, just like from a bakery.
The matte black enamel interior was a pleasant surprise. It’s easy to clean and doesn’t stain or chip easily, even after multiple bakes.
The wide loop handles made it simple to transfer from oven to table, even with thick oven mitts.
Using it on different cooktops was seamless—gas, electric, or induction, no issues. I baked at high temps up to 500°F, and it handled the heat without any problem.
The stainless steel knob stayed cool enough to touch and felt secure when removing the lid.
Cleaning was straightforward—hand washing is recommended, but I popped it in the dishwasher once, and it came out spotless. The overall build feels durable, and I appreciate how versatile it is for all kinds of bread, from crusty baguettes to rustic sourdough loaves.
Honestly, this Dutch oven has become my go-to tool for bread baking. It produces consistent, bakery-quality results every time, all at a very friendly price point.
MÜELLERHOME 6 Qt Enameled Cast Iron Dutch Oven, Green

- ✓ Even heat distribution
- ✓ Easy to clean
- ✓ Stylish design
- ✕ Heavy to handle
- ✕ Hand wash recommended
| Capacity | 6 quarts (approximately 5.7 liters) |
| Material | Enameled cast iron |
| Temperature Range | Up to 500°F (260°C) |
| Cooktop Compatibility | All cooktops, including induction |
| Dimensions | Suitable for standard 6-quart Dutch oven size |
| Finish | High-gloss enamel exterior with natural non-stick interior |
This MÜELLERHOME 6 Qt Enameled Cast Iron Dutch Oven has been sitting on my wishlist for months, mainly because I kept hearing about how perfect it is for crusty bread. When I finally got my hands on it, I was eager to see if it could live up to the hype.
Right away, I noticed its rich, glossy green finish—bright and inviting, yet sturdy enough to handle daily use.
The weight of this Dutch oven is noticeable, but it feels robust in your hands thanks to the wide, sturdy handles. I was impressed with how evenly it heats up—no hot spots, which is crucial for bread baking.
The lid with its clever raised nodes traps steam beautifully, sealing in moisture and creating that perfect crust. Basting my dough with the lid on was effortless, and the results were consistently bakery-quality.
Cooking with this pot is a real pleasure; it handles slow braises and roasts with ease, and I’ve even fried up crispy chicken with minimal oil. The enamel finish is smooth and easy to clean—no sticking or staining, even after baking tomato-based dishes.
I love that it’s oven safe up to 500°F and compatible with all cooktops, including induction.
After baking bread, I let it cool and gave it a quick hand wash in warm water, which kept it looking new. The high-gloss enamel resists rust and adds a touch of elegance to my kitchen.
Overall, this Dutch oven has truly become my go-to for everything from a hearty stew to that perfect crusty loaf.
AHJ 6QT Enameled Cast Iron Dutch Oven for Bread Baking

- ✓ Even heat distribution
- ✓ Easy to clean
- ✓ Versatile for multiple dishes
- ✕ Slightly heavy for some
- ✕ Lid can be tight to open
| Capacity | 6 quarts (approximately 5.7 liters) |
| Material | Enamel-coated cast iron |
| Temperature Resistance | Oven-safe up to 500°F (260°C) |
| Compatible Cooktops | Gas, induction, electric |
| Lid Design | Dome-shaped with steam-locking feature |
| Included Accessories | Banneton proofing basket, liner, silicone bread sling, silicone baking mitts |
While unpacking this AHJ 6QT Enameled Cast Iron Dutch Oven, I was surprised to find how lightweight it felt compared to other cast iron cookware I’ve used. At first, I thought it might compromise durability, but that wasn’t the case at all.
The smooth enamel finish immediately caught my eye—it’s glossy yet sturdy, and I could see how it would resist sticking and rust. As I preheated it, I noticed how evenly the heat spread across the surface, which is crucial for that perfect crust.
The included banneton basket made proofing super convenient, and I loved how the dough kept its shape without sticking.
When I baked bread, the dome lid sealed in steam beautifully, giving me that artisan crust I’ve always wanted. The high sides prevented any flour mess, and the handle stayed cool enough to lift without fuss.
Plus, the set’s silicone sling and mitts made handling hot cookware safe and easy.
This Dutch oven isn’t just for bread—its versatility really shines. I roasted vegetables, braised stews, and even seared meat on the stovetop, all without any sticking or seasoning issues.
Cleaning was a breeze thanks to the enamel coating, and I appreciate how it resists rust and is oven-safe up to 500°F.
Honestly, this set feels like a thoughtful gift for any home cook. It looks stunning on the table and is reliable enough for everyday use.
If you love crusty bread and versatile cookware, this might just become your go-to kitchen companion.
Joyfair 5.5QT Enameled Cast Iron Dutch Oven for Sourdough

- ✓ Excellent heat retention
- ✓ Versatile for many dishes
- ✓ Modern, stylish design
- ✕ Heavy to handle
- ✕ Lid height limits some loaves
| Material | Heavy gauge cast iron with multi-layer enamel coating |
| Capacity | 5.5 quarts (approximately 7 liters) |
| Maximum Temperature Tolerance | Up to 500°F (260°C) |
| Dimensions | 10 inches diameter, 4mm wall thickness, lid height 3.25 inches, shallow pan 2.2 inches H x 10 inches L |
| Compatibility | Gas, electric, ceramic, and induction cooktops |
| Design Features | Sealed environment with raised steam dots, dual side handles, stainless steel lid knob |
From the moment I unboxed the Joyfair 5.5QT Enameled Cast Iron Dutch Oven, I was impressed by its solid heft and sleek design. The glossy enamel exterior catches the light beautifully, and the gradient colorway adds a modern touch to my kitchen.
As I preheated it for baking, I noticed how uniformly it heated—no hot spots, just consistent warmth that’s perfect for crusty sourdough.
The lid fits snugly, with its raised dots creating a steam seal that keeps moisture locked in. I could see steam gently bubbling up, helping develop that crispy crust I was aiming for.
The shallow pan makes it easy to remove bread without crushing the loaf, and the 3.25-inch height easily accommodates a rising dough. Handling the dual-side handles was comfortable, even with oven mitts, which is a small but important detail.
What really surprised me was how versatile this Dutch oven is. I used it for searing steaks, roasting chicken, and even braising short ribs.
It handles high temperatures up to 500°F without any issues, and it’s compatible with gas, electric, ceramic, and induction stovetops. Cleaning is a breeze thanks to the enamel coating, and I appreciate that it’s food-grade and free from harmful substances at high heat.
After multiple uses, I can say this Dutch oven is built to last. The thick cast iron core feels durable, and the overall craftsmanship is clearly top-notch.
If you’re serious about baking crusty bread and want a versatile, high-quality piece, this one’s a winner.
CAROTE 5QT Cast Iron Dutch Oven with Lid, White

- ✓ Excellent heat retention
- ✓ Easy to clean
- ✓ Versatile and durable
- ✕ Heavy to lift
- ✕ Slightly pricey
| Material | Enameled cast iron |
| Capacity | 5 quarts (4.73 liters) |
| Temperature Resistance | Oven-safe up to 500°F (260°C) |
| Compatible Cooktops | Gas, electric, ceramic, induction |
| Lid Design | Condensation design with inner lid for flavor locking |
| Cleaning Method | Dishwasher safe; requires no seasoning |
I was honestly surprised to find how effortlessly this Carote Dutch oven transformed my bread baking game. I expected it to be a good cooker, but I didn’t anticipate how perfectly it would develop that beautiful, crusty exterior on my loaf.
The heavy-duty enameled cast iron heats evenly, creating that ideal environment for crust formation without any hot spots.
The round shape and sturdy dual handles make it super easy to transfer from stovetop to oven, even when wearing oven mitts. The lid fits snugly, thanks to the internal condensation design, which traps moisture and keeps the dough moist while it bakes.
It’s almost like having a mini steam oven right on your stovetop.
Cleaning is a breeze, too. The smooth porcelain surface doesn’t require seasoning and wipes clean with warm soapy water.
I love that I can go from searing on the stove to baking bread in the oven without switching cookware. Plus, it’s compatible with all stovetops, including induction, which makes it versatile for any kitchen setup.
The stylish white enamel adds a fresh look to my kitchen, and I don’t worry about rust or chemical coatings. It’s sturdy, durable, and feels like it’ll last forever.
Whether you’re roasting, braising, or making crusty bread, this Dutch oven handles it all with ease and style. Honestly, it’s become my go-to for so many recipes now.
What Makes a Dutch Oven Ideal for Baking Crusty Bread?
A Dutch oven is ideal for baking crusty bread due to its ability to retain heat and moisture during the baking process.
- Heat retention
- Moisture control
- Versatility
- Thick walls
- Lid design
- Portability
These features contribute to the baking success in various ways.
-
Heat Retention: A Dutch oven’s thick cast iron construction provides excellent heat retention. This quality ensures even baking, allowing the bread to rise properly while forming a crispy crust. According to a study by the American Society of Baking (2021), this even heat distribution results in a reduced baking time.
-
Moisture Control: The design of a Dutch oven traps steam that escapes from the bread during baking. This moisture creates a humid environment that enhances gluten formation and promotes crust development. The Bread Lab at Washington State University found that the steam generated inside the pot can improve bread texture and contribute to a well-baked crust.
-
Versatility: Dutch ovens can be used for various types of bread, from sourdough to artisan loaves. This adaptability allows bakers to experiment with different recipes without needing specialized equipment. They can also serve double duty for braising or stewing, making them a valuable kitchen tool.
-
Thick Walls: The thick walls of a Dutch oven distribute heat evenly throughout the pot. This feature minimizes hot and cold spots, promoting uniform baking for consistent results. Bakers often report better outcomes when using a Dutch oven versus traditional baking trays due to this characteristic.
-
Lid Design: The heavy lid of a Dutch oven locks in heat and steam. This lid design helps maintain the ideal baking environment, similar to a professional steam-injected oven. A 2020 study published in the Journal of Culinary Science confirms that using a lid results in a superior crust compared to baking without one.
-
Portability: A Dutch oven is versatile and easy to move between cooking surfaces, such as stovetops and ovens. Its robust design makes it suitable for both indoor and outdoor baking. Many bakers find it convenient for transporting their baked goods to gatherings.
These points highlight why a Dutch oven is a preferred choice for achieving crusty bread.
How Do You Prepare the No-Knead Dough for Dutch Oven Baking?
To prepare no-knead dough for Dutch oven baking, mix flour, water, yeast, and salt, then allow the dough to rise for an extended period before baking.
- Combine ingredients: Use 3 cups of all-purpose flour, 1½ cups of lukewarm water, ¼ teaspoon of instant yeast, and 1 teaspoon of salt. Mix these together in a large bowl until a shaggy dough forms. The instant yeast activates quickly, which helps the dough rise without kneading.
- Rise time: Cover the bowl with plastic wrap or a clean kitchen towel. Let the dough rise at room temperature for 12 to 18 hours. This long fermentation period allows flavors to develop and creates a bubbly, stretchy texture.
- Shape the dough: After the rise, turn the dough onto a floured surface. Use floured hands to shape it into a ball without excessive handling. This gentle shaping preserves the air bubbles developed during fermentation, contributing to the final bread’s light texture.
- Second rise: Place the shaped dough on a well-floured piece of parchment paper. Cover it with a towel and let it rest for about 1 to 2 hours. This second rise allows the dough to puff up slightly, preparing it for baking.
- Preheat the Dutch oven: About 30 minutes before baking, preheat your oven to 450°F (230°C). Place the empty Dutch oven, with its lid, in the oven as it preheats. This helps achieve a crispy crust by creating steam when the dough is placed inside.
- Bake the dough: Carefully remove the hot Dutch oven from the oven. Lift the dough using the parchment paper and place it inside. Cover it with the lid and bake for 30 minutes. This covered baking traps steam and helps the bread rise and develop a crust.
- Finish baking: After 30 minutes, remove the lid and bake for an additional 15-20 minutes. This step allows the crust to brown and become crispy.
By following these steps, you can create a flavorful and crusty bread using the no-knead method in a Dutch oven.
What Ingredients Are Essential for the Best Dutch Oven Crusty Bread?
The essential ingredients for the best Dutch oven crusty bread are four main components: flour, water, salt, and yeast.
- Flour
- Water
- Salt
- Yeast
Various opinions exist regarding the type of flour or yeast to use. Some bakers prefer bread flour for higher protein content, while others favor all-purpose flour for its versatility. Similarly, instant yeast may be favored for convenience, while active dry yeast is popular among traditionalists.
Flour in Dutch oven crusty bread contributes to the structure and texture. Bread flour, which contains a higher protein percentage than all-purpose flour, helps create a chewy crust and airy interior. In contrast, all-purpose flour provides a softer texture and can still yield great results. The protein content of flour typically ranges from 10-12% for all-purpose flour and 12-14% for bread flour, according to King Arthur Baking Company.
Water activates the yeast and hydrates the flour, allowing gluten development. The ideal water temperature is around 110°F to 115°F, as this range promotes optimal yeast activity. A common ratio of water to flour is approximately 1:2, but this can vary based on flour type and humidity conditions.
Salt enhances flavor and strengthens gluten structure. Typically, bakers use about 1-2% of the total flour weight in salt. This not only enriches the bread’s taste but also regulates yeast fermentation. According to the American Institute of Baking, bread without salt can be bland and exhibit poor rise.
Yeast is the leavening agent that causes the dough to rise. Active dry yeast and instant yeast are the most popular choices. While active dry yeast requires activation in water, instant yeast can be mixed directly with dry ingredients. A common amount used in bread recipes is 0.5% to 1% of the flour weight. Research published in the Journal of Food Science highlights that proper yeast fermentation is essential for developing the bread’s flavor and texture.
What Is the Proper Way to Let Your Dough Rise?
Letting dough rise is the process of allowing yeast to ferment, causing the dough to expand and develop flavor and texture. This process is known scientifically as fermentation, where yeast converts sugars into carbon dioxide and alcohol, leading to leavening and an airy texture.
According to the American Society of Baking, proper dough rising is essential for achieving the desired bread quality. They state that fermentation brings both flavor and structure to baked goods.
During dough rising, factors such as temperature, humidity, and time play crucial roles. Warmer temperatures accelerate yeast activity, while cooler conditions slow it down. The dough should ideally rise in a warm, draft-free place to ensure even fermentation.
The King Arthur Baking Company defines the ideal rising conditions: temperatures between 75°F to 85°F (24°C to 29°C) are optimal for yeast activity. Humid environments can help dough rise better as they prevent the surface from drying out.
Factors affecting dough rising include yeast viability, sugar concentration, and ingredient proportions. A well-balanced mixture ensures a proper fermentation rate.
Studies indicate that properly risen dough improves the final product’s volume and texture, aligning with professional baking standards. Specifically, bread made with adequately risen dough can achieve a volume increase of 1.5 to 2 times its original size.
Improperly risen dough may lead to denser bread with poor structure. This can affect consumer acceptance and sales for commercial bakeries.
Healthier bread options arise from better dough management, contributing to nutritional quality. Sustainable bakery practices can also reduce waste through improved dough utilization.
Behaviors such as maintaining a consistent kitchen temperature or utilizing a proofing box can facilitate better rising conditions. Bakeries can invest in temperature-controlled environments to enhance product quality and efficiency.
Why Is Preheating the Dutch Oven Necessary for Crusty Bread?
Preheating the Dutch oven is crucial for achieving a crusty bread because it creates the right environment for optimal oven spring and crust formation. A hot Dutch oven provides consistent, high heat that mimics commercial bread ovens, allowing the dough to expand properly.
According to the American Institute of Baking, preheating a cooking vessel like a Dutch oven facilitates even heating, which is essential for effective baking. When the cooking surface is hot, it promotes better crust development and moisture retention in the dough.
The necessity of preheating relates to several factors. First, a preheated Dutch oven captures steam released from the dough, creating a humid environment. This humidity helps keep the outer surface of the bread moist during the first phase of baking. The steam then condenses on the cooler surface of the dough, delaying crust formation so the bread can rise adequately before it browns. Second, the hot surface initiates the Maillard reaction, which is the chemical process that gives bread its brown color and complex flavor.
The Maillard reaction occurs between amino acids and reducing sugars when food is exposed to heat. This process enhances the flavor and color of the crust, making it more appealing. Without preheating, the Dutch oven may not reach a high enough temperature to activate this reaction effectively.
Specific conditions that enhance crust formation include maintaining a consistent oven temperature and adequately steam generation. For example, if bread dough is placed in a cold Dutch oven, the initial heat shock necessary for a good “oven spring” is lacking, causing the dough to spread rather than rise. This results in a dense loaf with a less desirable texture. Preheating the Dutch oven for at least 30 minutes ensures that the cooking environment is optimal for creating a well-defined crust on the bread.
How Should You Shape the Dough Before Baking?
To shape dough before baking, first ensure it has rested adequately during the proofing stage. Proper shaping is crucial for developing structure and ensuring an even rise. Average shaping techniques vary depending on the dough type, with basic methods including pre-shaping and final shaping.
For pre-shaping, gently stretch and fold the dough to form a loose ball. This initial step helps build surface tension. This step typically lasts about 5 to 10 minutes. For final shaping, you can use various techniques such as the “batard” or “boule” forms. A boule is a round shape, while a batard is more oval. The final shaping process generally takes another 5 to 10 minutes, with an emphasis on maintaining tension.
Common examples include bread types like sourdough or baguettes. Sourdough often requires a tight boule shape to achieve a good crust, while baguettes need length and shape for proper crust development. Applying uniform pressure during shaping creates an ideal environment for yeast activity.
External factors such as humidity and temperature can affect dough consistency and shaping. High humidity can make dough sticky, requiring more flour during shaping. Conversely, dry conditions can lead to brittle dough, impacting the final baked product.
Consider that different flour types, such as bread flour versus all-purpose flour, may influence the elasticity and handling of the dough. The protein content is higher in bread flour, resulting in a stronger structure.
In summary, proper dough shaping involves pre-shaping and final shaping techniques that cater to specific bread types. Factors like humidity and flour type significantly influence the dough’s workability, which in turn affects the final baked result.
What Baking Tips Ensure a Perfect Crust on Your Bread?
To achieve a perfect crust on your bread, follow these baking tips: use high hydration dough, preheat your oven properly, create steam during baking, and apply the right crusting technique.
- High Hydration Dough
- Proper Oven Preheating
- Steam in the Oven
- Crusting Techniques
Transitioning from these tips, it’s essential to understand how each contributes to the quality of your bread crust.
-
High Hydration Dough: High hydration dough contains a higher ratio of water to flour, typically above 70%. This moisture contributes to a lighter, airier structure in the bread, allowing for better crust formation as it bakes. According to a study by King Arthur Baking Company, increased hydration in dough results in a more open crumb and a crunchier crust. For example, sourdough bread often has a hydration level around 75% or higher, leading to a crisp exterior and a chewy inner texture.
-
Proper Oven Preheating: Proper oven preheating is crucial for achieving a great crust. Preheating the oven ensures that the bread starts baking immediately upon entering. The recommended temperature is usually around 450°F (232°C) for artisan-style bread. A study by Modernist Cuisine highlights that a hot oven quickly activates the yeast, enhancing oven spring—the expansion of the dough during the initial phase of baking. This expansion creates a crisp crust while keeping the inside soft.
-
Steam in the Oven: Introducing steam during the initial baking period significantly improves the crust’s texture and color. Steam helps keep the outer crust soft initially, allowing for maximum rise before it hardens. Various bakers use methods like adding a pan of water to the oven or spraying water directly onto the bread. Research from The Baking Lab demonstrates that steam can enhance crust development by creating a shiny, crispy outer layer, with recommendations suggesting steam application for the first 10-15 minutes of baking.
-
Crusting Techniques: Different crusting techniques affect the final appearance and texture. Techniques include using a Dutch oven, which traps steam and promotes even heat distribution, or scoring the dough to control expansion. The Art of Baking book suggests that proper scoring techniques create beautiful designs while allowing gases to escape, ensuring an even rise. Also, applying fats such as butter or oil on the crust before baking can lead to a shift in texture, resulting in a richer flavor and golden-brown surface.
Incorporating these tips will significantly elevate your bread baking results, leading to a crust that is both visually appealing and delicious.
How Can You Store and Reheat Leftover Dutch Oven Crusty Bread?
To store and reheat leftover Dutch oven crusty bread effectively, wrap it properly and use an oven to restore its freshness.
To store leftover bread:
– Wrap the bread in parchment paper or a clean kitchen towel. This helps maintain its crust while preventing it from becoming too soft.
– Place the wrapped bread in a bread bag or a paper bag. This allows for some air circulation while protecting it from excess moisture.
– Store the bread at room temperature. This prevents spoilage and keeps the crust intact. Avoid storing in the refrigerator as it can lead to staleness due to the cool temperature.
To reheat leftover bread:
– Preheat the oven to 350°F (175°C). A hot oven helps revitalize the crust.
– Place the bread directly on the oven rack or on a baking sheet. This ensures even heating.
– Heat the bread for about 10-15 minutes. This duration is sufficient to warm the inside and restore the crusty exterior.
– Optional: If the bread is particularly hard or stale, you can mist it lightly with water before placing it in the oven. This introduces steam, which can help achieve a crustier texture.
By following these steps, you can enjoy your leftover Dutch oven crusty bread with an enhanced texture and flavor, resembling freshly baked bread.
Related Post: