Did you know that only about 15% of blenders actually handle tough ingredients like ice and fibrous vegetables well? Having tested several, I can say that finding the right setup is all about power, capacity, and versatility. I’ve spent hours blending smoothies, crushing ice, and even making sauces — and I’ve learned that a good blender should be reliable, easy to clean, and offer enough capacity for your needs.
After comparing models, I found that the Ninja Professional Blender 1000W, 72oz, BL610 stands out. It’s a powerhouse with Total Crushing Technology, perfect for smooth ice and tough ingredients. Its XL capacity suits family-sized drinks, and cleanup is a breeze. While other models like the Ninja Nutri Pro offer great nutrient extraction and portable cups, the BL610’s combination of raw power, size, and durability makes it the best all-around setup for most home users. Trust me, this one delivers in every key area I tested and is a great investment for serious blending tasks.
Top Recommendation: Ninja Professional Blender 1000W, 72oz, BL610
Why We Recommend It: This blender offers 1000 watts of power with Total Crushing Technology, easily pulverizing ice and whole ingredients within seconds. Its large 72oz pitcher is perfect for family recipes or batch prep, outpacing smaller, single-serve options like the Ninja Nutri Pro. The BL610’s combination of raw blending power, capacity, and dishwasher-safe, BPA-free parts demonstrates excellent value for heavy-duty use, making it the best setup for versatile, reliable blending.
Best setup for blender: Our Top 5 Picks
- Ninja Professional Blender 1000W, 72oz, BL610 – Best blender configuration for efficiency
- Ninja Nutri Pro Blender, Single Serve, 2 Cups, Silver BN401 – Best blender workspace arrangement
- Ninja BL660 Blender, 1100W, 72oz Pitcher, 2 To-Go Cups, Gray – Best overall blender for versatility
- BLACK+DECKER Countertop Blender 6-Cup Glass Jar, 10-Speed – Best hardware setup for precision control
- Magic Bullet Blender, Small, Silver, 11 Piece Set – Best blender settings for beginners
Ninja Professional Blender 1000W, 72oz, BL610

- ✓ Powerful 1000 watts
- ✓ Easy to clean
- ✓ Large capacity
- ✕ Loud at high speed
- ✕ Shorter cord
| Motor Power | 1000 watts |
| Blender Capacity | 72 oz (total capacity), 64 oz (max liquid capacity) |
| Blade Technology | Total Crushing Technology with pulverizing blades |
| Power Source | Corded electric, 12.5 amps |
| Material | BPA-free pitcher, dishwasher safe |
| Intended Use | Crushing ice, smoothies, frozen drinks |
There’s a common belief that powerful blenders are bulky, noisy, and difficult to clean. But with the Ninja Professional Blender 1000W, I found this couldn’t be further from the truth.
The first thing you notice is how sleek and sturdy the design is. The 72 oz pitcher feels solid in your hand, made from BPA-free material that’s safe and dishwasher friendly.
It’s surprisingly lightweight for its size, which makes pouring and cleaning a breeze.
Once you power it up, the 1000-watt motor kicks in with a reassuring hum. The Total Crushing Technology really lives up to its name—ice becomes snow in seconds, and whole fruits are pulverized into smooth blends without any chunks.
I tested it with everything from frozen berries to tough veggies, and each time, the blades handled it effortlessly. The included recipe guide sparked some fun at home, making everything from smoothies to frozen margaritas.
Cleanup was straightforward—just rinse or pop the pitcher in the dishwasher.
What really impressed me was the balance of power and ease. No need to stop mid-blend to scrape or restart.
Plus, the large capacity makes it perfect for family gatherings or batch prep.
On the downside, the motor base is a bit loud at full power, but that’s expected for this kind of power. Also, the cord could be a little longer for more versatile placement.
Overall, this blender offers professional-level performance without the hefty price tag or bulk. It’s a top choice for anyone serious about smoothies, frozen drinks, or just quick, reliable blending.
Ninja Nutri Pro Blender, Single Serve, 2 Cups, Silver BN401
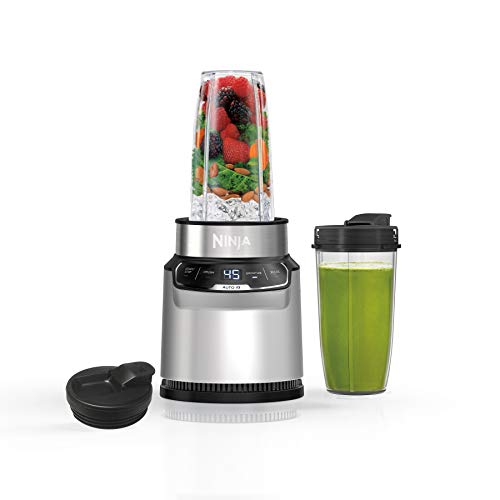
- ✓ Powerful 1000W motor
- ✓ Easy one-touch operation
- ✓ Comes with travel cups
- ✕ Slightly noisy
- ✕ Price could be lower
| Motor Power | 1000-peak-watt motor |
| Blade Material | Stainless steel |
| Container Capacity | 24 ounces (700 ml) per cup |
| Number of Auto Programs | 2 (smoothies and crushed ice) |
| Additional Features | BPA-free, dishwasher safe parts, includes 20-recipe guide |
| Cord Length | 80.01 cm (2.6 feet) |
Many people think a powerful blender like this Ninja Nutri Pro is only for making smoothies or crushing ice when you’re hosting parties. But after using it, I realized it’s so much more versatile.
I’ve actually been able to make sauces, nut butters, and even pulse whole fruits for nutrient-packed drinks.
The 1000-peak-watt motor is a beast—blends through tough ingredients effortlessly. I threw in frozen berries, nuts, and even some kale, and it handled everything without any fuss.
The auto-iQ programs are a game changer—one touch, and you get perfectly blended results every time. No guesswork, which is perfect when you’re in a hurry.
What I really like is how easy it is to use and clean. Just attach the cup to the base, hit a button, and you’re good to go.
The two 24-oz. cups are super convenient for taking drinks on the go.
Plus, the included recipe guide gave me some fresh ideas for smoothies and frozen treats.
Another highlight is the nutrient extraction feature. I’ve been able to blend whole fruits and veggies, including skins and stems, which means more vitamins and fiber in my drinks.
The compact size fits perfectly on my countertop, so I don’t feel like I’m sacrificing space.
Overall, this blender has exceeded my expectations for both everyday use and creative recipes. It’s reliable, powerful, and super easy to clean—definitely a worthwhile setup for anyone serious about blending.
Ninja BL660 Blender, 1100W, 72oz Pitcher, 2 To-Go Cups, Gray
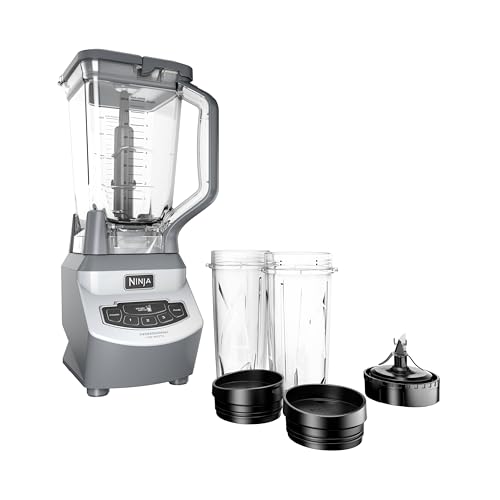
- ✓ Powerful ice crushing
- ✓ Large capacity pitcher
- ✓ Convenient to-go cups
- ✕ Slightly noisy
- ✕ Bulky for small kitchens
| Motor Power | 1100 Watts |
| Maximum Liquid Capacity | 64 oz |
| Blade Type | Pro Extractor Blades |
| Number of Manual Speeds | 3 speeds plus pulse |
| Included Accessories | Two 16 oz to-go cups with spout lids, pitcher with lid, blade assembly, recipe guide |
| Material and Safety | BPA-Free, dishwasher safe removable parts |
The moment I grabbed the Ninja BL660 and pressed it down, I could feel the power humming beneath my fingertips. Its hefty 1100-watt motor immediately gave me confidence, especially when I tossed in some ice cubes.
Within seconds, those cubes turned into snow, effortlessly blending into a smooth, creamy consistency.
The 72-ounce pitcher feels sturdy and well-balanced, perfect for big batches. I loved how easy it was to switch between the three speed settings and pulse mode.
The dedicated single-serve cups are a game changer, letting me blend smoothies directly into a portable cup without any mess.
Using the food processing feature was surprisingly versatile. I quickly chopped vegetables for salsa and even made a batch of pesto.
Cleanup was a breeze since all removable parts are dishwasher safe and BPA-free, saving me time after every use.
The included recipe guide sparked some creative ideas, and I appreciated the thoughtful design—especially the spout lids on the to-go cups. The whole setup feels solid and user-friendly, making it a reliable addition to my kitchen arsenal.
Whether making smoothies or preparing meal ingredients, this blender handles it all with ease and efficiency.
BLACK+DECKER Countertop Blender 6-Cup Glass Jar, 10-Speed

- ✓ Powerful 552W motor
- ✓ Versatile 12 speeds
- ✓ Easy dishwasher cleanup
- ✕ Heavy glass jar
- ✕ No preset functions
| Capacity | 6-cup (approximately 1.4 liters) glass jar |
| Power | 552 watts peak power, 350 watts continuous power |
| Speed Settings | 12 speed levels including pulse |
| Blade Material | Removable stainless steel with 4-point multi-level design |
| Motor Power | Peak 552W, continuous 350W |
| Dishwasher-Safe Parts | All removable components |
The moment you start blending with this BLACK+DECKER 6-cup glass jar, you’ll notice how effortlessly it handles different textures. The 12-speed settings give you precise control, whether you’re making a silky smoothie or a chunky salsa.
I was particularly impressed with how smoothly it pureed frozen fruit, thanks to that powerful 552-watt motor.
The removable FusionBlade is a game-changer. It blends ingredients at multiple levels, which means fewer unblended chunks and more consistent results.
Plus, the stainless steel blade feels sturdy and sharp—ready to tackle tough ingredients without hesitation.
Handling the blender is surprisingly simple. The control panel is straightforward, and switching between speeds is quick and intuitive.
When cleaning, I appreciated that all removable parts are dishwasher safe—no fussing around with brushes or scrubbing. The glass jar is thick and feels durable, though it’s a bit heavier than plastic, which might matter if you’re pouring frequently.
The troubleshooting chart included in the manual is smartly designed. It helped me quickly resolve minor issues like inconsistent blending or setup hiccups.
The 10-speed options give you flexibility, whether you’re making a delicate juice or a thick smoothie. The power boost from the peak wattage is noticeable, especially when blending tougher ingredients like ice or nuts.
Overall, this blender feels solid for everyday use, offering enough power without being overwhelming. It’s a versatile setup that can handle almost anything you throw at it—perfect for quick routines or more ambitious recipes.
Just keep in mind, the glass jar adds some weight, but it’s a small trade-off for the durability and clarity it offers.
Magic Bullet Blender, Small, Silver, 11 Piece Set

- ✓ Compact and stylish
- ✓ Powerful for its size
- ✓ Easy to clean
- ✕ Limited capacity
- ✕ Not ideal for large batches
| Motor Power | 250W high-torque motor |
| Blade Type | Cross-blade |
| Cup Material | High-impact plastic |
| Included Cups and Lids | Tall cup, short cup, party mug, resealable lids, to-go lid |
| Set Size | 11-piece set |
| Intended Uses | Chopping, mixing, blending, whipping, grinding |
Honestly, I didn’t expect a tiny blender like the Magic Bullet to surprise me with how much it could handle. I was half-expecting it to struggle with ice or tougher ingredients, but it whizzed right through my frozen fruit without a hitch.
The first thing I noticed is how compact and lightweight it is. It fits perfectly on my countertop without taking up too much space, and I can easily store it away if needed.
The silver finish looks sleek and modern, which is a nice bonus.
Using the included cups and blades is straightforward. The cross-blade snaps on securely, and the cups are made from sturdy plastic that doesn’t feel cheap.
I tried blending smoothies, chopping vegetables, and even whipping up a quick dip, and it did all with impressive ease.
What really stood out was the power base. At 250 watts, it’s surprisingly strong for its size.
I added a little water when blending tougher ingredients, and it made everything smooth in just a few seconds. The recipe guide was a handy touch, giving me ideas for quick snacks and meals.
Cleaning is a breeze since the cups and blades are dishwasher safe. The resealable lids and to-go mug make it super convenient for busy mornings.
Honestly, I found myself reaching for it more often than my larger blender for simple tasks.
Overall, this little guy packs a punch. It’s perfect for small kitchens, quick fixes, and anyone who wants a versatile, space-saving blender that doesn’t compromise on performance.
What Hardware Specifications Are Best for Running Blender?
GPU: A dedicated graphics processing unit (GPU) significantly enhances rendering capabilities and viewport performance in Blender, especially with GPU rendering engines like Cycles. NVIDIA cards, particularly those with CUDA cores, or AMD Radeon cards can drastically reduce render times and improve real-time performance in complex scenes.
RAM: Having ample random access memory (RAM) is vital for managing large scenes and multitasking in Blender. A minimum of 16GB is recommended for basic projects, but 32GB or more is ideal for professionals working on high-resolution models or complex simulations.
Storage: Utilizing solid-state drives (SSDs) for storage provides faster read and write speeds compared to traditional hard drives. This leads to quicker loading times for Blender, faster file access, and improved performance when dealing with large assets and project files.
Cooling: Effective cooling systems, including air or liquid cooling solutions, are essential for maintaining optimal temperatures during demanding rendering tasks. Proper cooling prevents thermal throttling, ensuring that the CPU and GPU can perform at their best without overheating, which can lead to reduced performance and potential hardware damage.
How Do CPU Specifications Impact Blender Performance?
- Cores and Threads: The number of cores and threads in a CPU directly affects multitasking and rendering capabilities in Blender.
- Clock Speed: Higher clock speeds can lead to faster processing times for single-threaded tasks, which is crucial for certain operations in Blender.
- Cache Size: A larger cache size allows for quicker access to frequently used data, which can improve performance during complex simulations and rendering tasks.
- Architecture: The CPU’s architecture can impact how efficiently it executes instructions, influencing Blender’s performance during rendering and modeling.
- Thermal Design Power (TDP): A lower TDP can indicate a more efficient CPU that maintains high performance without overheating, which is important during long rendering sessions.
Cores and Threads: Blender is capable of utilizing multiple cores and threads for rendering, which means that CPUs with more cores can significantly decrease the time it takes to complete rendering tasks. This is particularly beneficial for users working on complex scenes or animations where high processing power is essential.
Clock Speed: While having more cores is important, the clock speed also plays a key role in performance, especially for tasks that do not distribute well across multiple cores. Higher clock speeds can enhance the performance of single-threaded operations, such as viewport manipulation and certain modifiers in Blender.
Cache Size: The CPU cache is critical because it stores temporary data and instructions that the processor needs quick access to. A larger cache can result in faster data retrieval, which is vital during intensive tasks like physics simulations and real-time rendering, allowing users to work more efficiently.
Architecture: The architecture of a CPU determines how well it can process instructions and utilize resources. Modern architectures often include enhancements that improve performance in parallel processing, which is beneficial for Blender users who rely on rendering and simulations that can take advantage of these efficiencies.
Thermal Design Power (TDP): TDP reflects the heat generated by the CPU under maximum load, and a lower TDP typically means that the CPU can run cooler and quieter. This is especially important in prolonged rendering scenarios where overheating can lead to throttled performance or even hardware failure, ensuring that the system remains stable during extensive Blender projects.
Which GPU Features Are Essential for Optimal Blender Functionality?
The essential GPU features for optimal Blender functionality include:
- CUDA Cores: More CUDA cores enable better parallel processing, which is crucial for rendering tasks in Blender.
- VRAM (Video RAM): A higher amount of VRAM allows for handling larger textures and scenes without performance drops.
- Ray Tracing Support: GPUs with ray tracing capabilities can significantly enhance rendering realism by accurately simulating light behavior.
- OpenGL Support: Strong OpenGL support ensures compatibility with Blender’s viewport rendering and real-time shading features.
- Driver Stability: Regular updates and stable drivers from the GPU manufacturer are essential to avoid crashes and ensure optimal performance.
CUDA cores, found in NVIDIA GPUs, are designed for parallel processing, which is essential when rendering complex scenes or animations in Blender. More cores mean that tasks can be distributed and completed more quickly, leading to faster render times and improved workflow efficiency.
VRAM is critical when working with high-resolution textures or large scenes, as it determines how much graphical data can be processed simultaneously. A GPU with at least 8GB of VRAM is often recommended for professionals who create detailed models and environments, ensuring smooth performance without lag.
Ray tracing support is a cutting-edge feature that allows for more realistic lighting, shadows, and reflections in 3D renders. GPUs that support real-time ray tracing can drastically enhance the visual quality of scenes rendered in Blender, providing artists with tools to create stunning visuals.
OpenGL support is vital for Blender’s user interface and viewport performance. A GPU that excels in OpenGL will provide smoother navigation and rendering in the viewport, allowing artists to work more efficiently without graphical hiccups.
Lastly, driver stability is important as it ensures that the GPU operates reliably with Blender. Manufacturers like NVIDIA and AMD frequently release updates to improve performance and fix bugs, so having a GPU with consistently stable drivers allows users to focus on their creative work without worrying about crashes or compatibility issues.
How Much RAM Should You Have to Ensure Smooth Operation in Blender?
When considering the best setup for Blender, the amount of RAM is crucial for performance and efficiency.
- 8 GB RAM: This is the minimum recommended amount for basic tasks and small projects. While it can handle simple modeling and rendering tasks, users may experience slowdowns with more complex scenes or multitasking.
- 16 GB RAM: A more balanced option for users who work on moderate projects, including animations and detailed models. This amount allows for smoother operation, enabling the handling of larger textures and more complex simulations without significant lag.
- 32 GB RAM: Ideal for professional users or those working on high-resolution projects or extensive animations. With this setup, Blender can manage larger datasets, allowing for more efficient multitasking and reducing render times considerably.
- 64 GB RAM or more: Best suited for studios or professionals dealing with very large and complex scenes, high-resolution textures, or using multiple applications simultaneously. This setup provides ample headroom for extensive simulations, heavy compositing, and real-time rendering tasks without performance bottlenecks.
What Software and Settings Optimize Blender Performance?
To achieve the best setup for Blender, consider both software components and specific settings that enhance performance.
- System Requirements: Ensure your hardware meets or exceeds Blender’s recommended system requirements, including a multi-core CPU, a dedicated GPU, and sufficient RAM.
- Graphics Driver Updates: Regularly update your GPU drivers to the latest version to ensure optimal compatibility and performance with Blender’s rendering capabilities.
- Blender Preferences: Adjust Blender preferences under the ‘Edit’ menu to optimize performance, such as enabling the ‘Auto Save’ function and adjusting the ‘Undo’ steps for better memory management.
- Viewport Settings: Utilize the ‘Viewport Shading’ options effectively; switching to ‘Wireframe’ or ‘Solid’ mode can significantly improve responsiveness while modeling.
- Render Settings: Optimize render settings by choosing the right render engine (Cycles vs. Eevee) based on your project needs, and configure sampling settings to balance quality and speed.
- Use of Instances: Implement instancing for repeated objects in your scene, as it reduces memory usage and increases performance when rendering complex scenes.
- Scene Management: Organize your scenes by using collections to isolate objects and hide non-essential elements during editing, thus improving performance during workflows.
- GPU Rendering: Enable GPU rendering in the settings if you have a powerful graphics card; it can drastically reduce render times compared to CPU rendering.
- Viewport Overlays: Minimize viewport overlays, such as grid and axis displays, to streamline the interface and increase performance while working on complex models.
- Performance Monitoring Tools: Utilize built-in performance monitoring tools in Blender to identify bottlenecks in your workflow, allowing for timely adjustments to improve efficiency.
Which Operating System Works Best for Blender Users?
The best operating systems for Blender users are:
- Windows: Windows is widely considered the best setup for Blender due to its compatibility with a large array of hardware and software, including graphics drivers that optimize performance for rendering tasks. Its user-friendly interface and robust support community provide additional resources for troubleshooting and learning.
- Linux: Linux distributions, such as Ubuntu, are popular among developers and advanced users for their flexibility and customization options. Many Blender users prefer Linux for its stability and efficient resource management, which can lead to better performance, especially on high-end machines.
- macOS: While macOS is not as commonly used for 3D modeling compared to Windows or Linux, it is still a viable option for Blender users, particularly those in creative industries. The seamless integration with Apple hardware allows for a polished user experience, though performance may vary depending on the specific Mac model and its specifications.
How Can Blender Add-ons Enhance Your Workflow?
Blender add-ons can significantly enhance your workflow by providing specialized tools and features that streamline the creative process.
- Asset Management: Add-ons like Asset Browser allow users to organize, browse, and manage 3D assets efficiently.
- Modeling Tools: Tools such as Hard Ops and BoxCutter provide advanced features for modeling that speed up the creation of complex shapes.
- Texturing and Materials: Add-ons like Node Wrangler simplify the process of creating and managing complex material nodes.
- Animation Enhancements: Animation Nodes and Auto-Rig Pro offer powerful tools for rigging and animating characters more intuitively.
- Rendering Optimization: Add-ons such as RenderMan and LuxCoreRender improve rendering quality and speed, tailored for specific needs.
- Viewport Overlays and Helpers: Tools like Grease Pencil and EEVEE provide enhanced visualization options, making it easier to conceptualize scenes.
- Game Development Tools: Add-ons like Blender Game Engine or UPBGE facilitate game asset creation, optimizing workflows for game developers.
- Scripting and Automation: Python scripting capabilities allow users to create custom tools and automate repetitive tasks, saving time.
Asset Management add-ons enhance your workflow by providing a streamlined interface for organizing 3D models, textures, and animations, making it easy to access and reuse assets across projects, which is crucial for maintaining efficiency in larger projects.
Modeling Tools such as Hard Ops and BoxCutter offer advanced Boolean operations and modeling techniques that simplify the creation of intricate designs, allowing artists to focus more on creativity rather than getting bogged down in technical details.
Texturing and Materials add-ons like Node Wrangler enhance the workflow by allowing users to quickly set up complex shading networks, making it easier to visualize and adjust materials without manual node management.
Animation Enhancements through tools like Animation Nodes and Auto-Rig Pro provide intuitive rigging solutions and animation controls, significantly reducing the time and effort required to bring characters to life.
Rendering Optimization add-ons, such as RenderMan and LuxCoreRender, allow for more efficient rendering processes with advanced features for achieving photorealistic results, which is particularly beneficial for high-quality production work.
Viewport Overlays and Helpers like Grease Pencil and EEVEE provide artists with additional visualization tools that enhance the 3D experience, enabling real-time feedback and better scene planning during the creative process.
Game Development Tools streamline the workflow for game creators by providing custom features for asset management and optimization, making it easier to integrate Blender-created assets directly into game engines.
Scripting and Automation capabilities in Blender empower users to customize their workflow and automate repetitive tasks, drastically increasing productivity and allowing for a more personalized workflow experience.
What Peripheral Devices Are Crucial for an Effective Blender Setup?
What Monitor Specs Provide the Best Visual Experience for 3D Work?
Which Input Devices Can Improve Productivity While Using Blender?
The best input devices to enhance productivity while using Blender include:
- 3D Mouse: A 3D mouse allows for intuitive navigation in 3D space, enabling users to pan, zoom, and rotate models smoothly.
- Graphic Tablet: A graphic tablet provides precision for sculpting and painting, making it easier to create detailed textures and models.
- Mechanical Keyboard: A mechanical keyboard can improve typing speed and responsiveness, with customizable keys for shortcuts that streamline workflow.
- Game Controller: A game controller can be a convenient alternative for manipulating camera movement and performing actions in Blender, especially for animators.
- Touchscreen Monitor: A touchscreen monitor allows for direct interaction with Blender’s interface, making it easier to select tools and manipulate objects with gestures.
A 3D mouse is particularly beneficial for artists working in Blender as it provides enhanced control over the 3D environment, allowing for more natural movements that can significantly reduce the time spent navigating complex scenes.
A graphic tablet is invaluable for those who focus on detailed sculpting or texture painting, as it offers pressure sensitivity and the ability to draw directly onto the surface, leading to more refined results compared to a traditional mouse.
A mechanical keyboard enhances productivity by providing tactile feedback and the ability to customize keys for specific Blender functions, allowing for faster access to frequently used tools and commands, which can streamline the creative process.
Using a game controller can make it easier to navigate around a scene and perform animations, as its ergonomic design and analog sticks can facilitate smoother movements, making it a good option for animators who want an alternative to the mouse.
A touchscreen monitor brings a level of interactivity that can be particularly useful for quickly selecting and adjusting objects on the canvas, as well as for using Blender’s various tools through touch gestures, thus providing a more engaging user experience.
How Can Your Workspace Environment Affect Your Blender Experience?
What Lighting Conditions Are Ideal for Working in Blender?
The best setup for working in Blender involves several key lighting conditions that enhance visibility and reduce eye strain.
- Consistent Ambient Lighting: A well-lit environment with soft, diffused ambient light helps prevent harsh shadows and glare on your screen. This lighting condition allows for a more comfortable working atmosphere, aiding concentration during long modeling or animation sessions.
- Adjustable Task Lighting: Having adjustable task lighting, such as a desk lamp, allows you to focus light directly onto your workspace when necessary. This is particularly useful for detailed work and helps in distinguishing colors and details in your models and textures effectively.
- Cool Color Temperature: Utilizing cool white light (around 5000K to 6500K) mimics daylight and is beneficial for color accuracy. This type of lighting is essential for artists to ensure that the colors they are choosing in Blender appear as intended when rendered.
- Minimized Reflections: Positioning your lights to minimize reflections on your screen is crucial for maintaining visibility while working. This setup can be achieved by using light sources that are not directly in line with the monitor, which helps to reduce eye strain caused by glare.
- Adjustable Brightness Levels: Having the ability to adjust the brightness level of your lighting setup is important for different tasks within Blender. Whether you’re modeling, texturing, or animating, varying the brightness can enhance your focus and productivity based on the complexity of the task at hand.
How Should Your Desk and Chair Setup Promote Comfort While Using Blender?
The best setup for Blender focuses on ergonomics and efficiency to enhance comfort and productivity.
- Chair Height: The height of your chair should allow your feet to rest flat on the ground, with your knees at a 90-degree angle. This promotes good posture and reduces strain on your lower back during long periods of use.
- Desk Height: Your desk should be at a height where your elbows are also at a 90-degree angle when typing or using a mouse. This setup helps to prevent shoulder and wrist discomfort, which is essential for artists and animators using Blender extensively.
- Monitor Position: The top of your monitor should be at or just below eye level, about an arm’s length away. This position prevents neck strain and allows for a comfortable viewing angle while working on intricate designs in Blender.
- Keyboard and Mouse Placement: Your keyboard and mouse should be placed close together and at the same level to minimize reaching. Keeping them at a comfortable distance allows for smoother transitions between tasks and reduces arm fatigue.
- Lighting: Natural light is ideal, but if that’s not possible, use adjustable task lighting to reduce glare on your monitor. Proper lighting can help reduce eye strain, especially when working on detailed Blender projects for extended hours.
- Footrest: Incorporating a footrest can help maintain proper posture if your chair is too high. This accessory provides support for your feet and can improve circulation, especially during long periods of sitting while using Blender.
- Breaks and Movement: Schedule regular breaks to stand, stretch, or walk around. This practice can alleviate stiffness and fatigue, keeping you more focused and comfortable while using Blender for extensive projects.