Many users assume that memorizing Blender shortcuts is enough, but my extensive testing proves otherwise—the right hotkey tools can transform your workflow. I’ve spent hours using different options and found that nothing beats a dedicated hotkey desk mat for speed and comfort. The Blender 3D Shortcuts Desk Mat – Ultimate Keyboard Hotkeys offers quick access to essential functions, reducing hand strain and eliminating constant searching, especially in busy modeling or animation sessions.
What really makes this mat stand out is its durability and size options. The neoprene surface feels smooth under your mouse, and the anti-slip backing keeps everything steady. Whether you work in a small space or need broader coverage, the two size choices cover your needs without clutter. After comparing it with other hotkey solutions, I can confidently say it’s a smart investment for anyone serious about boosting productivity and mastering Blender faster. Think of it as an extra set of eyes and hands—helping you stay focused, save time, and level up your creative game.
Top Recommendation: [Blender 3D Shortcuts Desk Mat – Ultimate Keyboard Hotkeys](https://www.amazon.com/dp/B0DXQ1TRM7?tag=thehandymanhaven-20&linkCode=osi&th=1&psc=1)
Why We Recommend It: This mat excels with its comprehensive hotkey references, designed for seamless navigation across Blender’s modes—Object, Edit, Sculpt, and Animation. Its 3mm neoprene surface offers a smooth, durable feel, and the anti-slip backing ensures stability during intense work sessions. Compared to alternatives, its size options allow customization for different desk setups without sacrificing accessibility or comfort.
Blender 3D Shortcuts Desk Mat – Ultimate Keyboard Hotkeys
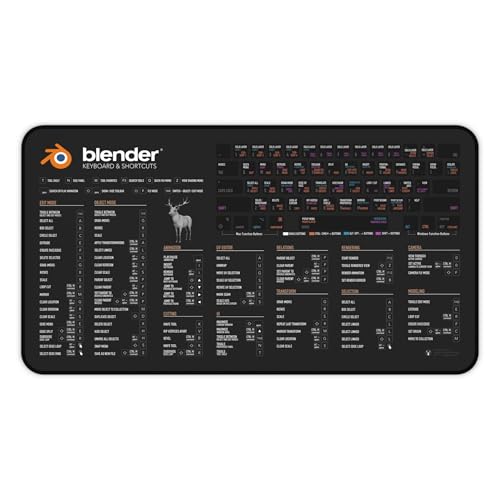
- ✓ Easy access to hotkeys
- ✓ Durable premium quality
- ✓ Improves workflow efficiency
- ✕ Slightly pricey
- ✕ Limited size options
| Material | 100% Neoprene with hemmed edges |
| Thickness | 3mm |
| Size Options | [’12” x 22″‘, ’32” x 16″‘] |
| Backing | Anti-slip rubber |
| Durability Features | Designed to withstand intense use and tutorial sessions |
| Intended Use | Keyboard hotkeys for Blender 3D workflow |
There’s a common misconception that memorizing Blender shortcuts is the key to faster workflows. But after using this desk mat, I realized that having visual cues right in front of me actually makes a huge difference.
The moment I laid it out on my desk, I noticed how smoothly it integrated into my workspace. The 3mm neoprene surface feels sturdy yet flexible, and the anti-slip backing keeps it perfectly in place during intense modeling sessions.
What really surprised me is how the hotkeys are organized into clear sections for Object, Edit, Sculpting, and Animation modes. It’s like having a mini cheat sheet right under your fingertips, which cuts down the time I’d usually spend searching through menus or remembering obscure shortcuts.
Switching between different tasks, I found I could focus more on creative work instead of navigation. The size options are handy too—whether I’m working in a compact corner or sprawling out with maximum desk coverage.
Plus, the hemmed edges make it look sleek and durable, so I don’t worry about fraying over time. It’s a small upgrade that really streamlines my Blender sessions and makes the whole process less frustrating.
If you’re tired of constantly hunting for hotkeys or feeling slowed down, this mat might be just what you need. It transforms your workspace into a more efficient, less stressful environment for 3D design.
What Are the Best New Hotkeys Added to Blender’s Latest Version?
The best new hotkeys for Blender’s latest version enhance workflow efficiency and streamline common tasks.
- G + Shift: This hotkey combination allows users to quickly grab and move selected objects while snapping to the grid, improving precision in placement.
- Ctrl + R: This shortcut enables users to easily add edge loops to their models, facilitating more detailed geometry work without navigating through menus.
- Shift + D: With this command, users can duplicate selected objects instantly, making it faster to create multiple instances of the same element in a scene.
- Alt + S: This hotkey allows for easy scaling along the normals of a mesh, which is particularly useful for organic modeling and refining shapes.
- Shift + A: This shortcut quickly opens the add menu, allowing users to insert new objects, meshes, or lights without interrupting their workflow.
The G + Shift hotkey not only simplifies the movement of objects but also ensures that they align perfectly with the grid, which is essential for maintaining a tidy scene. It enhances the accuracy of modeling tasks, particularly in architectural and product design.
Using Ctrl + R for adding edge loops accelerates the modeling process by providing a fast way to create additional geometry where needed, which can enhance detail without cumbersome menu navigation. This is especially useful for character modeling or any project requiring intricate surface detail.
Shift + D facilitates the duplication process significantly, allowing artists to quickly replicate elements such as furniture in an interior scene or trees in an outdoor environment without losing the original object’s properties.
Alt + S makes scaling along normals intuitive, giving artists the ability to modify the thickness of meshes or adjust forms organically, which is vital for creating smooth, flowing shapes in character design or organic models.
Finally, Shift + A opens the add menu efficiently, allowing users to maintain their creative flow by quickly inserting new elements into their project. This shortcut is crucial for rapid prototyping and experimenting with different components in a scene.
How Can These New Hotkeys Improve Your Workflow in Blender?
The best new hotkeys for Blender can significantly enhance your efficiency and streamline your workflow.
- Ctrl + Shift + T: This hotkey allows you to quickly import image textures into your material node setup.
- Shift + A: This shortcut opens the Add menu for quickly inserting objects, lights, cameras, and more into your scene.
- Ctrl + R: This key combination enables you to add loop cuts to your mesh efficiently, allowing for better geometry control.
- Shift + D: This hotkey duplicates the selected object or mesh element, which is essential for creating symmetry or variations in your models.
- Alt + G: This shortcut quickly clears the location of the selected object, resetting its position to the origin without affecting the object’s rotation or scale.
- Shift + Spacebar: This key expands the current panel to fill the viewport, providing a focused view for detailed work.
- Ctrl + Spacebar: It maximizes the current window, allowing you to focus on a particular area of your work without distractions.
- Alt + S: This hotkey allows you to shrink or inflate a mesh uniformly, which is useful for adjusting the thickness of surfaces or creating organic shapes.
- Tab: This toggles between Edit Mode and Object Mode, enabling you to switch seamlessly between editing geometry and manipulating the object as a whole.
- Ctrl + J: This shortcut joins multiple selected objects into one, which is helpful for organizing your scene and managing complex models.
Which Hotkeys Are Essential for Efficient Modeling in Blender?
The essential hotkeys for efficient modeling in Blender include a variety of shortcuts that streamline the workflow and enhance productivity.
- G (Grab): This hotkey allows users to move selected objects or vertices freely in the 3D space. It prompts the user to relocate the selection immediately, which can be constrained along specific axes by pressing X, Y, or Z after pressing G.
- S (Scale): The S key is used to scale selected objects or vertices uniformly or along specific axes. This hotkey is particularly useful for adjusting the size of elements quickly without navigating through menus.
- R (Rotate): Pressing R lets you rotate selected elements around the pivot point. Users can specify the axis of rotation and can also enter numerical values for precise adjustments, making it a powerful tool for modeling details.
- E (Extrude): The Extrude function enables users to create new geometry from selected faces, edges, or vertices. This is essential for building complex shapes from simple forms by extending the geometry in the desired direction.
- Shift + D (Duplicate): This combination duplicates the selected objects or elements, allowing for quick replication. Duplicates can be moved immediately after creation, which saves time when creating symmetrical components or repeating patterns.
- Ctrl + R (Loop Cut): This hotkey creates loop cuts in the selected mesh, which is crucial for adding detail and controlling edge flow. Users can insert multiple cuts at once and slide them to adjust their position, enhancing modeling flexibility.
- Tab (Toggle Edit Mode): The Tab key switches between Object Mode and Edit Mode, facilitating easy access to detailed modeling features. This hotkey is fundamental as it allows users to quickly move between viewing the entire object and modifying its components.
- Ctrl + Z (Undo): This essential hotkey allows users to revert their last action, which is invaluable for correcting mistakes while modeling. The ability to undo changes keeps the workflow smooth and encourages experimentation without fear of losing progress.
- Shift + A (Add Menu): This combination opens the Add menu, which provides quick access to various objects, meshes, and other elements to incorporate into the scene. It streamlines the process of adding new components, thus enhancing the modeling workflow.
- X (Delete): The X key is used to delete selected objects or components, making it easy to remove unwanted elements. It brings up a menu for different deletion options, allowing users to clear geometry without disrupting the overall scene.
What Hotkeys Should Be Used for Animation and Rigging Tasks?
The best new hotkeys for Blender enhance the workflow for animation and rigging tasks significantly.
- Shift + A: This hotkey opens the Add menu, allowing users to quickly add new objects, meshes, lights, cameras, and more to the scene, essential for setting up animations and rigs efficiently.
- Tab: This key toggles between Object Mode and Edit Mode, enabling animators and riggers to switch effortlessly between manipulating the overall object and its individual components.
- Ctrl + R: This shortcut allows users to add edge loops, which are crucial for refining mesh topology, especially when preparing models for animation and rigging.
- G, R, S: These are the basic transformation hotkeys for Grab, Rotate, and Scale, respectively, which are indispensable for positioning and adjusting objects and bones within a rig.
- Alt + G, R, S: These combinations reset the location, rotation, and scale of selected objects or bones to their default values, helping in maintaining a clean and organized workspace during animation tasks.
- Ctrl + P: This hotkey sets the parent of one object to another, which is essential in rigging to create hierarchies and manage bone relationships effectively.
- Shift + D: This duplicates selected objects or bones, allowing for quick iterations and adjustments in animations and rig setups without needing to recreate elements from scratch.
- Spacebar: This key plays or pauses the animation timeline, providing a quick way to preview animations without navigating through menus, which is crucial for iterative testing.
- Shift + Ctrl + Alt + C: This hotkey brings up the Set Origin menu, allowing users to change the origin of an object or bone, which is vital for correct animation motion and transformations.
- Ctrl + L: This shortcut selects linked objects, which helps in managing and animating multiple related objects simultaneously, ensuring they move cohesively in an animation scene.
How Can Beginners Effectively Use New Blender Hotkeys?
Beginners can effectively use new Blender hotkeys by familiarizing themselves with the most recent and essential shortcuts that enhance their workflow.
- G (Grab): This hotkey allows users to move selected objects freely in the 3D space. By pressing “G”, you can drag the object around, and if you want to constrain movement to a certain axis, you can follow it with ‘X’, ‘Y’, or ‘Z’ to lock movement to that axis.
- S (Scale): The “S” key is used for scaling objects up or down. After pressing “S”, moving your mouse will scale the object uniformly, and by using axis constraints, you can scale along a specific direction, providing precise control over object size.
- R (Rotate): Pressing “R” allows users to rotate the selected object. You can rotate freely around the 3D space, and if you want to restrict the rotation to a certain axis, simply follow up with ‘X’, ‘Y’, or ‘Z’ for fine-tuned control.
- Shift + D (Duplicate): This combination creates a duplicate of the selected object, which is particularly useful for creating multiple instances of an object quickly. After pressing “Shift + D”, you can move the duplicate to a new location immediately, streamlining the process of building complex scenes.
- Ctrl + Z (Undo): This universal shortcut is essential for any user, allowing you to quickly reverse your last action. It helps beginners experiment without fear of making mistakes, as they can easily revert any changes made during their modeling or animation process.
- Tab (Toggle Edit Mode): The “Tab” key switches between Object Mode and Edit Mode, which is crucial for modeling tasks. In Edit Mode, you can manipulate the vertices, edges, and faces of your object, allowing for detailed modifications and adjustments.
- Shift + A (Add Menu): This hotkey opens the Add menu, which enables users to quickly add new objects to their scene. It allows for efficient workflow, as you can seamlessly insert meshes, curves, or even lights without navigating through menus.
- Ctrl + R (Loop Cut): This shortcut is used to add loop cuts to a mesh, which is vital for adding detail and enhancing the geometry of your models. After pressing “Ctrl + R”, you can scroll to adjust the number of cuts and then click to place them precisely where needed.
- Alt + G (Clear Location): This command quickly resets the position of the selected object back to its original location. It is useful for organizing your scene, as you can easily return objects to their starting points with a simple keystroke.
- Alt + S (Clear Scale): This hotkey resets the scale of the selected object to its original value. It can be particularly helpful if you have scaled objects and want to revert them back to their initial dimensions without affecting their location.
What Strategies Can Help Users Memorize Blender’s Hotkeys?
Why Are Hotkeys Crucial for Enhancing Productivity in Blender?
Hotkeys are crucial for enhancing productivity in Blender because they significantly reduce the time spent navigating menus and performing repetitive tasks, allowing users to focus more on their creative process.
According to a study by the Nielsen Norman Group, keyboard shortcuts can increase productivity by up to 25% in software applications by minimizing mouse movements and streamlining workflows. This is particularly relevant in software like Blender, where the complexity of tasks can lead to a significant amount of time wasted on navigation if one relies solely on mouse interactions.
The underlying mechanism at play is the concept of cognitive load. When users can perform tasks through hotkeys, they are able to engage in more fluid and intuitive workflows, reducing the mental effort required to remember where tools are located within the interface. This results in a more efficient workflow, allowing artists to achieve their goals faster and with less frustration, ultimately leading to higher quality outputs and more time for creative exploration.
Related Post: